Install WorkZone Client
Install WorkZone Client on a single database
To install WorkZone Client, you must have administrative rights on the local machine.
Manual installation
- Double-click the
KMD WorkZone Client.msifile. The KMD WorkZone Client Setup Wizard - Welcome page is displayed. - Click Next. The End-User License Agreement page is displayed.
- Read the license agreement, select the I accept the terms in the License Agreement check box and then click Next. The Custom Setup page is displayed.
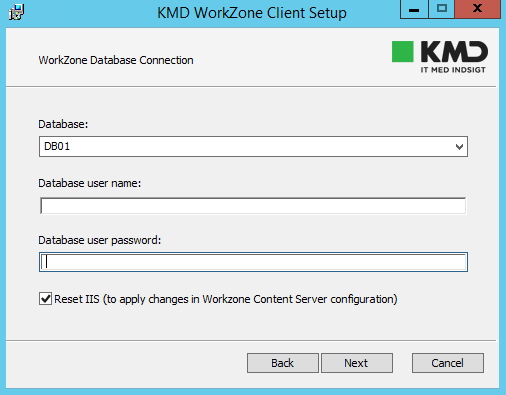
- On the WorkZone Database Connection page, you can view a list of Oracle database names on which WorkZone Content Server has been installed. Select the needed Oracle database from this list and then enter your credentials for database access.
- On the Ready to Install KMD WorkZone Client page, click Install.
- After installation, the KMD WorkZone Client Setup Wizard Completed page is displayed. Click Finish.
By default, the IIS (Internet Information Services) will be restarted. If you need to skip the IIS restart, clear the Reset IIS check box.
Click Next.
Silent installation
In the command line, execute the following command:
msiexec /i "KMD WorkZone Client.msi" DB_NAME=<db_name> USER_NAME=<user> PASSWORD=<password> /qb
Where:
<DB_NAME>is the name of the Oracle database.<USER_NAME>and<password>are the credentials to the database.
msiexec /i "KMD WorkZone Client.msi" DB_NAME=db01 USER_NAME=user1 PASSWORD=12345 /qb
Install WorkZone Client on several databases
You can install WorkZone Client on several databases and support the user access to these databases through the same client. For each database you need to perform a new instance of WorkZone Client installation, that is, to run the KMD WorkZone Client.msi file.
On the server, you can install up to 50 instances of WorkZone Client on different databases.
Every installed instance of WorkZone Client will be listed in Programs and Features with a database name in the title. For example, KMD WorkZone Client - db01, KMD WorkZone Client - db02, and so on.
Manual installation
- Run a new instance of the WorkZone Client installation (that is, run the
KMD WorkZone Client.msifile). - Follow steps 2-6 of the manual installation on a single database. Note that at step 4 you need to provide a different database name each time when you install WorkZone Client on a different database.
Silent installation
To install WorkZone Client on several databases from a command line, execute the following command for each database:
msiexec /i "KMD WorkZone Client.msi" DB_NAME=<db_name> USER_NAME=<user> PASSWORD=<password> MSINEWINSTANCE=1 TRANSFORMS=:Instance<instance_number> /q
Where:
<DB_NAME>is the name of the Oracle database.<USER_NAME>and<PASSWORD>are the credentials to the databases.<instance_number>, from 0 to 49, is the number of the WorkZone Client installation instance .
In this example, two databases (db01 and db02) are installed on a web server. To enable users to access data from these databases, an administrator installs two WorkZone Client instances. To do this, the following commands are executed:
msiexec /i "KMD WorkZone Client.msi" DSN_NAME=Client DB_NAME=db01 USER_NAME=user1 PASSWORD=12345 MSINEWINSTANCE=1 TRANSFORMS=:Instance0 /qb
msiexec /i "KMD WorkZone Client.msi" DSN_NAME=Client DB_NAME=db02 USER_NAME=user2 PASSWORD=67890 MSINEWINSTANCE=1 TRANSFORMS=:Instance1 /qb
Now users can access data from both databases.