Install WorkZone PDF Engine
Install manually with standard settings
If you install WorkZone PDF Engine for working with other WorkZone products, you must select the Real-time conversions installation profile which is the default profile.
The following WorkZone features are automatically enabled by the Real-time conversions profile:
- Preview of documents in WorkZone Client.
- Print reports for WorkZone Client and WorkZone Process.
The Real-time conversions installation profile also:
- Installs WorkZone PDF Engine under the WorkZone web site.
- Identifies WorkZone PDF Engine by the URI
<WorkZone URL>/Render, for example http://db01/render. - Creates an application pool with the default name WZRender. You can rename the Application Pool Name if necessary.
- Uses Windows authentication.
Custom parameters cannot be specified during installation when using the Real-time conversions profile. If you need to define custom parameters for the WorkZone PDF Engine, you must either select the Custom installation profile or wait until the installation has completed and then define any custom parameters after the installation. See WorkZone PDF Engine custom parameters.
To install the WorkZone PDF Engine with standard settings:
- Double-click the KMD WorkZone PDF.exe file. On the Welcome to the KMDWorkZone Installation Wizard page, click Next.
- On the WorkZone Products page, click WorkZone PDF Engine to start the installation of WorkZone PDF Engine.
- On the WorkZone PDF Engine page, click Install.
- On the Installation Profiles page, select Real-time conversions to install the WorkZone PDF Engine with standard settings and then click Select.
- On the License Agreement page, you must read and accept the license agreement terms before you can continue the installation. Select the I accept the terms of this license agreement check box and then click Next.
- On the Prerequisites page, click Verify to ensure all prerequisites are present on the local machine and then click Next.
- On the WorkZone PDF Engine Settings page, define the Application Name. You cannot define any other settings due to the selected Real-time conversion installation profile. Click Next to continue.
- On the WorkZone PDF Engine OData Settings page, specify the location of the OData Service as well as user credentials for accessing the OData service. Click Next to continue.
- On the Ready to installWorkZone PDF Engine page, click Install to start the installation.
If you want to specify your own default parameter values for the WorkZone PDF Engine application during the installation, you can specify these in the Database Configuration installation option or select to install WorkZone PDF Engine with customized settings. See Perform database configuration.
Install manually with customized settings
If you want to customize the WorkZone PDF Engine installation to match the specific needs of your organization, you must select the Custom installation profile.
If you want to change the custom parameter setup after installation, you can edit the parameters in the WorkZone PDF Engine Web.config file. The WorkZone PDF Engine Web.config file is located: C:\Program Files (x86)\KMD\WorkZone\IIS\WorkZone\Render.
See WorkZone PDF Engine custom parameters.
To install the WorkZone PDF Engine with customized settings:
- Double-click the KMD WorkZone PDF.exe file. On the Welcome to the KMDWorkZone Installation Wizard page, click Next.
- On the WorkZone Products page, click WorkZone PDF Engine to start the installation of WorkZone PDF Engine.
- On the WorkZone PDF Engine page, click Install.
- On the Installation Profiles page, select Custom to install the WorkZone PDF Engine with customized settings and then click Select.
- On the License Agreement page, you must accept the license agreement terms before you can continue the installation. Select the I accept the terms of this license agreement check box and then click Next.
- On the Prerequisites page, click Verify to ensure all prerequisites are present on the local machine and then click Next
- On the WorkZone PDF Engine Settings page, define the settings for the PDF Engine. The settings already contain the default values, but you can overwrite the settings if necessary.
The FQDN field is automatically filled in with the current domain but you can change it, for example if you want to set up a test system to run in a different domain. In the Host Headers field, you can enter the host headers that you have created.
Click Next to continue. - On the WorkZone PDF Engine Parameters page, specify the values of the parameters you want to customize.
If you want to change the WorkZone PDF Engine parameters after installation, you can edit the parameters in the WorkZone PDF Engine Web.config file. - On the Ready to install WorkZone PDF Engine page, click Install to start the installation.
To install WorkZone PDF Engine under a new site, follow this procedure:
- Open the Command prompt window as administrator.
- Type the path to the
KMD WorkZone PDF.exefile. - Specify the product name
-engine. - Specify parameters.
| Parameter | Required? | Default value | Meaning |
|---|---|---|---|
|
-i |
Yes |
|
Installation mode. |
|
-profile |
No |
"Typical" |
Installation profiles:
|
|
-app |
No |
"Render" |
Web application name. |
|
-pool |
No |
"WzRender" |
Application pool name for web application. |
|
-auth |
No |
"Anonymous" |
Authentication method for web application (Windows, Anonymous). Can only be used with the Custom profile. |
|
-params |
No |
|
List of custom parameters for PDF Engine. |
There is one additional common parameter, which you can use to extend the behavior of the installation:
|
-l |
Log, which enables text log output that can be used to review and find issues during the installation, update, or uninstallation process. |
Example: Typical installation
"KMD WorkZone PDF.exe" -Engine -i -profile:Typical -l:"c:\mylog.txt"
Example: Custom installation
"KMD WorkZone PDF.exe" -Engine -i -profile:Custom -app:"Default web site/Pdf" -pool:WzRender -auth:Windows -params:"Hide review information=True, PDF output format=Default, Optimize pdf output for the web=True, Suppress content that exceeds page bounds=False" -l:"c:\mylog.txt"
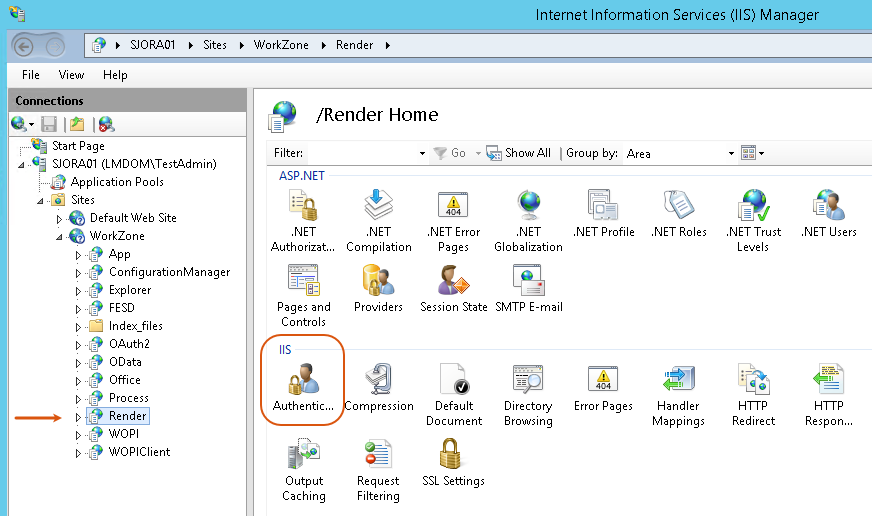
- In Internet Information Services (IIS) Manager, select Render.
- Double-click Authentication.
- Verify that settings specified during installation are correct.
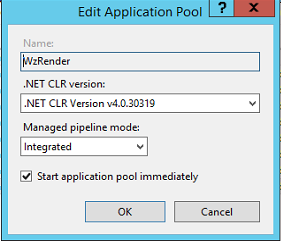
- Navigate to Application Pools and double click on the WZRender application pool that was created during installation. The Edit Application Pool dialog box displays.
- Under .NET CLR Framework version, verify that
.NET CLR Framework v.4.0.30319for the application pool which is used for the WorkZone PDF Engine. - Click OK.
- If you selected the Custom installation profile to use WorkZone PDF Engine with host headers, you can verify the binding between the web site and the appropriate host header. Select the web site under which the PDF service is installed, and then click Bindings in the Actions menu.
In the Site Bindings dialog box, verify that the bindings to the appropriate host headers are created.