Install WorkZone 365
WorkZone 365 Outlook - Mail module is only supported with Microsoft Exchange Server Online. It is not supported with Exchange Server 2019 or Exchange Server 2016.
The installation process consists of two steps:
- Installing the WorkZone 365 server.
- Installing WorkZone 365 client by uploading manifests.
- Double-click the
KMD WorkZone Office Setup.msifile. - Click Run, and then click Next.
- Read the terms and conditions and select the I accept the terms in the License Agreement check box. Click Next.
- Click Install, and then click Finish.
Before installing you must download the manifests from the WorkZone server. Use this link with the proper host name:
https://[hostname]/app/office/webaddins/office/OfficeManifest.xml
https://[hostname]/app/office/webaddins/outlook/meeting/MeetingManifest.xml
https://[hostname]/app/office/webaddins/outlook/mail/MailManifest.xml
Adjust the MeetingManifest.xml
If you use:
- Multiple instances of WorkZone 365 for Outlook on the same Exchange server, or
- Different versions of WorkZone 365 for Outlook on the same Exchange server,
you must change WorkZone 365 GUID in the MeetingManifest.xml.
- Generate a new GUID by using any online GUID generation tool, for example, GUID Generator.
-
When GUID is updated, upload manifest to the Exchange Admin Center.
Save a copy of each manifest locally to easily access GUIDs. It will help you monitor all your instances and versions of WorkZone 365 for Outlook.
Install WorkZone 365 for Microsoft Office 365
You can install WorkZone 365 for Microsoft Office 365 that includes Word, Excel, PowerPoint, and Outlook by using:
- Microsoft 365 admin center (web interface), or
- Microsoft PowerShell (command line).
Use web interface
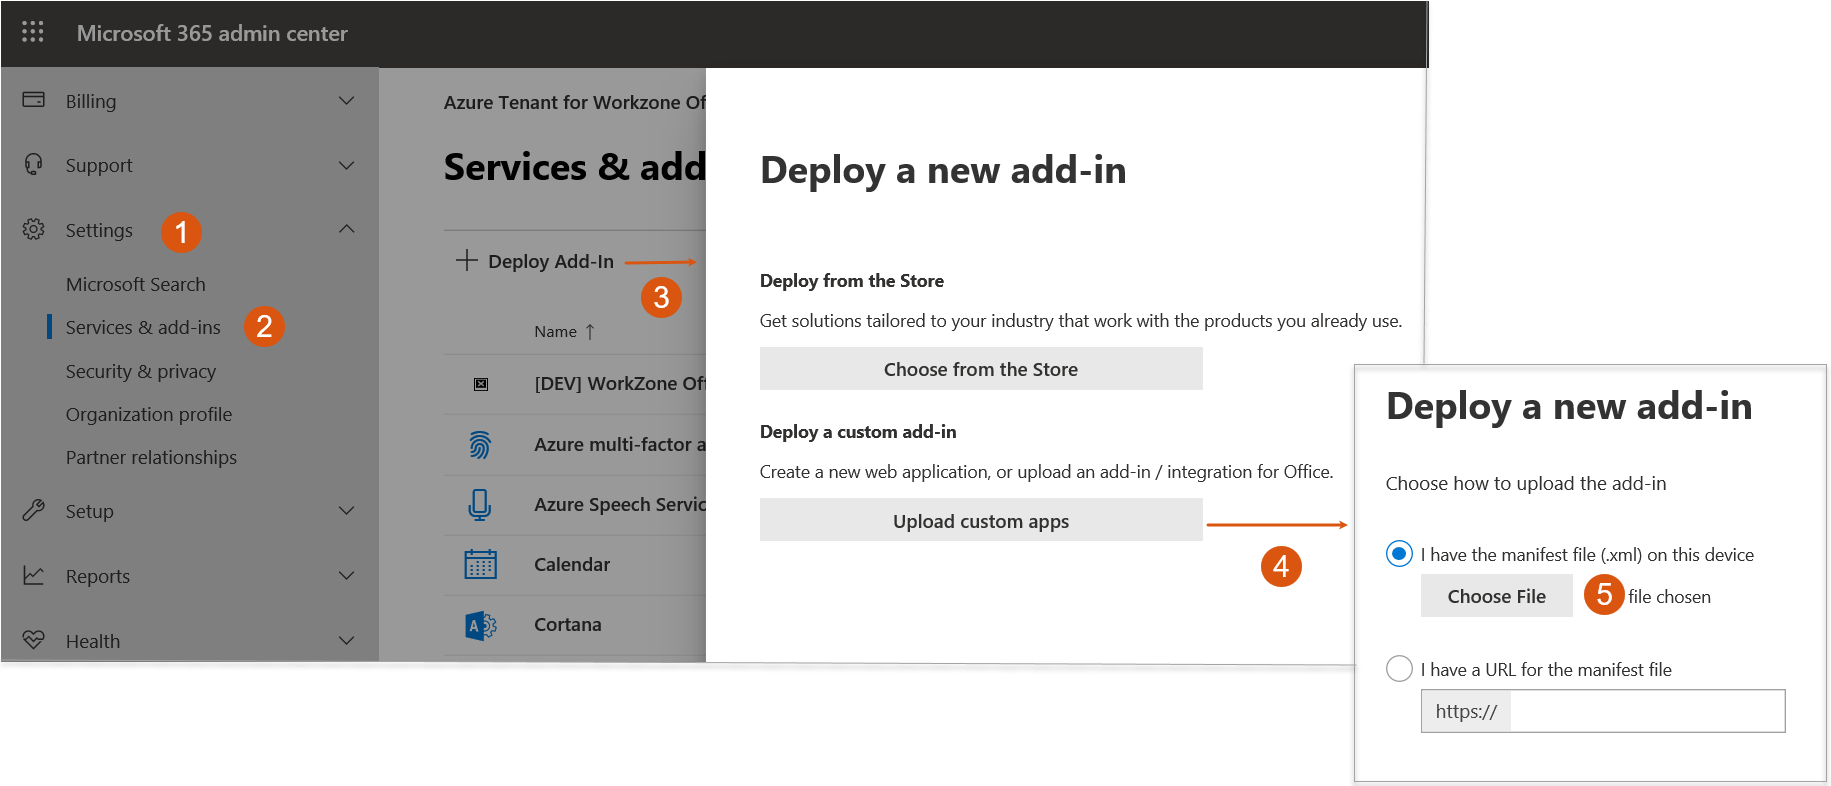
If you have access to the Microsoft admin center, use the standard Microsoft guidance to deploy WorkZone 365 for Office 365. See Deploy an Office add-in using the admin center.
In step 3, click Upload custom apps and select the manifest from your computer.
Use command line
You can use Microsoft PowerShell to deploy WorkZone 365 for Office 365. To do this, follow the standard Microsoft guidance. See Use the Centralized Deployment PowerShell cmdlets to manage add-ins.
See also Deploy and publish your Office Add-in.
By default, WorkZone 365 is disabled after the installation. You can enable it in WorkZone Configurator. To do this, go to Global > Feature settings > WorkZone 365 , select the needed products, and click Save.
Install WorkZone 365 for Microsoft Office 2016 and 2019
You can install WorkZone 365 for Microsoft Office 2016 and 2019 that includes Word, Excel, and PowerPoint by using:
- a desktop application (Word, Excel, or PowerPoint), or
- a registry script
Download manifests and add them to a shared folder. To share a folder, right-click it, select Properties > Sharing > Share. Add yourself and users and/or groups with whom you want to share WorkZone 365. Click Share.
Use a desktop application
- Open a new document in Word, Excel, or PowerPoint.
- Go to the File tab, and then click Options.
- Click Trust Center, and then click the Trust Center Settings... button.
- Click Trusted Add-In Catalogs.
- In the Catalog Url field, enter the full network path to the folder that you shared previously. Click Add catalog.
To find the full network path, right-click the shared folder, click Properties > Sharing, and copy the path from Network Path.
- Select the Show in Menu check box for the new item, and then click OK.
Use the registry script
- In a text editor, create a file named TrustNetworkShareCatalog.reg.
- Add the following content to the file:
[HKEY_CURRENT_USER\Software\Microsoft\Office\16.0\WEF\TrustedCatalogs\{GUID}]"Id"="{GUID}""Url"="NetworkPath""Flags"=dword:00000001 - Generate a random GUID. In the registry script, replace GUID with the generated GUID. For this, you can use any online GUID generation tool, for example, GUID Generator.
- Replace NetworkPath with the full network path to the folder that you shared previously.
- To find the full network path, right-click the shared folder, click Properties > Sharing, and copy the path from Network Path.
- Remember to escape backslashes.
- Save the changes.
- Close all Office applications and double-click the
TrustNetworkShareCatalog.regfile to execute it.

Add WorkZone 365 to local Microsoft Office application
When WorkZone 365 is deployed, each user must add WorkZone 365 as add-in to the local Microsoft Office application.
- In Excel, Word, or PowerPoint, go the Insert tab and click My Add-ins.
- Click SHARED FOLDER and select WorkZone 365.
- Click Add.
Install WorkZone 365 for Microsoft Outlook 2016 and 2019
You can install WorkZone 365 for Outlook by using:
- Exchange Admin Center (EAC, web interface), or
- Microsoft PowerShell (command line).
See the detailed instruction on how to do this in the following article by Microsoft: Install add-ins for Outlook for your organization in Exchange 2013 (these guidelines apply also to the Exchange 2016 and Exchange 2019 versions).