Start a mass dispatch
You start and send a mass dispatch from WorkZone Client. The mass dispatch process consists of the three steps:
Prerequisites:
- You must be assigned the MASSDISPATCH access code to start a mass dispatch process.
- You must be assigned the MASSDISPATCHSEND access code to be able to send a mass dispatch.
- You have prepared a Recipient list and a Letter template and saved them on a case. This case is now the dispatch case, where you manage the mass dispatch.
- In WorkZone Client, open the dispatch case that the recipient list and the letter template are saved on.
- Click Process > Start Mass Dispatch.
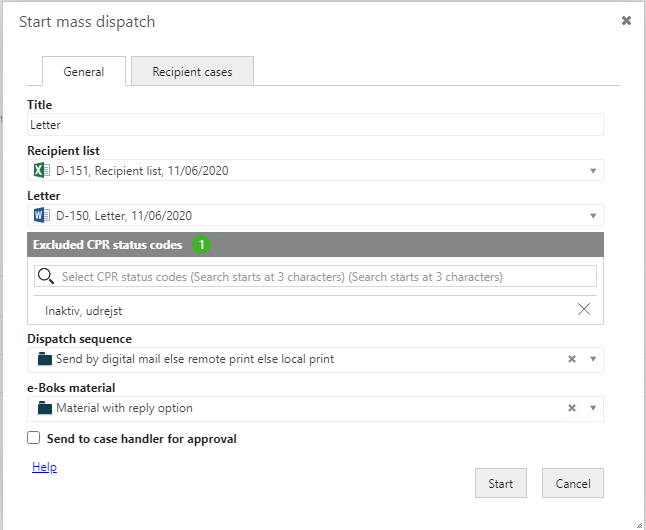
- Enter a title of the mass dispatch process in the Title field. The title will be used as the name of the Mass dispatch process and as the title of the email that is sent to the recipient's inbox in e-Boks. By default, the title of the current case is used. When you select a letter, the title changes to the name of the letter automatically. You can change the title.
- In the Recipient list field, select the recipient list you want to use. Select the Excel workbook that holds the recipients you want to send the letter to. See Recipient list.
- In the Letter field, select the letter template you want to use.
- In the Excluded CPR status codes field, select the status codes that you want to exclude from the dispatch, for example, 80, Inactive, emigrated or 90, Inactive, dead.
- Select a dispatch sequence in the Dispatch sequence field. The dispatch sequence must only contain an e-Boks dispatcher as this is the only dispatcher that Mass dispatch supports.
- Select a material in the e-Boks material field. The materials on the list are defined by your organization and e-Boks. For example, you may be able to select a material that enables the recipients to reply to the message that you are about to send.
- Select the Send to case handler check box, if you want the case handler to review and approve the mass dispatch. Note that the case handler must have the MASSDISPATCHSEND access code to review and approve a mass dispatch. If you leave the check box cleared, you will, as the process owner be the approver of the mass dispatch.
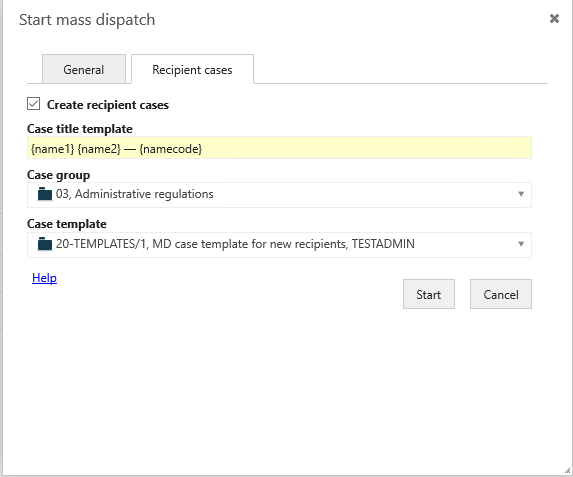
- Click the Recipient cases tab if you want to create a new case for each of the recipients in the mass dispatch and save the letter on the new cases. If you do not want to create new recipient cases, you can skip the steps 10-11.
- On the Recipient cases tab, select the Create recipient cases check box, and fill in required information about the case title, case group, and case template you want to base the creation of new recipient cases on.
For example, if you select 80, Inactive, emigrated, recipients with this status code will not receive a letter even if they are included in the recipient list. The validation report will list the recipients that have been excluded from the mass dispatch because of their status code.
Note: If you see the message "The recipient with id <CPR number> is not subscribing to the material ID <material ID>"?, you are trying to send the message to a recipient who is not registered as an e-Boks user. See SmartPost FAQ to solve this issue.
When recipient cases are created, they will get the case title and the case group that you have specified on the Recipient cases tab. Other information can also be retrieved from the Files.Schema sheet and from the selected case template. In the case template you can specify additional meta data that you want to be added to the recipient cases, for example a case text or state.
New cases will not be created for the recipients that have references to existing cases in the Cases sheet (using a foreign key column).
|
Case title template |
Specify how you want the case titles of the new recipient cases to be created. You can use the columns names from the Contacts.Schema sheet to define the title template. Specify the column names in curly brackets.
Results in, for example, the case title: Amy Duke — 210206-8621 Note: The title that you specify in the Case title template field overwrites the title that is specified in the Cases sheet. |
|
Case group |
Select the case group you want to apply to new recipient cases. Other case data ares either taken from the recipient list or from the case template that you select in the Case template field. Note: The case group that you specify in the Case group field overwrites the case group that is specified in the Cases sheet. |
|
Case template |
Select a case template you want to use as template for new recipient cases. In the case template, you can specify which meta data that you want to be added to new cases by default, for example case type, case state, or case text. The case that you use as the case template must have the case group TEMPLATES, Template case group to be available for selection in the Case template field. |
- Click Start to start the mass dispatch. The validation of the recipient list will start.
- Click the Processes tab and double-click the process to open it in the preview pane where you can follow the progress and open tasks that are related to the process.
- If the validation of the recipient list fails, you will receive a Validate mass dispatch task, see Validate the recipient list. If the validation is successful, the mass dispatch process continues directly to the approval step and you will, as the process owner, receive an Approve mass dispatch task. See Approve and send a mass dispatch.

When you click Start in the Start mass dispatch dialog box, the Mass dispatch process starts validating the recipients in the recipient list. If there are errors in the recipient list, you as the process owner will receive a Validate mass dispatch smarttask/smartmail.
- Open the task from the preview pane in WorkZone Client or as a smartmail in Outlook similarly to other processes. The task contains the letter template, the recipient list, and a validation report.
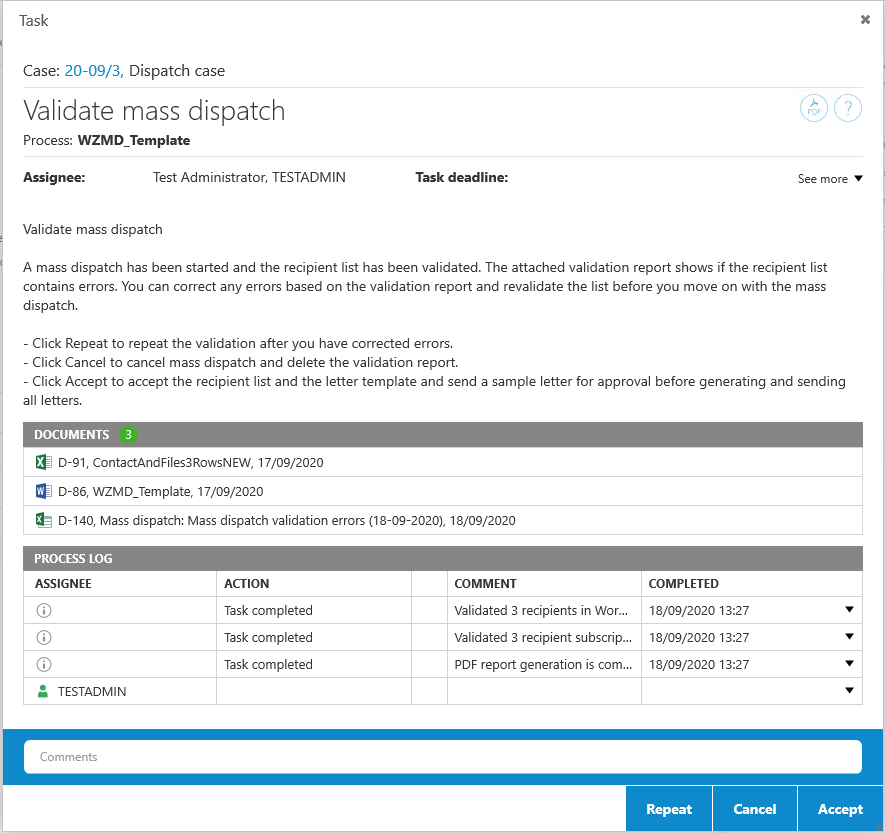
- In the smarttask/smartmail, you have the following options:
- Click Repeat if you want to repeat the validation after you have corrected errors in the recipient list. You can base your corrections on the error descriptions listed in the validation report. You can repeat this step until you are satisfied with the recipient list.
- Click Cancel to cancel the mass dispatch and delete the validation report from the dispatch case.
- Click Accept to accept the content of the recipient list and move on to the approval of the mass dispatch.
For information about working with tasks, see Work with tasks in the WorkZone Process User Guide.
Correct errors in the recipient list
- In the Validate mass dispatch task, click the validation report to open it.
- Preview or open the report. The report lists the recipients that do not fulfill the requirements for the recipient list and an error description next to the recipients.

The report lists all errors in the recipient list. Examples of errors may be:
- Requirements to the structure of the recipient list are not fulfilled. Check and correct errors in the Excel sheet based on the error messages listed in the validation report. See Recipient list.
- Contacts in the recipient list do not exist as WorkZone contacts.
- Some required fields in the recipient list do not have values in WorkZone. In this case, you can either remove Required from the field in the recipient list if it is not required information, or you can add the missing information to the contacts in WorkZone.
For a list of errors and possible solutions, see Error handling.
- Click Repeat in the Validate mass dispatch task to repeat the validation until you are satisfied with the recipient list.
- Click Accept when you are satisfied with the recipient list and ready to proceed with the mass dispatch.
When you click Accept, a sample letter is generated based on the letter template and one recipient from the recipient list. As the process owner you will receive an Approve mass dispatch smarttask/smartmail. See Approve and send a mass dispatch.
Correct errors in the letter template
If there are errors in the letter template, the dispatch will fail and you will receive a Mass dispatch failed task/smartmail with the error.
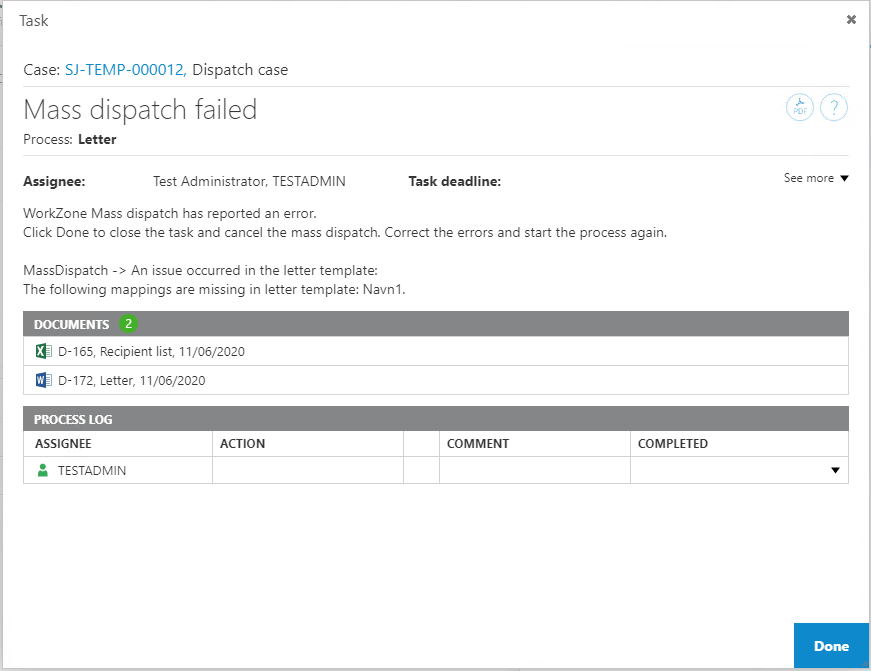
If the letter template does not contain the same fields as the fields that are defined in the recipient list, you can either add or remove the fields from the letter template in Microsoft Word or remove the fields from the recipient list. The fields must match.
- Click Done to close the Mass dispatch failed task. The mass dispatch will be canceled.
- Correct the errors in the template and start the Mass dispatch process again.
Approve and send a mass dispatch
As the process owner you will receive an Approve mass dispatch task/smartmail when the recipient list is validated successfully and there are no errors in the letter template.
- Open the task from the preview pane in WorkZone Client or as a smartmail in Outlook similarly to other processes. The task contains a sample letter , the recipient list, and the letter template.
- In the task, you have the following options:

- Click Approve if you are satisfied with the sample letter and want to start dispatching the letters.
- Click Repeat if you made corrections to the sample letter or the recipient list. The validation is repeated and you will receive a new approval task with a new sample letter.
- Click Cancel to cancel the mass dispatch. All documents that have been generated are deleted from the dispatch case.
- Click Forward if you want to forward the approval to another user.
Note: If the contact information is updated after you have approved a mass dispatch, the updated contact information will not be merged with the letter. You need to execute the mass dispatch validation process again to use the latest updated information.
When you approve the mass dispatch, WorkZone creates the letters and merges data in to the merge fields in the letters. WorkZone sends the letters to e-Boks. When e-Boks has dispatched all the letters, receipts are returned to WorkZone and History documents are generated. The generated letters and history documents are saved on the dispatch case or on individual recipient cases if you have specified existing cases in the recipient list and/or defined that new cases are created based on the options on the Recipient cases tab in the Start mass dispatch dialog box.
Note: If e-Boks returns an error in the receipt, the error will be handled according to the same rules as configured for SmartPost. See e-Boks errors in the WorkZone ProcessAdministrator Guide.
Save letters on the dispatch case
If you do not specify a recipient case for each of the recipients in the recipient list, the letters will be saved on the dispatch case together with a Mass dispatch history document for the entire dispatch and history documents for each of the dispatches. The individual history document is saved as a supplementary document on the letter document. See History documents.
Save letters on recipient cases
In the Cases sheet in the recipient list, you can specify a recipient case for each of the recipients or you can specify individual field values for case creation. Creation of new cases requires that you have you have selected the Create recipient cases check box and have filled in the options on the Recipient cases tab in the Start mass dispatch dialog box, see the steps 10-11.
Depending on how the case sheet in recipient list is defined and your settings on the Recipient cases tab when you started the mass dispatch, the following happens:
- If there is no case specified in the recipient list, and you have selected the Create recipient cases check box and specified the options for new recipient cases on the Recipient cases tab, the letters and history documents will be saved on newly created cases. See the steps 10-11 under Start a mass dispatch.
- If a case is specified for each recipient in the recipient list and the cases exist, the letters and history documents will be saved on the specified cases. See Cases sheet.
- If a case is specified but it does not exist in WorkZone, the validation will generate an error for the recipient which will be shown in the validation report.
When a mass dispatch process is complete, WorkZone generates one history document for the entire dispatch and one history document for each individual dispatch. The mass dispatch history documents are documents that summarize the actions during the mass dispatch process. The history documents are in CSV format. You can open the history documents in Excel to view information about the dispatches. If needed save the CSV file as an Excel workbook to process it further in Excel.
The history document for the entire mass dispatch includes a list of the recipients with information about the individual dispatches.
Example: History document for the complete mass dispatch
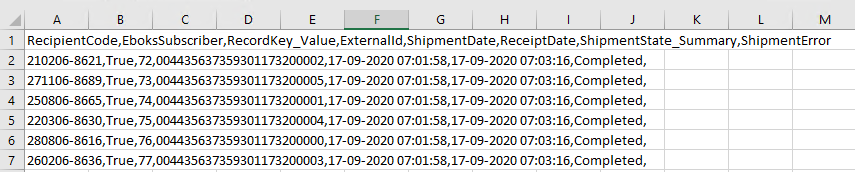
The history documents contain the following information:
| Field | Description |
|---|---|
| RecipientCode | The ID of the recipient, for example a CPR or CVR number. |
| EboksSubscriber | If the value is True, the recipient is registered as an e-Boks user. |
| RecordKey_Value | The document number of the letter that was sent to the recipient. |
| ExternalId |
External ID, which is used to track the delivery of the dispatch. If the message is sent through e-Boks and the field contains an ID, it means that the dispatch is completed and that e-Boks has acknowledged the receipt of the message. |
| ShipmentDate | The dispatch date and time of the letter. |
| ReceiptDate | The date and time that the letter was received by e-Boks and e-Boks has generated a receipt. |
|
ShipmentState_Summary |
Shows the status of the dispatch that was sent to each recipient. If the dispatch was successful, the status will be Completed. If it has failed, an error code and a description will be shown in the Dispatch Error field. |
|
ShipmentError |
An error code and a description will be shown next to each recipient who did not receive the letter. |
Save letters on the dispatch case
If you have decided to save all the generated letters on the dispatch case, the history document for each dispatch will be saved as a supplementary document on the letter as shown below. The history document for the entire dispatch is also saved on the dispatch case.

Save letters on recipient cases
If you have decided to save the generated letters on individual recipient cases, the history document for each dispatch is saved on the recipient case as a supplementary document to the letter. The history document for the entire dispatch is saved on the dispatch case.