Acquire and install the e-Boks Certificate
The organization needs a certificate from Nets for SmartPost to work as a dispatch system for e-Boks. The steps in the certificate process are:
- Acquire a certificate (Funktionscertifikat)
- Import the certificate in to the certificate store
- Add the private key of the IIS user to the certificate
- Export the P12 certificate to a CER certificate
- Upload the certificate to e-Boks
- Apply the certificate to the e-Boks dispatcher
Acquire a certificate (Funktionscertifikat)
An employee at the organization must order a certificate from Nets. The employee must be a NemID administrator at the organization and have an employee signature to be able to order a certificate. The employee will receive an email from Nets with an installation code to use to get the certificate from Nets and a password, which is connected to the certificate.
The employee starts the certificate process using the Nets link: https://www.nets-danid.dk/produkter/funktionssignatur/bestil_funktionssignatur/ and follow the instructions. When the process has been completed, the employee will receive an email with an installation code and a link to start the installation process. During the installation process, the employee selects the certificate type PKC#12, enters the installation code from the email, and creates a password for the certificate. The result of the installation is a certificate file.
Important: The certificate file and the password are connected and will be used later in the process.
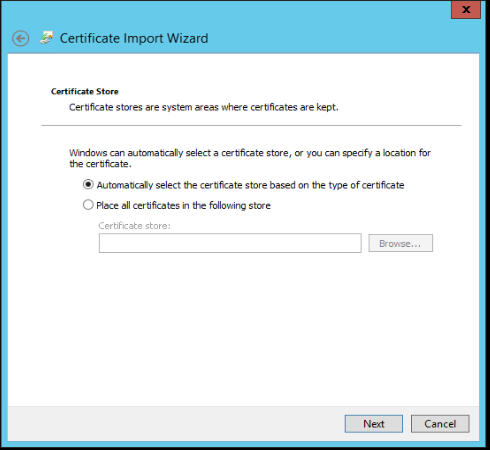
Import the certificate in to the certificate store
You need to import the certificate in to the certificate store on the server that runs the SmartPost process using the Windows Certificate Import Wizard.
- Double-click the certificate to start the Certificate Import Wizard.
- On the Welcome page, click Local Machine, and then click Next.
- Click Next until you reach the Certificate Store page, and then select Automatically select the certificate store based on the type of certificate option.
- Complete the wizard.

Add the private key of the IIS user to the certificate
You must add the private key of the IIS user that runs the WzpSvc app pool, typically that is IIS APPPOOL\WzpSvc, to the SmartPost certificate. This is done in the Certificate Manager. See Apply certificates to SmartPost.
Export the P12 certificate to a CER certificate
The certificate file that is acquired from Nets is a P12 certificate, see the previous section. This certificate will be used by the dispatcher in WorkZone. However, in e-Boks you must register the certificate in the CER format. Therefor, you need to convert the P12 certificate file to a CER certificate file.
Export certificate
- Open Certificates Manager.
- Expand Certificates Local Computer > Personal > Certificates.
- Right-click the SmartPost certificate, and then select All tasks > Manage Private Keys > Export. The Certificate Export Wizard starts.
- Click Next until you get to the Export File Format page, and then select BASE-64 encoded X.509 (.CER), and then click Next.
- On the File to Export page, enter a name of the file to export, and then click Next.
- Complete the wizard.
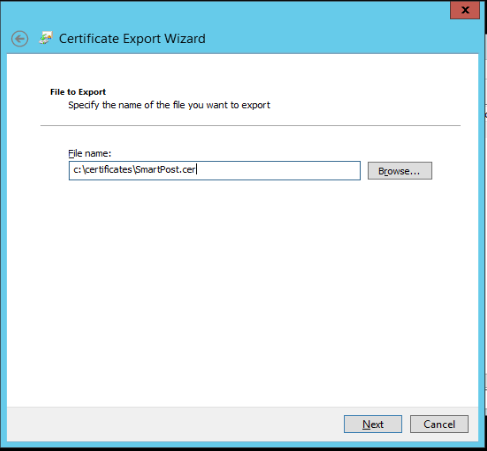
A CER certificate file is created. The next step is to upload it to e-Boks.
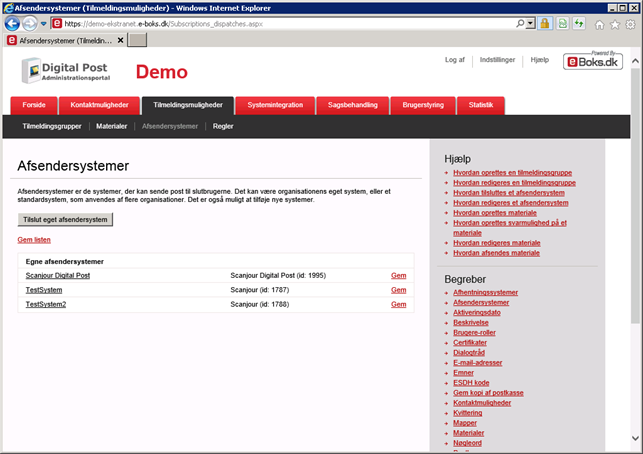
Upload the certificate to e-Boks
You upload the CER certificate file to e-Boks using the e-Boks Administration Portal.
Upload certificate
- In a browser, open the e-Boks Administration Portal
- Log in with your credentials.
- On the Welcome page, select Tilmeldingsmuligheder (Registration options).
- Click Afsendersystemer (dispatch systems), and then click the dispatch system, you want to use.
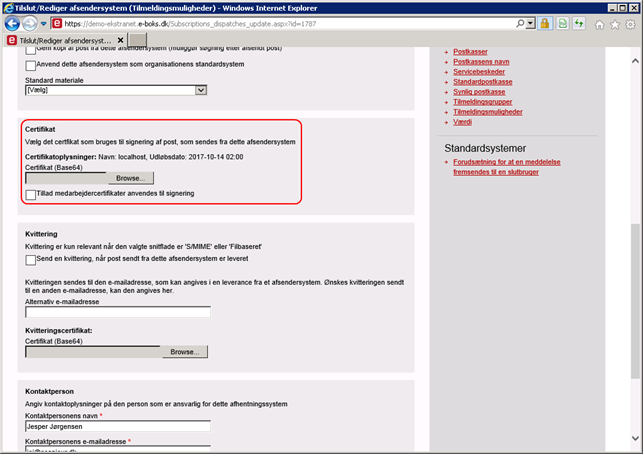
- On the Rediger afsendersystem page, scroll to the Certifikat (Certificate) section, and browse to locate the certificate.
- Click OK. The certificate is now registered in e-Boks.
Demo: https://demo-ekstranet.e-boks.dk/
Production: https://ekstranet.e-boks.dk
The Rediger afsendersystem (Edit dispatch system) page is shown.
Apply the certificate to the e-Boks dispatcher
You register the e-Boks certificate in WorkZone Configurator.
- In WorkZone Configurator, click Process > Process dispatchers.
- Select the eBoks dispatcher.
- Enter the thumbprint of the certificate in the EboksCertificateThumbPrint field.
See also Process dispatcher module in the WorkZone Configurator Installation Guide.