Updated: 12/03/2025
Detail pages
About detail pages
When you open, for example, a case, a document, a contact, or a saved search, its detail page opens on a new tab. You can have multiple detail pages open simultaneously, and you can work on multiple items at the same time.
The detail pages
Icons on the detail page titles
The icons on a detail page indicate what type of detail page the tab displays:
- Case detail page: A case folder icon
- Document detail page: An icon which depicts the type of document, for example a Word icon or Excel icon.
- Contact detail page: A business card icon
Unsaved work
You cannot close a detail page that contains unsaved work. You must save your work or click Cancel to discard any changes before you can close the detail page.
Arranging your detail pages
Open detail pages can be arranged as you like by dragging them with your mouse, placing them in the order you consider necessary.
Pinning detail pages
You can pin a detail page to the upper tab row of WorkZone Client. Pinned detail pages will be collapsed and grouped in the far left of the tab row, freeing up space for the detail page tabs. A tooltip text of the tab is displayed when you place your mouse cursor over a pinned tab.
Click on a tab (pinned or unpinned) to open the corresponding detail page. You can close a tab by right-clicking the tab and then selecting Close. Closing a pinned tab will also unpin it.
Note: Detail pages are not the only elements you can pin. Many other elements can also be pinned, including lists opened in tabs, saved searches, and actor sequences.
Reorder tabs
You can rearrange the order of all tabs by dragging the tabs to new positions within in the tab groupings (pinned or unpinned). Pinned and unpinned tabs cannot be mixed in the tab row.
Restoring pinned tabs
Pinned tabs as well as the tab order will be restored whenever WorkZone Client launches and can be used as a quick way to have a set of favorite or important pages ready for work when WorkZone Client is opened.
The tab menu
Right-click the tab header to open the tab menu with the following options:
- Pin: Pins the active open detail page and moves the tab to the far left of the pinned tabs in the tab row. The Pin option is inaccessible if the page is already pinned.
- Unpin: Unpins the active open detail page and moves the tab to the far left of the unpinned tabs in the tab row. The Unpin option is inaccessible if the page is not pinned.
- Pin all tabs: Pins all open detail pages.
- Unpin all tabs: Unpins all open pinned detail pages.
- Unpin all but this: Unpins all open detail pages except the active detail page (the page you right-clicked to open the menu).
Note: Some pages cannot be pinned, for example dynamic lists and search pages.
Close detail pages
Detail pages can be closed by clicking the X icon in the upper right-hand corner of the page. You can also right-click the detail page to open the page menu and select how the page is to be closed:
- Close: Closes the active detail page. If you have unsaved work, you will be prompted to save or cancel the work.
- Close all tabs: Closes all open detail pages. If you have unsaved work on any of the pages, you will be prompted to save or cancel the work for each page containing the unsaved work. Detail pages that do not contain unsaved work will be closed.
- Close all tabs but this: Closes all open detail pages except the active open detail page (the detail page you right-clicked to open the menu). If you have unsaved work on any of the detail pages, you will be prompted to save or cancel the work for each page containing the unsaved work. Detail pages that do not contain unsaved work will be closed.
Note: Closing a pinned tab will also unpin it.
Adding or removing a detail page to the Favorites list
Click the favorite icon to add an item (case, document or contact person) to or remove an item from the Favorites list in the details page.
For more information, see About favorites
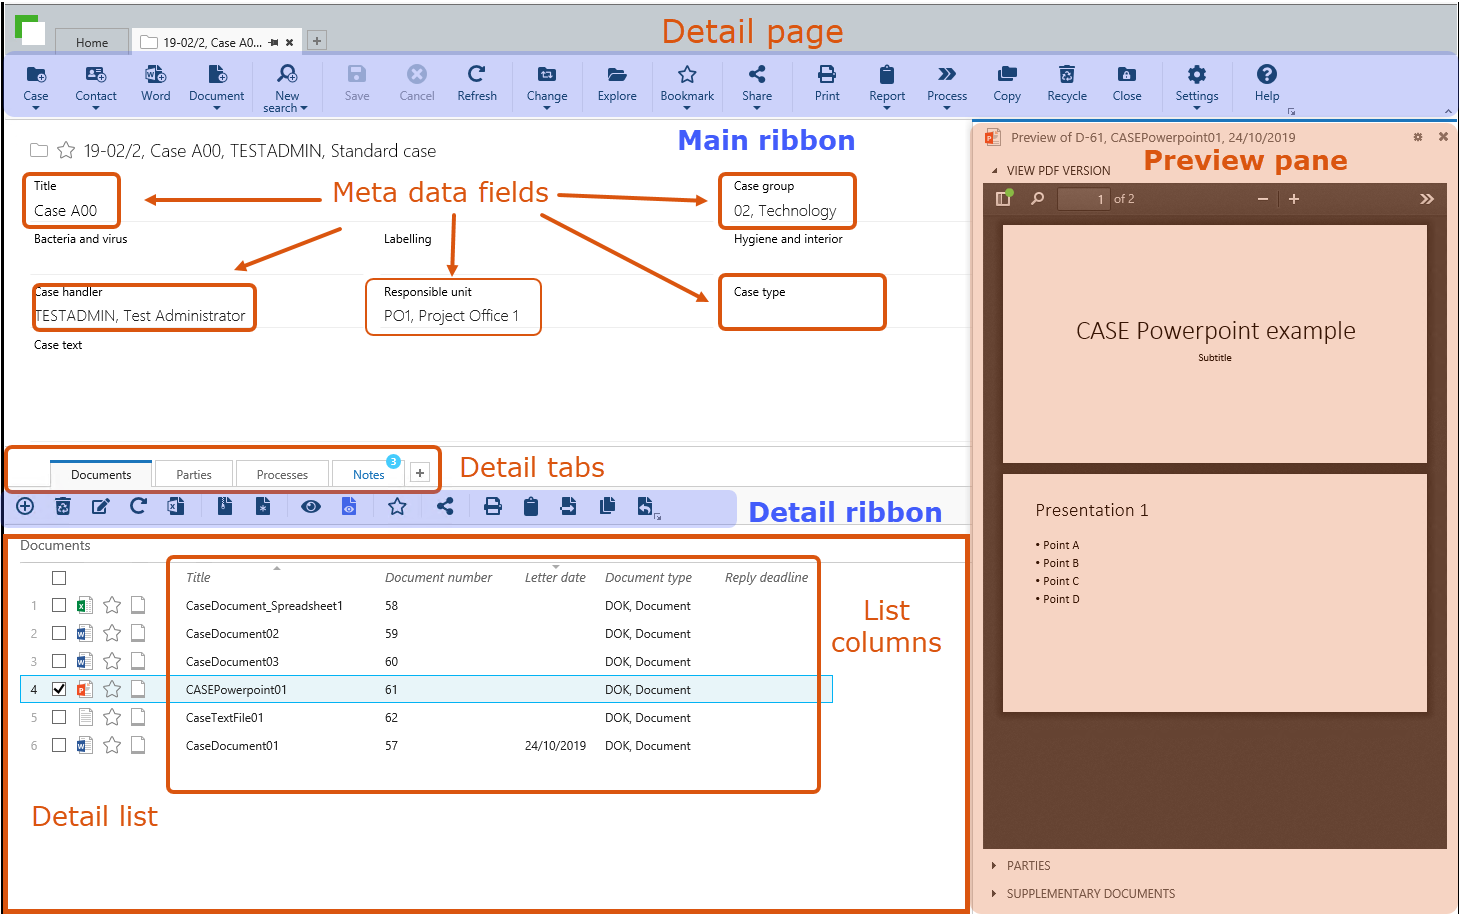
Meta data panel
The meta data panel on the detail page shows the meta data fields related to the case, the document, or the contact. Use the divider to display more or fewer fields on the meta data panel.
If you have the CONFIGADM access code, you can configure the case detail page (add, remove, resize, or reorder the displayed meta data fields.)
See Working with WorkZone Client configurations.
Character counters on text fields
The total number of characters available for content in a text field is displayed in gray text in the upper right hand corner of the field. The number to the left of the slash is the number of characters used and the number to the right of the slash is the total number of characters available. Some text fields can contain 4,000 characters while other text fields can contain less, for example the Case text field can contain 4,000 characters while the Note text field can contain 2,000 characters.
For text field containing formatting options, such as Note text fields, the hidden formatting codes will also be included in the total amount of used characters.
The Detail tabs
At the bottom of each detail page for a case, document, or contacts, you will find detail tabs. Each of the detail tabs has a small ribbon with relevant features.
For example, if you have a document detail page open, the detail tabs display detail lists of the cases and contacts linked to this document. For searches, the list of search results is displayed.
See Also
About fields on the case detail page
About fields on a document detail page