Install XDI service for WorkZone Content Server Imaging
This procedure describes how you configure a channel and install a service for monitoring and fetching files with scanned documents from WorkZone Content Server Imaging. The configuration and installation is done in WorkZone Configuration Management, see the WorkZone Configuration Management online help.
Prerequisite:
- To use the WorkZone Configuration Management, you must have access to WorkZone, and you must have the relevant access codes. For more information, see the Active Directory.
- You must open WorkZone Configuration Management as a system administrator to be able to install the XDI service.
- The XDI service uses WorkZone Content Server for saving documents. Therefore WorkZone Content Server must be installed on the computer where you install the XDI service.
Install the XDI service
- Log on to the computer on which the service for monitoring and fetching files with scanned documents from WorkZone Content Server Imaging will run.
- Select Start > Programs > KMD and then right-click on WorkZone Configuration Management and select Run as administrator to open WorkZone Configuration Management.
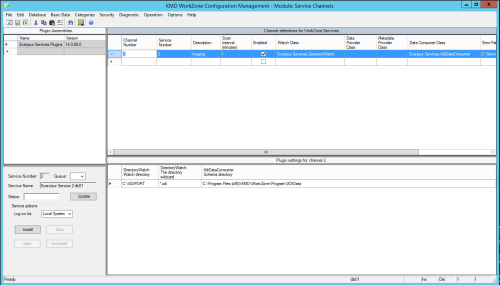
- Select Operation > Service Channels. The WorkZone Configuration Management - Modules: Service Channels window opens.
- In an empty row in the Channel definitions for WorkZone Content Server Services list, do the following:
- In the Channel Number column, enter the value 2.
- In the Service Number column, enter the value 2.
- In the Description column, enter a description which you can use to identify the purpose of the channel.
- In the Scan Interval (minutes) column, enter the value 1.
- In the Enabled column, select the check box to enable.
- In the list in the Watch Class column, select the value
Scanjour.Services.DirectoryWatch. - In the list in the Data Consumer column, select the value
Scanjour.Services.XdiDataConsumer. - In the Error Path column, enter the entire path to the folder, in which errors must be logged, for example,
C:\ServiceError\Channel 2. - Click Database > Save.
- In the Channel definitions for WorkZone Services list, click the row where channel 2 is defined. The row is selected, and information on the plug-in parameters is shown in Plugin settings for channel 2.
- In Plugin settings for channel 2, do the following:
- In the DirectoryWatch - Watch directory column, enter the path to the folder, in which the service will fetch the files from WorkZone Content Server Imaging, for instance,
C:\XDIPORT. - In the DirectoryWatch - The directory wildcard column, enter
*.xdi. - In the XdiDataConsumer - Schema directory column, enter the path to the xml schemas. By default the XML schemas are located in the folder
C:\Program Files\KMD\WorkZone\Program\XdiData. - Click Database > Save.
- In the Channel definitions for WorkZone Content Server Services list, click the row where channel 2 is defined. The row is selected, and the Service Id and Service Name fields in the left part of the window are filled in.
- In the Log on As list, select Local System. The communication with SOM now will be handled through the sjserviceagentuser user.
- Click Install. When the installation is complete, the Install log window appears informing whether the installation has been successful.
- Click OK. The Install log window closes. Now the monitoring of the configured channel must be initiated. For more information, see Start and stop WorkZone Content Server services in service framework.

