Manage documents

Open a document
You can open a case document by using the Search for Documents function or from the list Open Recent.
- Open the relevant Microsoft Office application.
- Click File > Cases & Documents.
Search for a document
- Click Search.
- In the Select Document dialog, enter your search criteria. See Search operators, text fields, and free text fields.
- Click Search. The search results are displayed in the lower pane.
- Select the relevant document, and click OK.
Open a recent document
- Click Recent.
- Select the relevant document.
Open the Document Registration pane
In the Document Registration pane, you can view and edit document information.
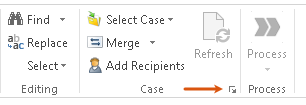
- To open the Document Registration pane, click the right-arrow button
 in the Case group on the main ribbon.

Open case or document in WorkZone Client
WorkZone Client provides a broader list of actions on changing the case and document details. For example, you can define access codes or move a document to a different case. To open cases and documents in WorkZone Client, click the links displayed in the Document Registration pane:

Refresh registration information for a document
You can get the latest registration information for a saved case document from the server.
- Open a document for which you want to get the latest registration information.
- On the Home tab in the Case group, click
 Refresh. All registration information for this document is updated from the server.
 , all your unsaved changes to this document will be lost.
Copy document
You can reuse an existing Word, Excel, or PowerPoint document saved on a case, and save it as a new document on another case or on the same case.
- Open a document that you want to copy.
- Open the Document Registration pane.
- Click Save as New.
- Apply search criteria and select a case to which you want to copy this document.
- Click OK.
- Optional: Make your changes to a document.
- Fill in the required fields in the Document Registration pane. See Register a document.
- Click Save on Case.
Share a document
You can send a case document by email. The new email inherits the case context from the document. This means that you are requested to save the email on the case after sending it.
- On the File tab, click Share > Email.
- Select one of these options:
- Send as Attachment
- Send as PDF
- Send as XPS
An email window appears where subject and attachment are inserted.
- Add recipients.
- Add contents to the email, and click Send. The Save Outlook Item dialog appears.
- If you do not want to save the document, clear the check box.
- Click Save.

