Install and configure WorkZone e-Boks Push Service
WorkZone e-Boks Push Service is a web service that makes it possible for WorkZone to receive e-Boks messages using Digital Post 2 and Next generation Digital Post (NgDP).
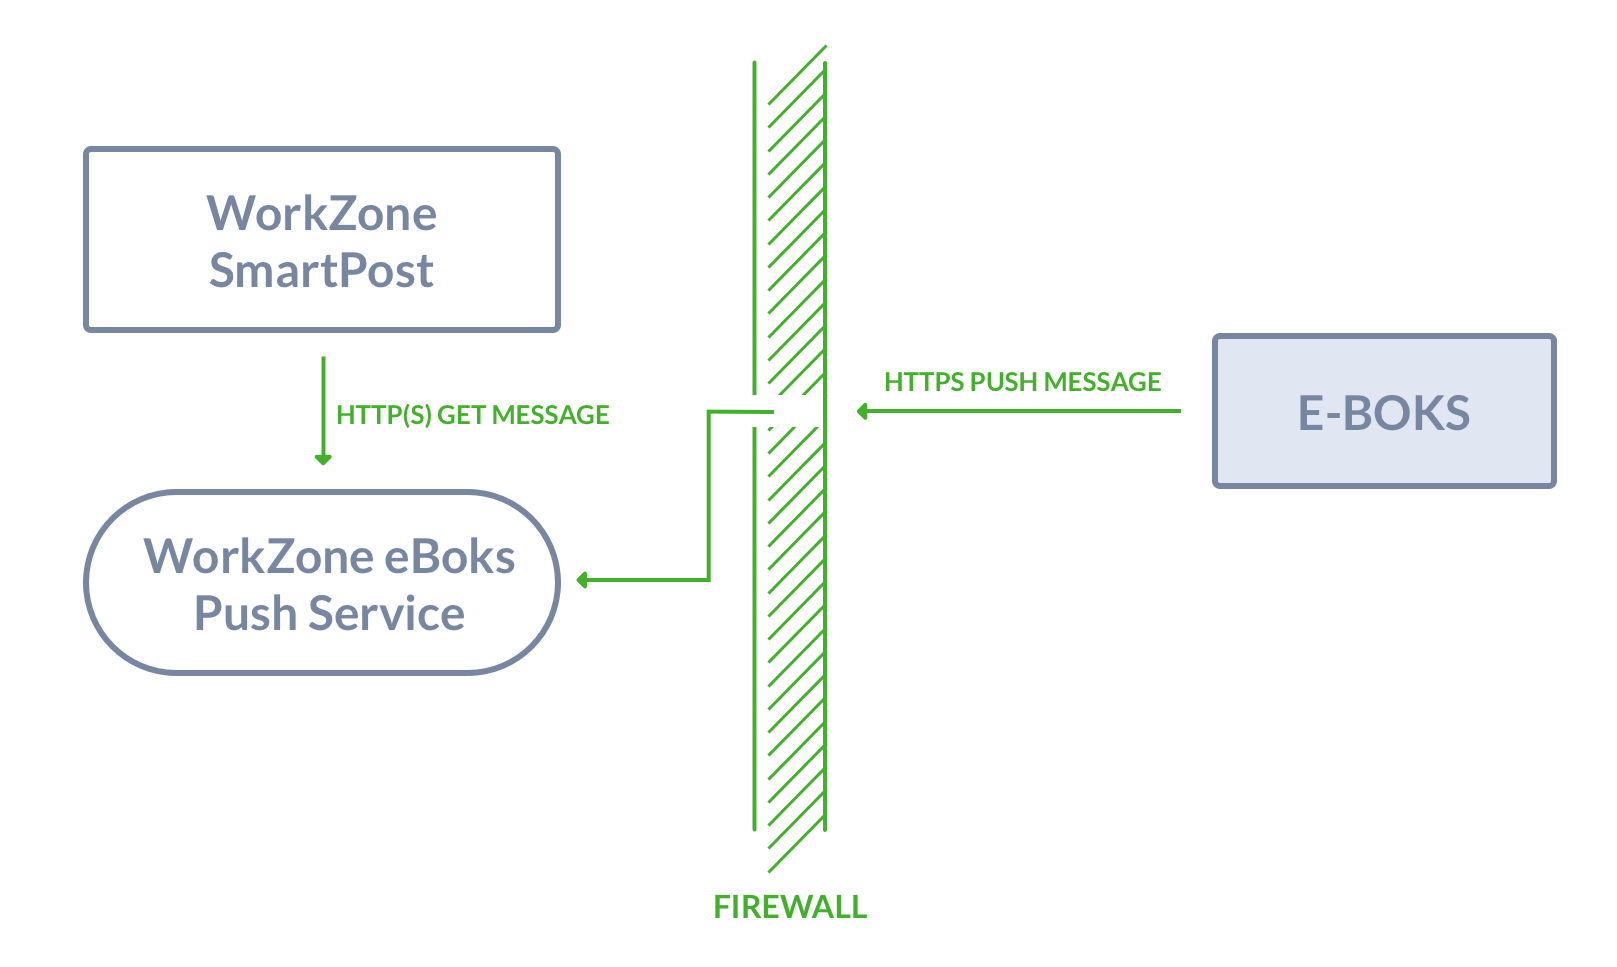
You can install the push service behind or in front of the firewall or in a DMZ at a separate location, for example in Azure. By default, the push service is installed behind the firewall. You need a hole in the firewall to allow access to the push service as illustrated in the diagram below. This means that you must open port 443 on the server that you have installed the push service on.
You can only install one instance of the push service for each retrieval system. The push service is self-contained with a data store. By default, the data store is placed in the same location as the push service. If you want the data store in a different location, for example where you have your backup, or where you have more space, you can change the location. You change the location of the data store as well as other settings in the app config file named Appsettings.json, which is placed in the same location as the push service. To change the location of the data store, change the configuration of the ConnectionStrings parameter.
Regardless of whether your setup is with only one server that acts as both web server and agent server or the push service is installed on a separate server, the database must be populated. See Replicate the configuration from the WorkZone database to the push service (NgDP).
Digital Post 2
As of the WorkZone 2020.1 release, SmartPost supports Digital Post 2. The most significant difference between Digital Post 1 and Digital Post 2 is that the polling for new messages is replaced by a push. For information about Digital Post, see Vejledninger Digital Post and Kom godt igang - for virksomheder, Digital Post 2.
To use SmartPost with e-Boks using Digital Post 2, you need to install WorkZone e-Boks Push Service. e-Boks requires an end point that can receive messages. The WorkZone e-Boks push service exposes the required interface to e-Boks.
NgDP
As of the WorkZone 2022.0 release, SmartPost supports NgDP in production. For more information, see Configure SmartPost to use next generation Digital Post (NgDP).
WorkZonee-Boks Push Service receives messages and receipts on incoming calls from a Next generation Digital Post (NgDP) system and transforms messages between the MeMo format and Digital Post 1 or 2.
For more information about MeMO, please refer to Det nye meddelelsesformat on the Agency for Digitisation's website (Digitaliseringsstyrelsen).
The push service must be accessible from NgDP and from the local web servers. Because of the incoming NgDP calls, it is required to configure firewalls and routers to allow these requests and ensure that a legal HTTPS server certificate is installed.
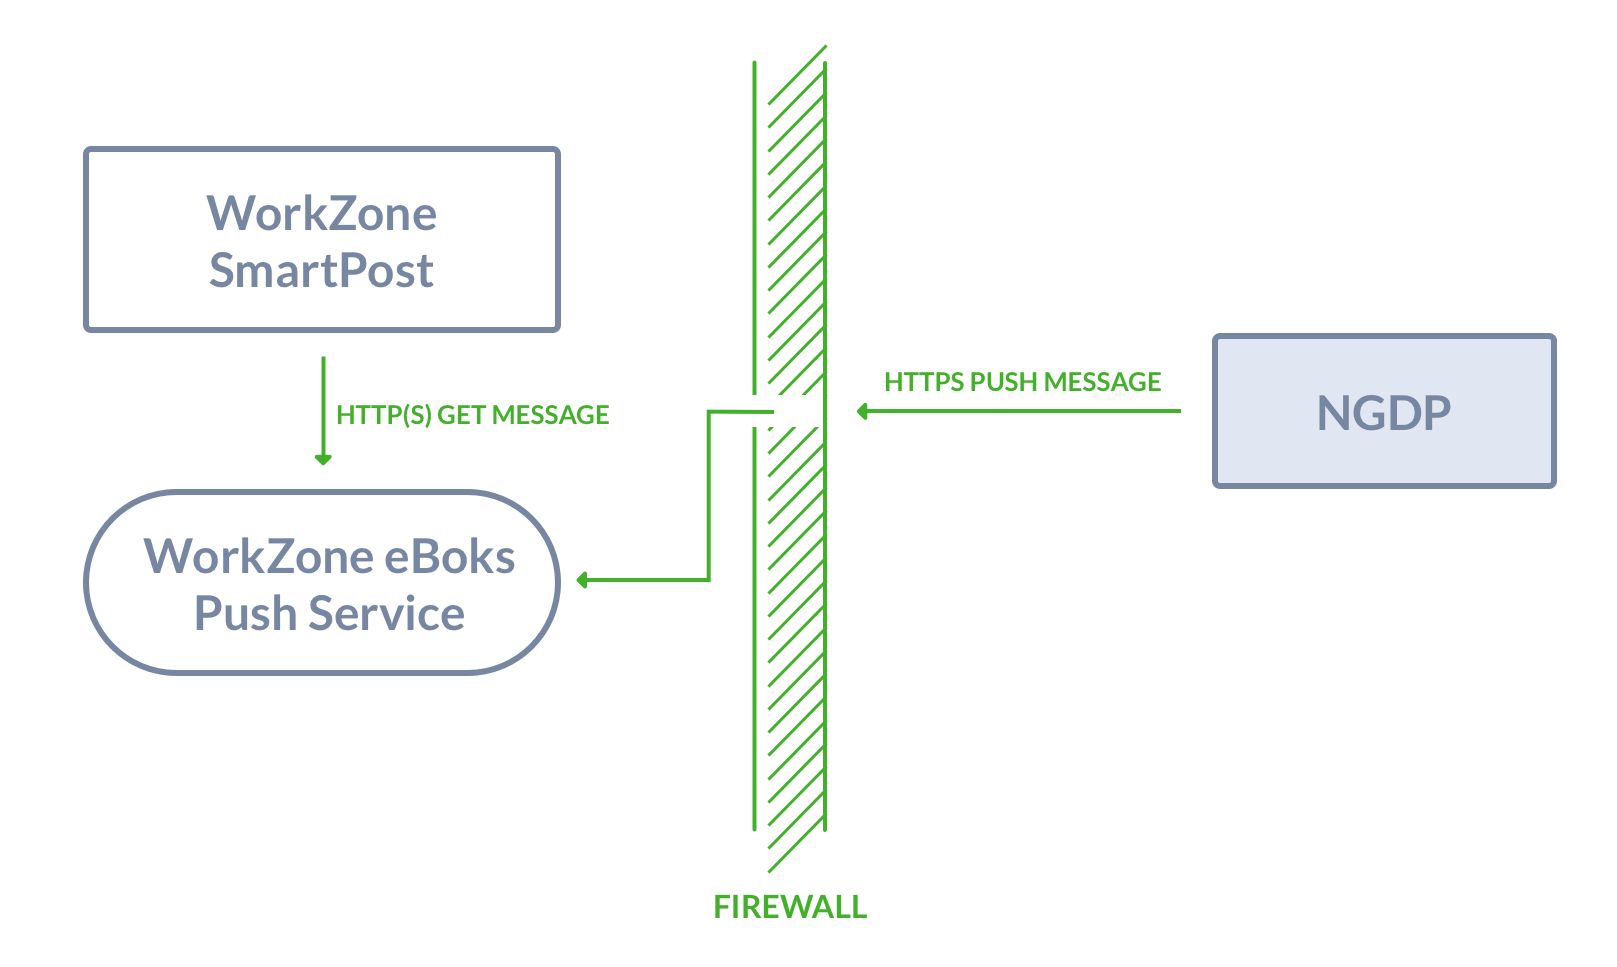
The IIS server should be configured to only allow requests with NgDP client certificates, and the certificate that your organization uses.
Install WorkZone e-Boks Push Service
To install and configure the push service, you need to complete the following steps:
- Run the installer that sets the site for the push service on all web and agent servers. This step also involves configuring the service for the retrieval and dispatch systems in use.
- Configure the e-Boks dispatcher to use the push service.
- Set up the e-Boks Administrationsportal to send messages to the push service.
Prerequisite:
- WorkZone Process including SmartPost must be release 2018.0 or later.
- The WorkZone site must be configured to run in https mode.
- .NET Core Windows Hosting Bundle (dotnet-hosting-5.0.7-win.exe) must be installed.
See Install .NET Core Windows Hosting Bundle. - Microsoft Visual C++ 2015 Redistributable (vc_redist.x64.exe) must be installed.
Install .NET Core Windows Hosting Bundle
You can run the Microsoft .Net 5.07 Windows Server Hosting installer (dotnet-hosting-5.0.7-win.exe) which is delivered with WorkZone Process to install .NET Core Windows Hosting Bundle, or you can install it with a PowerShell script.
Install with a PowerShell script
- Run Windows PowerShell as administrator.
- Run the script:
powershell -NoProfile -ExecutionPolicy unrestricted -Command "[Net.ServicePointManager]::SecurityProtocol = [Net.SecurityProtocolType]::Tls12; &([scriptblock]::Create((Invoke-WebRequest -UseBasicParsing 'https://dot.net/v1/dotnet-install.ps1'))) -channel 5.0 -Runtime aspnetcore"

Install WorkZone e-Boks Push Service with the WorkZone e-Boks Push Service Setup wizard
You must run the installer with elevated privileges on both web and agent servers where the WorkZone Process web profile is already installed.
- Run the WorkZone e-Boks Push Service Setup wizard, WorkZone.Dispatcher.Eboks.PushService.Setup.msi.
- Click Next through the wizard until you get to the Complete the WorkZone e-Boks Push Service Setup page. If you see this page, the service has been installed successfully.
- Click Finish to close the wizard.
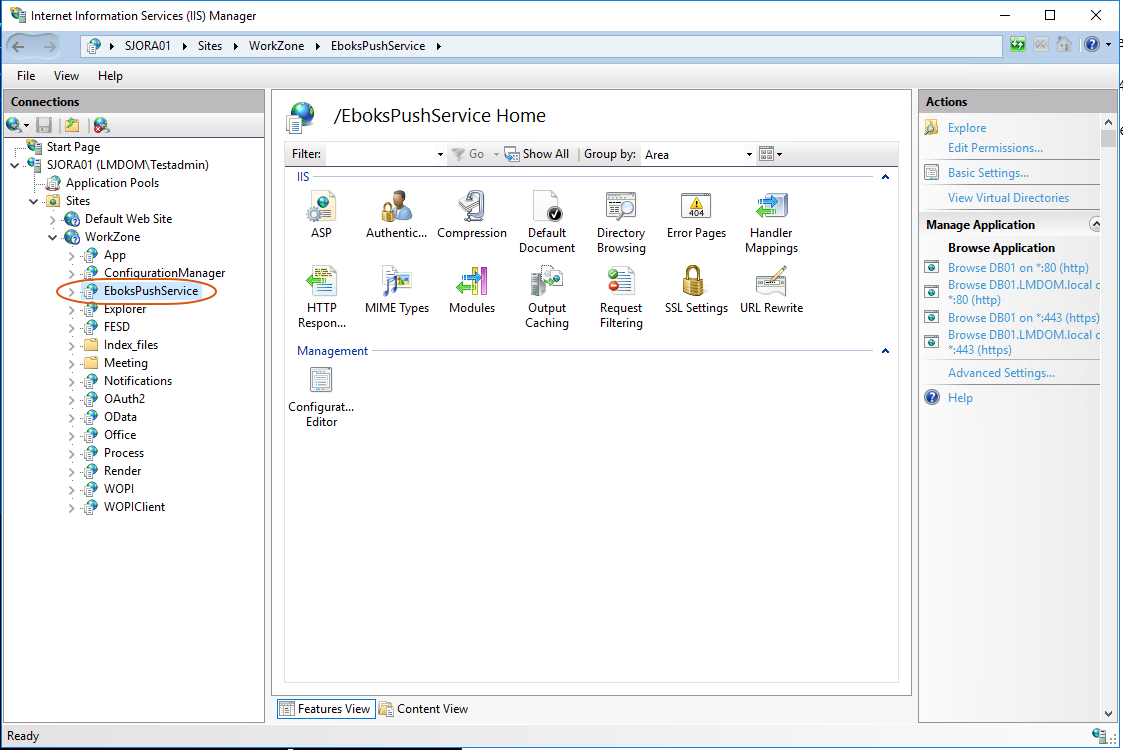
After the installation, the EboksPushService web application is created under the WorkZone site as shown in IIS Manager.
Install with Olympus
If you have a test setup with only one server that acts as both web server and agent server, you can use the Olympus installation to automatically deploy the push service by setting the InstallEboksPushService parameter to True in the <WZP> configuration element.

In a more complex setup, you need to deploy the push service manually by using the WorkZonee-Boks Push Service Setup wizard. See Install WorkZone e-Boks Push Service with the WorkZone e-Boks Push Service Setup wizard.
Verify the installation
You can verify that the e-Boks push service responds by invoking the URL:
https://<database>/EboksPushService/api/MeddelelseV2/afhentningssystem/0000/meddelelser
It should result in the following XML:
<MeddelelseReferenceSamling xmlns="urn:oio:dkal:2.0.0" />
You can also use the following URL:
https://<database>/EboksPushService/api/MeddelelseV1/afhentningssystem/0000/meddelelser
which results in the following XML:
<MeddelelseReferenceSamling xmlns="urn:oio:dkal:1.0.0" />
Note: As long as the resulting XML contains a return value of either "urn:oio:dkal:1.0.0" or "urn:oio:dkal:2.0.0", the installation is verified
Install a stand-alone e-Boks Push Service
You can install the e-Boks Push Service on a Windows server that does not have a WorkZone database or WorkZone Process installed.
|
|
|
For the NgDP PUSH dispatcher to work, you need to install the hosting bundle supplied with the WorkZone Process (dotnet-hosting-X.X.X-win.exe).
When installing the push service, you must run the MSI installer manually from an elevated PowerShell session.
msiexec /i WorkZone.Dispatcher.Eboks.PushService.Setup.msi SITENAME=`"Default Web Site`" WEBROOT=https://<full qualified servername> /l*v logfile.txt
If you invoke the installation through a remote PowerShell session, you can add the /quite flag the arguments.

Verify the installation
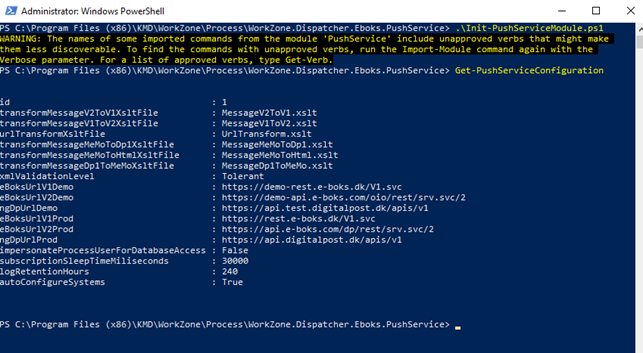
You can verify that the push service is installed and works by running the administration script Init-PushServiceModule.ps1 located in
C:\Program Files (x86)\KMD\WorkZone\Process\WorkZone.Dispatcher.Eboks.PushService\
Invoke the cmdlet Get-PushServiceConfiguration.
The service is installed correctly if no errors occur.
Whitelist IP addresses
Make sure to whiteliste IP addresses from NgDP to WorkZone. Please refer to Technical Integration NgDP v1.30 on the Agency for Digitisation's website (Digitaliseringsstyrelsen). You also need to make sure that the WorkZone web and agent servers are whitelisted.
Method level access control
It is possible to control access to the web service for external and internal methods. External methods are methods that are called by NgDP and internal methods are methods that are called by WorkZone server-side modules.
It is possible to whitelist certificates when installing the push service from command line using new arguments INTERNAL_CERTIFICATE_WHITELIST and EXTERNAL_CERTIFICATE_WHITELIST.
Installation example:
msiexec /i WorkZone.Dispatcher.Eboks.PushService.Setup.msi SITENAME=`"Default Web Site`" `
WEBROOT=https://ngdptest.workzone-rd.dk `
INTERNAL_CERTIFICATE_WHITELIST=344CDEA8138E11AB1CB216A0AB6FAA07E08F19DD `
EXTERNAL_CERTIFICATE_WHITELIST="9D5BCB17A1746AF51EB3633463EE4882B3F709E8;DD45412F79822FA8FCEE38DC7330E4AEE5454D71"
When whitelisting is enabled, it is required that IIS accepts the client certificates that are in use. This means, for example, that the root certificates must be trusted and not be expired.
If the web service is protected with certificates, the push service PowerShell administration module must also use this certificate. This can be done by initializing the module with one of the whitelisted client certificates.
PowerShell example:
.\Init-PushServiceModule.ps1 -Certificate (dir Cert:\LocalMachine\My\344CDEA8138E11AB1CB216A0AB6FAA07E08F19DD)
It is also possible to white list ip addresses using arguments INTERNAL_IP_WHITELIST and EXTERNAL_IP_WHITELIST. Note that IP access permissions have lower priority than certificate access permissions.
Please refer to NgDP OCES-certifikat on the Agency for Digitisation's website (Digitaliseringsstyrelsen) for finding certificates that can be used with NgDP.
Replicate the configuration from the WorkZone database to the push service (NgDP)
The push service has its own local configuration database that must be populated. In a one-server test installation, the database is populated automatically when the push service application pool is recycled. If the push service is installed manually on another server, the database can be populated using the PowerShell interface for the push service.
If the push service is installed on a separate server, it is recommended to turn of the auto-configure feature by setting the configure-pushservice -AutoconfigureSystems to False.
configure-pushservice -AutoconfigureSystems $false

You can do manual configuration from a WorkZone database using the cmdlet AutoConfigure-PushServiceSystems. This cmdlet takes the ODataEndpoint of the database as an argument and returns the number of configuration items that are returned from the system.

The credentials of the current user is used to access OData. The current user must have the rights to access OData and read the configuration data.
This cmdlet must be called on a regular basis or manually after a change of the configuration.
Use contact points on outgoing messages (NgDP)
You can test if it is possible to send NgDP messages to a specific contact point. Contact points can be assigned to addresses in the WorkZone database by using custom address info with the label NgDpCp.
To test if it is possible to send NgDP messages, it is required to create the metadata for the address property and address type. This can be done with the cmdlet New-NgDpMetadata.

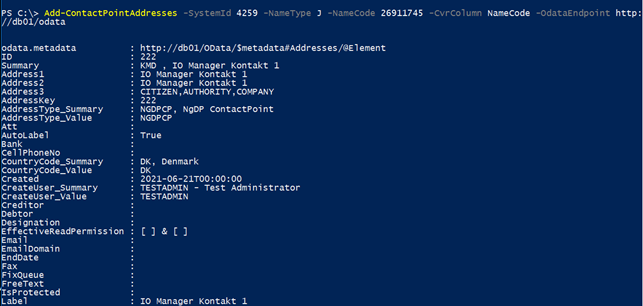
To create WorkZone addresses for a specific CVR contact that corresponds to the contact point that is defined in the NgDP system for the same CVR number, use the cmdlet Add-ContactPointAddresses.
PowerShell cmdlets
The following e-Boks Push Service cmdlets are available:
-
Initialize-PushServiceModule
-
Get-SubscriptionStatus
-
Configure-PushService
-
AutoConfigure-PushServiceSystems
-
Get-PushServiceConfiguration
-
Configure-PushServiceSystem
-
Get-PushServiceSystemConfiguration
-
Delete-PushServiceSystemConfiguration
-
Get-PushServiceLogs
-
Delete-PushServiceLogs
-
New-Receipt
-
Get-Receipt
-
Delete-Receipt
-
Get-PendingRecipients
-
Create-PendingReceipts
-
Push-TestMessage
-
Ship-TestMessage
-
Configure-Material
-
Get-Material
-
Delete-Material
-
Get-ContactPoints
-
New-NgDpMetadata
-
Add-ContactPointAddresses
Map NgDP error messages to e-Boks error messages
Errors that are returned from the NgDP system are mapped to e-Boks errors using in the appsettings.json file of the service. The default location this file is:
“C:\Program Files (x86)\KMD\WorkZone\Process\WorkZone.Dispatcher.Eboks.PushService\WebService”
Below is an example of a mapped error informing that the title column exceeds the maximum length:
		  "NgDpErrorCodes": {
    "message.create.label.size": {
      "ErrorCode": 4071,
      "ErrorText": "Feltet MeddelelsesTitelTekst indeholder mere end 256 tegn."
    }
  }
See also e-Boks errors.
Appsettings.json
The table below provides descriptions of parameters in the Appsettings.json file.
| Name | Description |
|---|---|
| Logging |
Configuration log levels for various components. Logging is done in the eventlog. |
| AllowedHosts |
Configuration of hosts that are allowed to call the service. It should only be allowed to call the service from e-Boks and the servers that are running WorkZone Process.
|
|
Configuration of the location of the temporary store of the messages. The connect string |
|
| TransformMessageV2ToV1XsltFile |
Reference to an xslt file that can transform e-Boks from V2 to V1. |
| TransformMessageV1ToV2XsltFile | Reference to an xslt file that can transform e-Boks from V1 to V2. |
| UrlTransformXsltFile |
Reference to a xslt file that can transform e-Boks entities that contains URL references. |
|
EBoksUrlV1Demo |
The e-Boks demo v1 endpoint. By default, the endpoint is |
|
EBoksUrlV2Demo |
The e-Boks demo v2 endpoint. By default, the endpoint is |
|
EBoksUrlV1Prod |
The e-Boks production v1 endpoint.By default, the endpoint is |
|
EBoksUrlV2Prod |
The e-Boks production v2 endpiont.By default, the endpoint is |
|
EBoksUrlV1Custom |
Can be used to set up a custom v1 endpoint for the RelayMessageCallsToCustomEndpoint setting on e-Boks systems. |
|
EBoksUrlV2Custom |
Can be used to set up a custom v2 endpoint for the RelayMessageCallsToCustomEndpoint setting on e-Boks systems. |
|
ServiceUserName |
The user name of the process user that is used for impersonation. It is filled out automatically during installation. |
|
ServiceUserDomain |
The domain of the process user. It is filled out automatically during installation. |
|
ServiceUserPassword |
The encrypted password of the process user. It is filled out automatically during installation. |
|
ImpersonateProcessUserForDatabaseAccess |
True or false. If set to True, the process user is impersonated when database calls are made. |
Configuration per system in the array “EBoks”:”Systems”[]
| Name | Description | Example |
|---|---|---|
| SystemId | SystemId of the e-Boks system | 4259 |
| EBoksSystemType | "AfsenderSystem" or “AfsenderSystem”. It must match the configuration in the e-Boks Administrationsportal. | AfsenderSystem |
| EBoksApiVersion | The API version of the configuration at e-Boks must match the API version set in the e-BoksAdministrationsportal. Only ‘1’ and ‘2’ are legal values that correspond to v1 and v2 in the e-Boks Administrationsportal. | 1 |
| UseEboksProduction | This can be either True or False. This value is used to resolve the URL for the endpoint of the e-Boksservice using the settings EBoksUrlVxProd and EBoksUrlVxCustom. |
False |
|
ClientCertificateStore |
Configuration of where the certificate used for communicating with e-Boks is stored. The legal values are |
LocalMachine |
|
ClientCertificateThumbPrint |
The thumbprint of the certificate used for communicating with e-Boks. |
F63A18100F5AA0454E17D25AD85082362D96AFC2 |
|
ClientCertificateFile |
File name that contains the client certificate. Storing the certificate in a file is an alternative to storing it in the certificate store. If the setting |
/home/cert.pfx |
|
ClientCertificatePassword |
Contains the password that protects the |
Secret |
|
RelayMessageCalls-ToCustomEndpoint |
This setting can be used to redirect calls to a remote installation of the EBoksProxy service that receives the messages from e-Boks. |
False |
|
RelatedSystem |
The ID of the ‘reverse’ system. For SenderSystem it should be the ID of the reciver system, and vice versa. |
4259 |