The QueryBuilder page
This article describes the components on the QueryBuilder page.
Open QueryBuilder
You can open WorkZone QueryBuilder from the WorkZone start page.
-
Enter
https://<WorkZone database>in a browser to open the WorkZone start page. -
Click WorkZone OData - QueryBuilder to open the QueryBuilder page.

About the QueryBuilder page
The QueryBuilder page is split into three areas: Header, Clauses, and Results.
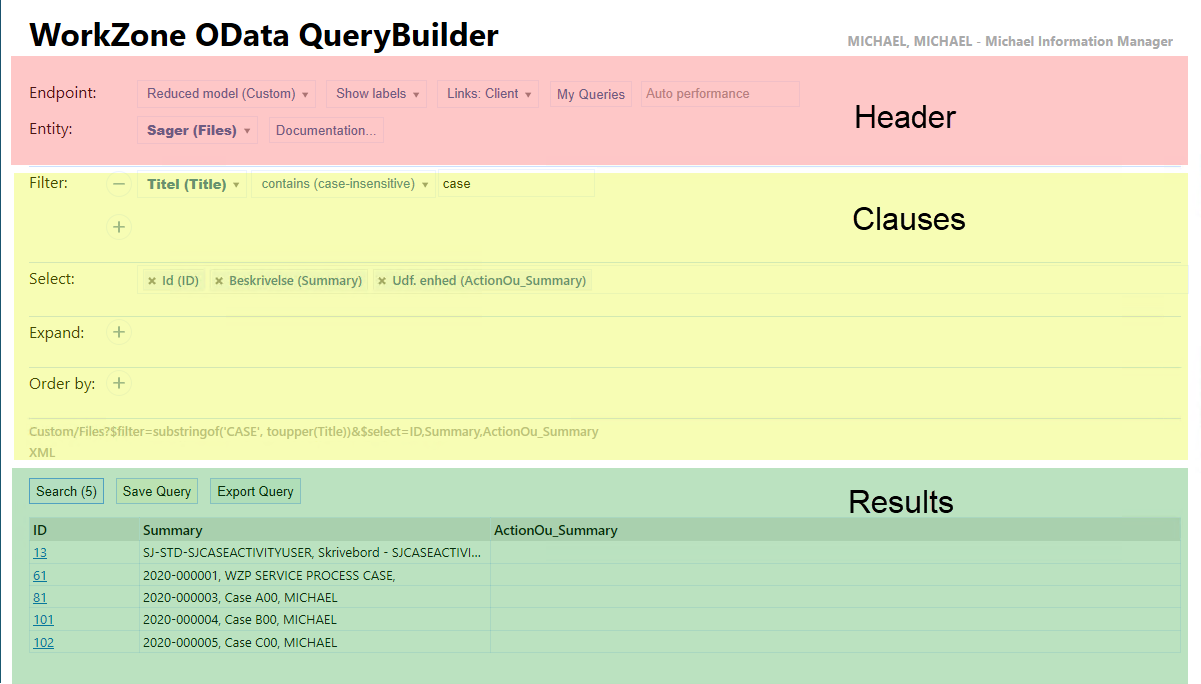
Header area
In the header area, you can specify general options for the current query, such as which endpoint model to use, if labels are to be displayed, and which application and entity to query.
You must select the entity and only one entity can be selected to be queried, however, you can extend the query to other connected tables by specifying additional tables in Expand in the Clauses area.
Select an endpoint
The Endpoint field lists different endpoints that you can select depending on the purpose of your queries. The different endpoints represent subsets of the OData API.
| Model | Description |
|---|---|
|
Full Strict OData V3 (V3) |
The full model with all entities and fields for OData version 3.0. Use this model as the default model. |
|
Full Model () |
The full model with all entities and fields for OData version 2.1. This model option is maintained for backwards-compatability with older versions. |
|
Interact mapping model (InteractEndPoint) |
A model that only contains the entities and fields that are supported by WorkZone Interact. You can use WorkZone QueryBuilder to find the IDs that you need to know to be able to map fields in Interact forms to WorkZone data. For more information, see Mapping fields in Interact forms to data. |
|
Just Custom Properties (CustomProperties) |
A model that only contains all custom properties and types. Use this model to search and filter all non-standard WorkZone fields that have been created by customers or partners. |
|
LightSwitch Compatible (LightSwitch) |
A model that contains entities and fields that are compatible with Microsoft LightSwitch apps. |
|
Meeting EndPoint (Meeting) |
A model that only contains entities and fields that are used for WorkZone Meeting |
|
Reduced model (Custom) |
A sample model that contains a limited number of entities and fields for easier navigation. If you cannot locate specific entities or fields, switch to the Full Strict OData V3 (V3) model. |
|
WorkZone Flex (WorkZoneFlex.svc) |
A model that contains entities and fields that are compatible with WorkZone Flex (beta product). |
Show or hide labels
Click Show labels or Hide labels to select whether to display entity and field labels. Labels are more user-friendly names for the entities and fields. If you display labels, the label of an entity or field will be displayed with the system name displayed in parenthesis.
Example: When selecting the Files entity in the Entity field:
- Show Labels: Cases (Files)
- Hide Labels: Files
Select application or service
Click Links: Client or Links: Flex to select which WorkZone application or service the query is applied to. The default is Client.
View saved queries
Click My Queries to open a new QueryBuilder page to display your saved queries.
Select automatic performance settings
Click Auto performance if you want to disable:
- Oracle hints
- Inline select
Select an entity
Select the entity to be searched. You can expand your search results to include other connected entities by using the Expand option in the Clauses area.
Tip: Click the Entity label to copy the Entity value clause to the clipboard. See Copy query components to the clipboard .
View data model documentation
Click Documentation to open the data model documentation for the selected entity on a new tab.
Clauses area
In the Clauses area you can specify the clauses which will narrow the query results, expand the search results to include other connected entities as well as define which fields to display and how the query results will be sorted.
Tip: The Search button in the Results area displays the expected number of search results based on the values of the Filter, Select and Expand search clauses.
Clauses in the Clauses area:
- Filter
- Select
- Expand
- Order by
- Aggregate
Tip: Click the each label to copy the value of the clause to the clipboard, for example clicking Aggregate will copy the defined aggregate function to the clipboard, and clicking Expand will copy the defined expand clause to the clipboard.
Filter
Define one more filter conditions to narrow the query results.
- Equals
- Equals (case-insensitive)
- Is empty
- Is not empty
- Does not equal
- Does not equal (case-insensitive)
- In (; separated)
- Starts with
- Starts with (case-insensitive)
- Does not start with
- Does not start with (case-insensitive)
- Ends with
- Ends with (case-insensitive)
- Does not end with
- Does not end with (case-insensitive)
- Contains: The + operator can be used as a prefix to apply Oracle's Fuzzy Matching to filter the query results.
- Contains (case-insensitive)
- Smart contains: Automatically applies Oracle's Fuzzy Matching to filter the query results.
- Does not contain
- Does not contain (case-insensitive)
- On/in
- Before
- After or equals
- Is null
- Is not null
- Specific month
- Specific day number
When filtering date/time fields, you must provide a date or date interval for several filter options (On/in, Before, After or equals), or the exact month or day (Specific month, Specific day number).
When defining the date or date interval, you can select the appropriate date interval type and then define the interval to the right of the field.
- Today +/-
- This week +/-
- This month +/-
- This quarter +/-
- This year +/-
Example: Using the date interval
When creating the After or equals filter condition, you can specify This week +/- and then how far back or forward in time you want to define for the date interval.
For the Cases (Files) entity, the filter: Created (Created) [after or equal] [this month] [-1] will return all files that were created last month and up to today's date.
For Boolean fields, the following filter conditions can be applied
- Is true
- Is false
- Is null
- Is null or true
- Is null or false
- Is null
- Is not null
- Equals
- Not equals
- Greater than
- Greater than or equal to
- Less than
- Less than or equal to
Multiple filters
Multiple filters are cumulative and can be considered to be connected with the AND operator, for example if you specify two filters, the query will apply both filters and display the query result: Filter 1 AND Filter 2.
There are three types of filter, depending on the field you are filtering:
- White background:
- Light blue background: Tables with a light blue background depict a one-to-one relation with the main entity.
- Yellow background: Tables with a yellow background depict a one-to-many relation with the main entity.
Select
Select which fields you want to display in the Results area.
Expand
Select another related table to connect the main entity to. You can connect multiple related tables to the main entity but you cannot connect tables to each other sequentially.
The Expand clause expands the search results to also include the related table, creating a hierarchy of search results in the Results area.
Example:
Main entity – expand -> sub table 1
Main entity – expand -> sub table 2
and not:
Main entity – expand -> sub table 1 – expand -> sub table 2
Order by
Select which field to sort the query result by as well as the sorting direction.
The sorting order of the results will be determined by the order of the specified fields in the Order by section.
Aggregate
The Aggregate clause enables you to use and display the results of simple calculation functions performed in the query itself.
The calculation functions that you define in the Aggregate clause are part of the query itself, and can be combined with Filters definitions, Select conditions, Expand commands, and the Order by sorting order. The Aggregate clause will be executed automatically as part of the count query.
The results of the calculation functions are an integral part of the query results and displayed in the Results area.
The following calculations can be defined in the Aggregate clause:
| Function | Description | Can be applied to... |
|---|---|---|
|
Avg (Average) |
The average value of the search results. |
Number fields only. |
|
CountDistinct (CountDistinct) |
The number of unique search results. |
All fields. |
|
Max (Maximum) |
The highest value of the search results. |
All fields. |
|
Median (Median) |
The median value of the search results. |
Number, Date or DateTime fields only |
|
Min (Minimum) |
The lowest value of the search results. |
All fields. |
|
Stddev (Standard Deviation) |
The statistical standard deviation of the search results. |
Number fields only. |
|
Sum (Sum) |
The sum of the search results. |
Number fields only. |
|
Variance (Variance) |
The statistical variance of the search results |
Number fields only. |
Multiple calculations can be defined and are combined using a non-displayed AND operator. This means that each defined calculation function should successively reduce the number of hits in the query .
When using Aggregate calculation functions, the results of the calculation functions that are defined in the Aggregate clause are displayed in top of the Results area, above the search results.
Results area
The search results of a query are displayed in the Results area.
The Search button displays the expected number of search results based on the values of the Filter, Select and Expand search clauses.
Tip: Copy the query string or data as XML or comma-separated data.
- Copy the query as text by selecting the query string in the Results area and pressing CTRL+C.
- Click the query line above the XML link to open a new tab page and display the search results as comma-separated data.
- Click XML to open a new tab page and display the search results as raw XML data.
Delete this text and replace it with your own content.
Display the results
Click the Search button to run the query and display the results.
Each search result from the main entity is displayed in a single row per search hit, while any additional results from expanded tables are displayed as sub-rows in the main row (in the case of multiple results from the expanded search results), or as a continuation of the single row (in the case of a single result from the expanded search results).
You can save your query and export the query to Microsoft Excel. If you are working on a saved query, you can update your query with your changes, or you can delete it.
See Save a query and Export a query to Excel.
See also:
Oracle's Fuzzy Matching
Fuzzy Matching and Stemming (external link to Oracle documentation site)
Oracle Text Indexing Elements (external link to Oracle documentation site)