Conversion policies
Prerequisite:
- To configure conversion policies, you must be assigned the CONFIGADM access code.
- To configure these settings, WorkZone PDF must be installed.
About policies
You can configure policies to define which documents are to be converted to PDF and in which priority.
You can specify which documents to convert based on the following criteria:
- Document state (for example, Draft, Locked, Archived)
- Document type (for example, Incoming, Outgoing)
- Document group (for example, Decision, Hearing, Complaint, Minutes)
- Date of last change
For more detailed information, see WorkZone PDF Administrator Guide.
Policy priority
Policy priorities enables conversion of important (high priority) policies first and relegates conversion of less important (lower priority) policies later, when there may be vacant machine resources to convert documents of these policies. The highest priority is 0. You can assign as many priority values to the policies as you need, for example, 0, 1, 2, ... 10, 11 and so on.
Create a new policy
- On the start page, click PDF.
- On the Conversion policies tab, click
 Create.
 - Fill in the following fields:
- Name – Enter a name for the new policy.
- Priority – Enter an integer number that defines a priority.
- Enabled – Turn it on to make the policy active.
- Document state, Document type, Document group – Define the documents to which you apply the policy:
- <All> – Apply the policy to documents of all states, types, and/or groups.
- Include – Apply the policy to particular states, types, and/or groups only. You can use multiple selection for each field.
- Exclude – Define which documents must be skipped by the policy. You can use multiple selection for each field.
- Document last updated – Apply the policy to a document if:
- Greater than – The document is updated after the selected day.
- Less than – The document is updated before the selected day.
- Greater than or equal – The document is updated during the selected day or after.
- Less than or equal – The document is updated before or during the selected day.
- <None> – Ignore this setting.
Note: This settings affects only documents where content (body) was updated. The changes in the document's metadata is not considered as an update here. - Week days – Select the week days when the policy must apply. You can use multiple selection.
- Start time – Select an hour when the conversion must start.
- End time – Select an hour when the conversion must end.
- Click Create. The policy is created. Its unique key is generated automatically.
- Select a policy that you want to edit.
- Click
 Edit.
Edit. - Apply the required changes in the Edit policy dialog box.
- Click Save.
- Select a policy that you want to delete.
- Click
 Delete, and then click Delete.
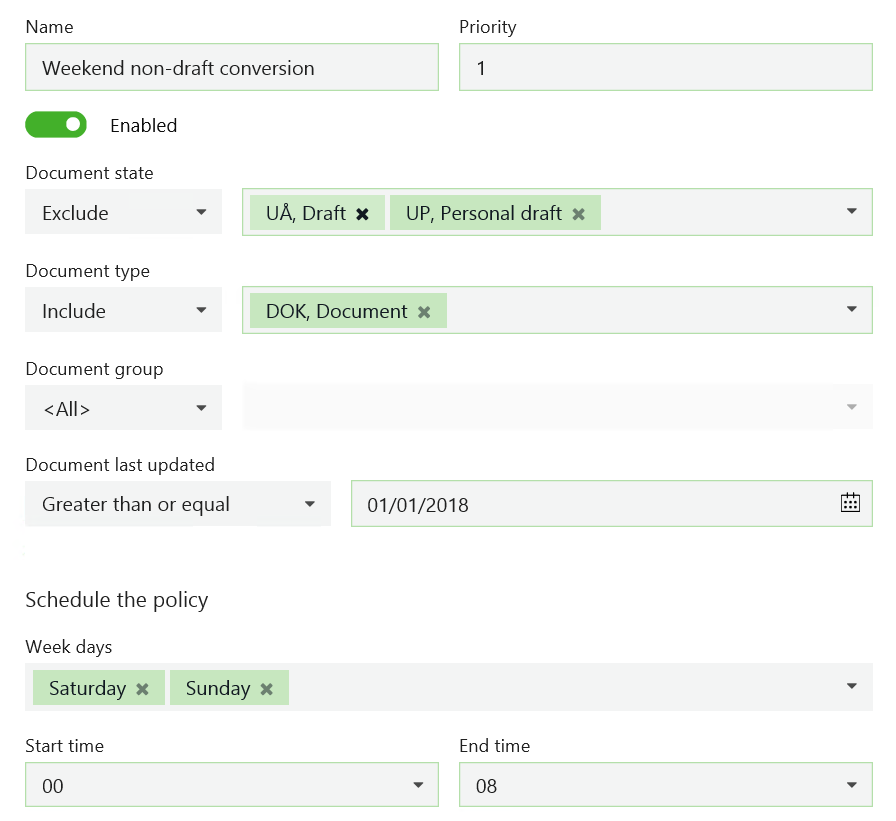
The policy converts all documents of the type DOKUMENT that are not drafts and have been changed within 2018 year. The conversion is scheduled on weekend nights to ensure that load on servers won't affect employees' regular work.
Edit a policy
Delete a policy