Configure WorkZone 365
Download and adjust the WorkZone 365 add-in manifest files
You will need to download and adjust the manifest files for relevant WorkZone 365 add-ins. Download the manifest files from your WorkZone server, via the links below (replace the [hostname] with your proper host name):
- WorkZone 365 add-in for Word, Excel, and PowerPoint:
https://[hostname]/app/office/webaddins/office/OfficeManifest.xml - WorkZone Meeting add-in:
https://[hostname]/app/office/webaddins/outlook/meeting/MeetingManifest.xml - WorkZone 365 add-in for Outlook:
https://[hostname]/app/office/webaddins/outlook/mail/MailManifest.xml
Download the manifest file
- Copy and paste the URL provided above into your browser's address bar.
- Replace the [hostname] with your preferred WorkZone instance. For example: https://workzone.dk/app/office/webaddins/office/OfficeManifest.xml.
- Press Enter. The manifest file will be downloaded to your computer's default download location.
Adjust the manifest file
If you want to adjust the WorkZone add-in name and description, you need to edit the manifest file. By default, the add-in label is "WorkZone", but you can adjust it in the relevant manifest file as follows:
- OfficeManifest.xml file (WorkZone 365 add-in for Word, Excel, and PowerPoint):
 Example:
 <DisplayName DefaultValue="WorkZone">
<Override Locale="da-DK" Value="New_name"/>
<Override Locale="de-DE" Value="New_Name"/>
</DisplayName>
...
<Resources>
...
<bt:ShortStrings>
<bt:String id="XXXX.Label" <DefaultValue="WorkZone">
<bt:Override Locale="da-DK" Value="New_name" />
<bt:Override Locale="de-DE" Value="New_name" />
</bt:String>
</bt:String id="YYYY.Label" DefaultValue="WorkZone">
<bt:Override Locale="da-DK" Value="New_name" />
<bt:Override Locale="de-DE" Value="New_name" />
</bt:String id="YYYY.Label" DefaultValue="WorkZone">
<bt:ShortStrings>
- MailManifest.xml file (WorkZone 365 add-in for Outlook): Example:
<DisplayName DefaultValue="WorkZone">
<Override Locale="da-DK" Value="New_name"/>
<Override Locale="de-DE" Value="New_name"/>
</DisplayName>
<Description DefaultValue="WorkZone 365 - Mail">
</Description>
...
<Resources>
...
<bt:ShortStrings>
<bt:String id="XXXX.Label" <DefaultValue="WorkZone">
<bt:Override Locale="da-DK" Value="New_name" />
<bt:Override Locale="de-DE" Value="New_name" />
</bt:String>
<bt:ShortStrings>
- MeetingManifest.xml file (WorkZone Meeting add-in for Outlook): Example:
<Override Locale="da-DK" Value="New_name"/>
<Override Locale="de-DE" Value="New_name"/>
</DisplayName>
<Description DefaultValue="WorkZone 365 - Meeting">
</Description>
</DisplayName>
Adjust manifest ID (GUID)
If you use multiple instances of WorkZone 365, for example, Outlook on the same Exchange server, or different versions of WorkZone 365 for Outlook on the same Exchange server, you must change the WorkZone 365 ID (GUID) in the MailManifest.xml under ID.
<Id>7f0f121e-7dba-428b-b37f-6035270e48b4</Id>
An example of a unique ID (GUID) for production and test instances in the manifest file could look as follows:
- Manifest file for Outlook Test add-in:
<Id>7f0f121e-7dba-428b-b37f-6035270e48b4</Id> - Manifest file for Outlook PROD add-in:
<Id>7f0f121e-7dba-428b-b37f-6035270e48b4</Id>
You can use a GUID generation tool, for example, GUID Generator to get the unique IDs.
Tip: Save a copy of each manifest file locally or on a shared drive with proper file names to easily access the manifests and GUIDs. This will help you monitor all your instances and versions of WorkZone 365, especially if you need to rewrite names or if any feature changes have been made to the manifest file. In this case, you will need to upload a new manifest file in the admin center to get the newest add-in features. When you upload the new manifest file, remember to insert the manifest name, description, and ID for the add-in that you want to update. Read more about this under ‘updating existing add-ins'.
After you have adjusted the manifest file, you are ready to install the WorkZone 365 add-in. You can do that from the 365 admin center/Exchange admin center, or via side-loading.
Install WorkZone 365 add-in for Microsoft Office 365
You can install WorkZone 365 add-in in two ways, depending on your purpose:
- Configure WorkZone 365: the most common method of installing add-ins is through the admin centers, targeting users, groups, and organizations.
- Side-loading: in some scenarios, you might prefer to side-load the add-ins. For example, to test them on different environments. Side-loading can also be done via the admin center, which allows a single person to install the add-in on their device.
-Or-
Centralized deployment via Microsoft 365 or Exchange admin center
Installation through admin centers is intended for distribution to users, groups, and organizations. As an admin, you can choose one of three deployment methods for Outlook add-ins during add-in deployment:
- Fixed: The add-in will be automatically deployed to the assigned users and they will not be able to remove it from their ribbon.
- Available: Users can install the add-in manually in Outlook by clicking Home > Get More add-ins > Admin-managed.
- Optional: The add-in will be deployed automatically to the assigned users, but they can choose to remove it.
See Deploy an Office add-in using the admin center.
Side-loading
Follow the steps below to side-load relevant WorkZone 365 add-ins on Windows.
- In Outlook, click File > Manage Add-ins. The Add-ins for Outlook dialog will open in a new browser window.
- Select the My add-ins tab and scroll down to the Custom Add-ins section.
- Click Add a custom add-in > Add from File.
- Select the relevant manifest file (.xml) of your WorkZone 365 add-in for Outlook from your computer, and click Next.
- Click Install.
- If prompted, confirm that you trust this add-in by clicking Trust It. Once installed, the add-in will appear in the list of add-ins for your Outlook account.
- Close and reopen the Outlook to ensure that the add-in is properly loaded.
- The WorkZone 365 add-in should now be available in your Outlook ribbon.
- On your drive, create a folder named Manifest and add there the manifest file for your WorkZone 365 add-in for Word, Excel, and PowerPoint.
- Right-click on the Manifest folder, and select Share with/Give access to > Specific people > select yourself. This will create a network share.
- Open Word and navigate to Files > Options > Trust Center > Trust Center Settings > Trusted Add-in Catalogs.
- In the Catalog URL field, enter the URL for your Manifest folder created in step 3 (for example: "\\A12345\Manifest"), and click Add catalog.
- Select the Show in Menu checkbox.
- Click OK to apply your changes, and then restart Word for the changes to take effect.
- Go to Insert > My Add-ins > Shared folder. You should see the WorkZone 365 add-in.
Update an existing WorkZone 365 add-in
When you upgrade to a newer version of WorkZone, the WorkZone 365 add-ins will automatically update to the latest release. In some releases, changes to the manifest may require administrators to update the manifest in the admin center.
Update the WorkZone 365 add-in when there are changes to manifests
Some releases include changes to manifest files to enable the utilization of new features from Microsoft. In such scenarios, you must update the add-in to access the latest functionality. Any changes to the manifest files will be documented in the release notes.
- Go to the Microsoft 365 Admin Portal > Settings > Integrated apps.
- From the list of deployed apps, select the WorkZone app that you want to update.
- In the app overview, select Update add-in from the Actions menu.
- Select Upload manifest file (.xml) from device and click Choose file.
- Browse to the location of your manifest file (.xml), select the file and click Open.
- Click Next.
- Confirm the selected manifest file and its contents.
- Accept permissions and start the update by clicking Accept and update.
Using WorkZone 365 with shared mailboxes on Exchange Server 2019
If your organization wants to use WorkZone 365 with shared mailboxes on Microsoft Exchange Server 2019, you must complete the following steps first:
- Add your Exchange server URL in WorkZone Configurator
- Add impersonation permission to your Exchange Server 2019
See Add a new external service.
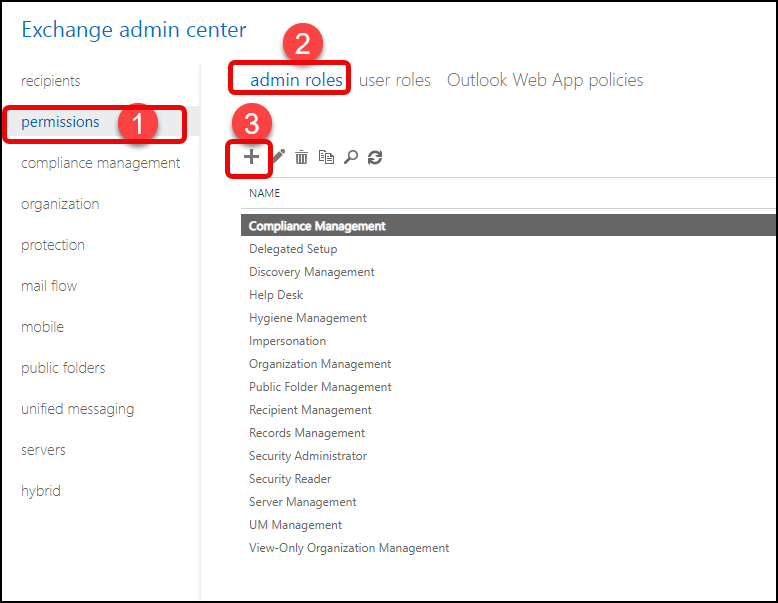
- Log in to your Exchange admin center:
https://[your_exchange_server]/ecp/, replacing the [your_exchange_server] with your Exchange server. For example, https://workzone/ecp/. - On the permissions tab, select admin roles and click +.
- In the new Impersonation dialog:
- Enter the permission name. For example, Impersonation.
- Add role: ApplicationImpersonation.
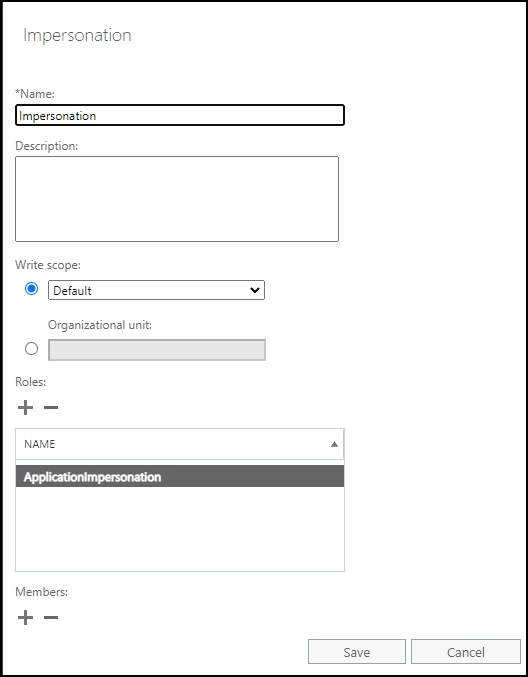
- In the Members section, click + and add your user.
Prerequisite: This user must also:
- Have access to OData.
- Exist in WorkZone and (only for cloud environments) in the Entra ID directory (under the SystemAccountUsers catalog in the WorkZone 365 server properties).
- Be a member of the security group that has security code 1 or higher (for example,
ScanJourCaptia_1). See Entra ID provision and Apply security groups.
- Click Save.