Deploy and configure WorkZone 365
WorkZone 365 extends Microsoft 365 (formerly Office) applications with add-ins for document management and collaboration.
There are two types of WorkZone 365 add-ins which require different deployment approaches:
- Outlook add-ins (for email and meeting integration)
- Office add-ins (for Word, Excel, and PowerPoint integration)
Prepare the WorkZone 365 add-ins manifest files
Before you start the deployment, you must download and, in some cases, adjust the manifest files for all relevant WorkZone 365 add-ins.
A manifest file is an XML document that tells Microsoft Office how to load and display the WorkZone 365 add-in. Each type of WorkZone 365 add-ins (Office, Outlook mail, Outlook meeting) has its own manifest file.
If you need multiple WorkZone installations to coexist in the same Office environment, you must customize the manifest files by using unique GUIDs (to prevent conflicts) and different add-in display names (to help users identify which WorkZone 365 version they are using).
To customize the manifest file, you will need to:
- Download the manifest files from your WorkZone server using the following links (copy and paste the URLs provided below into your browser's address bar, replacing the
[hostname]with your proper host name): - WorkZone 365 add-in for Outlook:
https://[hostname]/app/office/webaddins/outlook/mail/MailManifest.xml - WorkZone Meeting add-in:
https://[hostname]/app/office/webaddins/outlook/meeting/MeetingManifest.xml - WorkZone 365 add-in for Word, Excel, and PowerPoint:
https://[hostname]/app/office/webaddins/office/OfficeManifest.xml - Replace the [hostname] with your preferred WorkZone instance. For example: https://workzone.dk/app/office/webaddins/office/OfficeManifest.xml.
- Press Enter. The manifest file will be downloaded to your computer's default download location.
If you use multiple instances of WorkZone 365, for example, Outlook on the same Exchange server, or different versions of WorkZone 365 for Outlook on the same Exchange server, you must change the WorkZone 365 ID (GUID) in the MailManifest.xml under the <Id> tag. For example:
<Id>7f0f121e-7dba-428b-b37f-6035270e48b4</Id>
An example of a unique ID (GUID) for production and test instances in the manifest files could look as follows:
- Manifest file for Outlook Test add-in:
<Id>7f0f121e-7dba-428b-b37f-6035270e48b4</Id> - Manifest file for Outlook PROD add-in:
<Id>d9be36b1-6aea-425c-87bc-ce614ce8053d</Id>
You can use a GUID generation tool, for example, GUID Generator to get the unique IDs.
By default, the WorkZone 365 add-in label is "WorkZone", but you can adjust it in the relevant manifest file. If you use multiple instances of WorkZone 365, you will need to update the label values and DisplayName in the manifest file to identify your environment in the Office UI. For example, you can replace "WorkZone" with your environment name, such as "WorkZone Prod" or "WorkZone Test". Additionally, you can add a localized label for different languages (replace the "New_name" in the examples below with your preferred name for each language).
Examples for each type of manifest files:
- OfficeManifest.xml file (WorkZone 365 add-in for Word, Excel, and PowerPoint):
 Example:
 <DisplayName DefaultValue="WorkZone">
<Override Locale="da-DK" Value="New_name"/>
<Override Locale="de-DE" Value="New_Name"/>
</DisplayName>
...
<Resources>
...
<bt:ShortStrings>
<bt:String id="XXXX.Label" <DefaultValue="WorkZone">
<bt:Override Locale="da-DK" Value="New_name" />
<bt:Override Locale="de-DE" Value="New_name" />
</bt:String>
</bt:String id="YYYY.Label" DefaultValue="WorkZone">
<bt:Override Locale="da-DK" Value="New_name" />
<bt:Override Locale="de-DE" Value="New_name" />
</bt:String id="YYYY.Label" DefaultValue="WorkZone">
<bt:ShortStrings>
- MailManifest.xml file (WorkZone 365 add-in for Outlook): Example:
<DisplayName DefaultValue="WorkZone">
<Override Locale="da-DK" Value="New_name"/>
<Override Locale="de-DE" Value="New_name"/>
</DisplayName>
<Description DefaultValue="WorkZone 365 - Mail">
</Description>
...
<Resources>
...
<bt:ShortStrings>
<bt:String id="XXXX.Label" <DefaultValue="WorkZone">
<bt:Override Locale="da-DK" Value="New_name" />
<bt:Override Locale="de-DE" Value="New_name" />
</bt:String>
<bt:ShortStrings>
- MeetingManifest.xml file (WorkZone Meeting add-in for Outlook):
Example:
<Override Locale="da-DK" Value="New_name"/>
<Override Locale="de-DE" Value="New_name"/>
</DisplayName>
<Description DefaultValue="WorkZone 365 - Meeting">
</Description>
</DisplayName>
Important: Make sure to update all "WorkZone" instances in the XML file.
Save a copy of each manifest file locally or on a shared drive under a proper file name. This will help you monitor all your instances and versions of WorkZone 365, especially if you have updated the displayed name or made any feature changes to the manifest file.
When you upload the new manifest file, remember to insert the manifest name, description, and GUID for the add-in that you want to update.
After you have adjusted the manifest file(s), you are ready to deploy the WorkZone 365 add-ins.
Deploy the WorkZone 365 add-ins
The deployment approach depends on your environment.
- For Cloud environments: Microsoft 365 Admin Center deployment
- For on-premises environments:
- Outlook add-ins: Exchange Admin Center deployment
- Office add-ins: Group Policy deployment
Cloud Deployment
- Open the Microsoft 365 Admin Center.
- Navigate to Integrated apps > Upload custom apps.
- Upload your customized manifest files.
For the detailed steps, see Microsoft article Deploy an Office add-in using the admin center.
On-Premises Deployment
- Open the Exchange admin center: https://[exchange-server]/ecp.
- Upload your customized manifest files (
MailManifest.xmland/orMeetingManifest.xml). - Install the WorkZone 365 Outlook add-ins. See Microsoft article Add-ins for Outlook in Exchange Online for the detailed steps.
Office add-ins (for Word, Excel, and PowerPoint) cannot be deployed via Exchange admin center. Instead, the centralized deployment must be done using the group policies.
- Download and install Microsoft Office Administrative Templates.
- On your drive, create a folder named Manifest and add there your
OfficeManifest.xmlfile. - Create a network share for the Manifest folder, and add network share to trusted locations. See Microsoft article Sideload Office Add-ins for testing from a network share for the detailed steps.
- Configure the Group policy for WorkZone 365 add-ins.
Post-deployment verification
After you have deployed the WorkZone 365 add-ins:
- Check that the add-in appears with the Office label specified in the manifest file
- Verify that add-in loads in all required applications
- Confirm that WorkZone functionality works as expected
Troubleshooting
If WorkZone 365 add-ins do not appear:
- Verify that relevant manifest file is available and has correct formatting
- Clear the Office cache. See the Clear cache Microsoft article for the detailed steps.
- Users might need to relaunch the Office app for the WorkZone 365 add-in to appear.
Update existing WorkZone 365 add-ins
When you upgrade to a newer version of WorkZone, the WorkZone 365 add-ins will automatically update to the latest release. However, some releases include updates to the manifest files to enable new Microsoft features, which means that if you made any customizations to your manifest files (such as GUIDs, add-in displayed name, localized labels), you will need to preserve them.
- Any changes to the manifest files will be documented in the release notes.
- Download the new manifest files from the WorkZone server.
- Preserve your customizations for the manifest files, if any (GUIDs, displayed name, localized labels).
- Upload the customized manifest files using your deployment method:
- For Cloud environments: Microsoft 365 Admin Center > Settings > Integrated apps.
- For on-premises environments: Update all manifest files in your network share (for Outlook add-ins) and in the Exchange admin center (for Office add-ins).
Using WorkZone 365 with shared mailboxes on Exchange Server 2019
If your organization wants to use WorkZone 365 with shared mailboxes on Microsoft Exchange Server 2019, you must complete the following steps first:
- Add your Exchange server URL in WorkZone Configurator
- Add impersonation permission to your Exchange Server 2019
- Set custom account in WorkZone 365 application pool
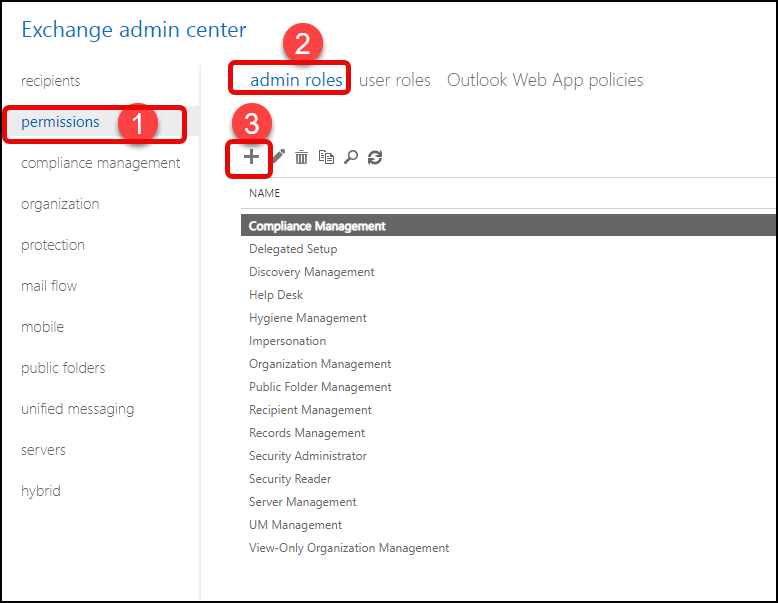
- Log in to your Exchange admin center:
https://[your_exchange_server]/ecp/, replacing the [your_exchange_server] with your Exchange server. For example, https://workzone/ecp/. - On the permissions tab, select admin roles and click +.
- In the new Impersonation dialog:
- Enter the permission name. For example, Impersonation.
- Add role: ApplicationImpersonation.
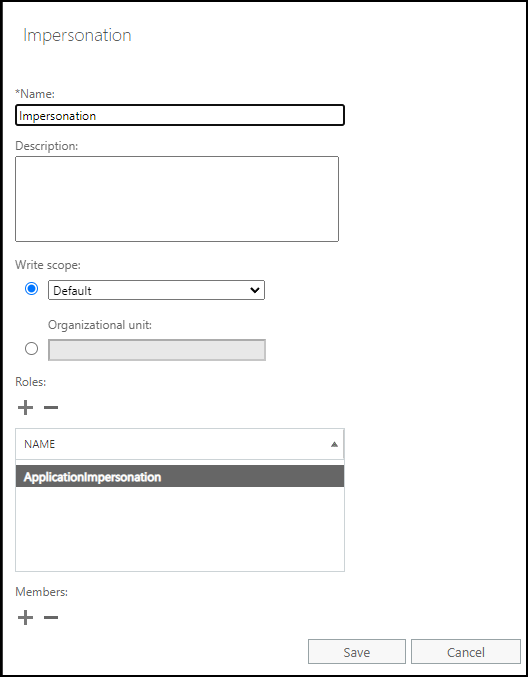
- In the Members section, click + and add your user.
Prerequisite: This user must also:
- Have access to OData.
- Exist in WorkZone and (only for cloud environments) in the Entra ID directory (under the SystemAccountUsers catalog in the WorkZone 365 server properties).
- Be a member of the security group that has security code 1 or higher (for example,
ScanJourCaptia_1). See Entra ID provision and Apply security groups.
- Click Save.
- From web server, open the IIS Manager.
- On the left panel, expand your server and select Application Pools.
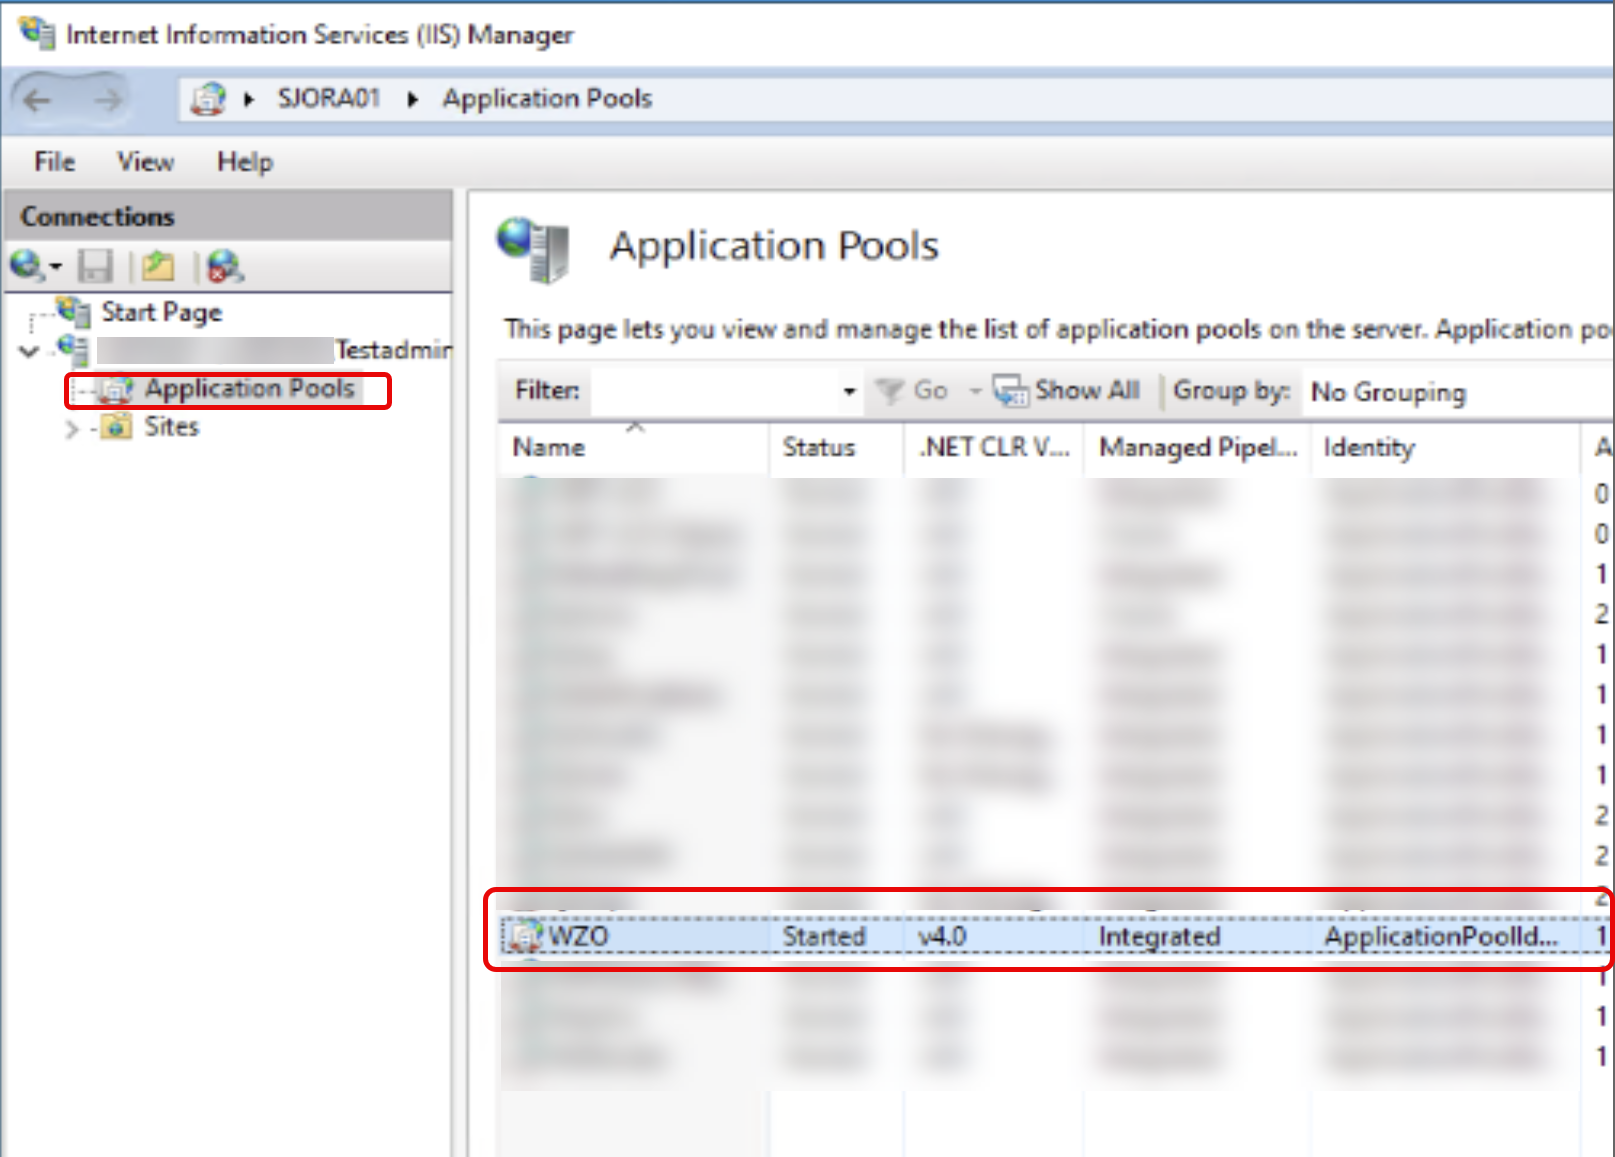
- Right-click the WZO application pool and select Advanced settings.
- Under Process Model, click ... next to the Identity.

- Click Custom account > Set.
- Enter the user name and password for your service account in Exchange Server, and click OK.
- Verify that your new account is created in WorkZone.