Install and configure ServerScan Directory Watcher Service
.NET 8 SDK (Download .NET 8.0) .
Access to OData to update the documents and metadata for respective cases (URL).
Permission to use a Microsoft Windows Installer (MSI) file to install the ServerScan Directory Watcher Service.
Application ID and secret, and Tenant ID of the WorkZone application.
Windows Server 2022 with 64-bit.
All Danish names must be replaced with English names in XSLTToSj.xsl file. See Sample metadata XML templates.
Access to login.microsoftonline.com from ServerSkan.
The files in the Components folder must be located in the installation package.
Make sure that the following information types (custom labels) exist in WorkZone:
Of the type AO (dokumentoplysning):
- SSURI (File path of the scanned document)
- AO (Document)
- IndScanPers (Person who scanned the document)
- IndScanSide (Number of pages)
- IndScanTid (Time of scanning)
Of the type AP (Aktpart):
- Forfatter (Author)
- Afsendt af (Sent by)
- Afsendt fra (Sent from)
- Modtager (Recipient)
- CPR-nr (CPR No.)
If you do not have these information types, you can add them in WorkZone Configurator. Go to Document > Informantion types. See Information types.
Note that you need to write the custom labels in lower case in the cfg files in the CFG folder. Read about the CFG folder in Configure WorkZone Content Server Imaging (2024.4).
App registration
Start by registering ServerScan Directory Watcher Service as an app in your Azure tenant.
-
Follow steps 1 and 2 only in Set up third-party integrations in Azure.
-
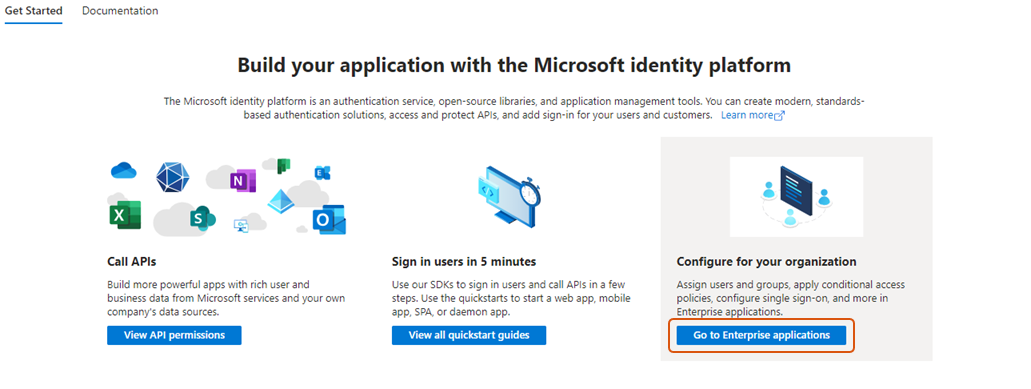
Go to Entra ID > App Registration, and select your app.
-
Click Go to Enterprise applications at the bottom right of the page.
-
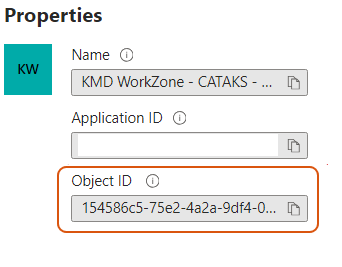
Copy the Object ID (Enterprise Application Object ID) and paste it to, for example Notepad, as you will need it later for configuration in WorkZone Configurator.
-
To configure the Enterprise Application Object ID in WorkZone, see Configure APP Enterprise Application ID.
Configure APP Enterprise Application ID
When you have registered ServerScan Directory Watcher Service as an app, you need to configure the access to WorkZone in WorkZone Configurator.
-
Log in to WorkZone and open WorkZone Configurator.
-
Go to Global > OAuth settings > Integrations tab, and click
 Edit next to the XDISCANUSER account.
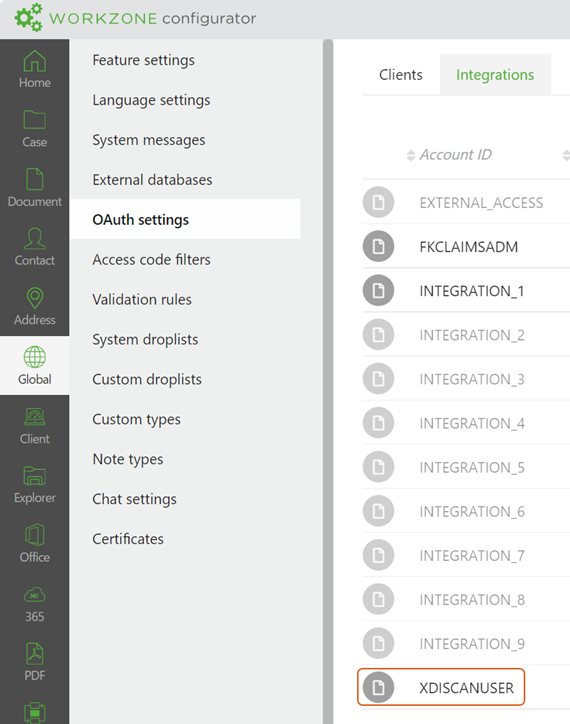
-
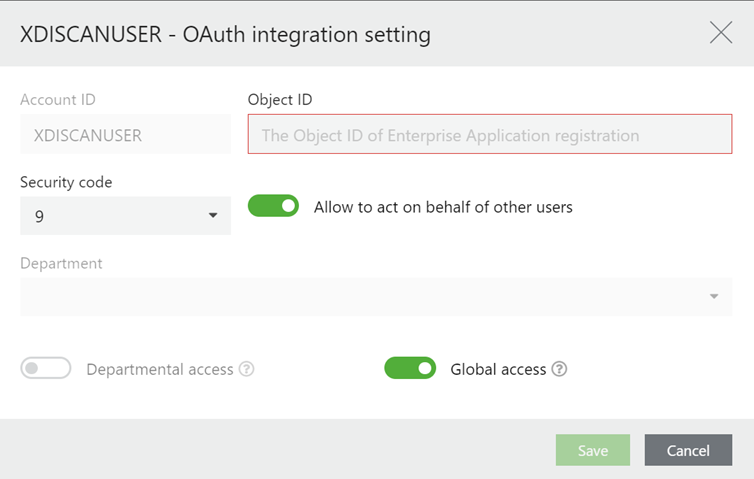
Enter the Enterprise Object ID of the Azure Entra ID app in the Object ID field, turn on Allow to act on behalf of other users, and select the security code 9 in the Security code field.
-
Click Save.
Download the folders
Before you can start the installation, you need to download two folders from the release drive ..\Release\WorkZone Directory Watcher:
-
Deployment folder that contains the deployment script for automatic installation and configuration files.
-
WZSS_Setup folder that contains the installer.
Install ServerScan Directory Watcher Service
Run the installer
-
Right-click Windows PowerShell and select Run as Administrator.
-
Go to the WZSS_Setup folder that contains the KMD.WorkZone.ServerScan.Setup.MSI file.
-
The table below shows the parameters that are required to install ServerScan Directory Watcher Service:
Use the following command to install the .MSI with all parameters. Replace the placeholders with actual values:
msiexec /i "KMD.WorkZone.ServerScan.Setup.msi" DIRECTORYWATCHER="C:\ScannedDocs" SCHEMA="C:\Components\Schedules\" TRANSFORMATIONS="C:\Components\Transformations\" ERRORPATH="C:\Logs\Errors" OUTPUTPATH="C:\ProcessedDocs" CLIENTID="12345678-1234-1234-1234-123456789abc" TENANTID="87654321-4321-4321-4321-abcdef123456" CLIENTSECRET="EncryptedValue" REDIRECTURL="https://localhost" AUTHREQUESTURL="https://<domainname>/.default" ODATAURL="https://<domainname>/odata/v3" PROTOCOLANDHOST="https://<domainname>" LOGPATH="<log file path>\log.txt" /q Note: If a parameter value contains spaces, enclose parameter value in single quotes ' when you pass the command. For example: DIRECTORYWATCHER='"C:\testwzss\Scanned Documents\"'
Start the service with the following PowerShell command:
Start-Service -Name "KMD WorkZone Directory Watcher Service"
| Parameter |
Description |
Example |
|---|---|---|
|
DIRECTORYWATCHER |
Path to the folder to monitor for scanned documents. |
C:\ScannedDocs |
|
SCHEMA |
Path to the Components\Schedules folder. The folder must be named as shown in the example. |
C:\Components\Schedules\ |
|
TRANSFORMATIONS |
Path to the Components \Transformation folder. The folder must be named as shown in the example. |
C:\Components \Transformations\ |
|
ERRORPATH |
Path to the folder that stores error files. |
C:\Logs\Errors |
|
OUTPUTPATH |
Path to the folder that stores processed files. |
C:\ProcessedDocs |
|
CLIENTID |
Azure application client ID. |
12345678-1234-1234-1234-123456789abc |
|
TENANTID |
Azure tenant ID. |
87654321-4321-4321-4321-abcdef123456 |
|
CLIENTSECRET |
Encrypted Azure application client secret. |
EncryptedValue See Encrypt the secret. |
|
REDIRECTURL |
Redirect URL for OAuth authentication |
https://localhost |
|
AUTHREQUESTURL |
URL for authentication requests. |
https://<domainname>/.default Replace <domainname> with your domain name. |
|
ODATAURL |
URL for OData API. |
https://<domainname>/odata/v3 Replace <domainname> with your domain name. |
|
PROTOCOLANDHOST |
Protocol and host for communication |
https://<domainname> Replace <domainname> with your domain name. |
|
LOGPATH |
The path to the folder that stores logs that are generated daily. |
<log file path>\\log.txt Replace <log file path> with the location of logs to be generated. For example: "C:\\WZ\\WZSS\\log.txt" |
Encrypt the secret
-
Go to the EncryptionHelper.ps1 file in the Deployment folder.
-
Open Windows PowerShell in administrative mode and run the command.
.\EncryptionHelper.ps1 -encryptText "<Secret>" -
Copy the Encrypted text and update the ClientSecret value.
Sample metadata XML templates

|
Sample metadata file (XML file) |
|
|
English names (XSL file) |
Danish names are no longer supported but you can use this file to map Danish names to English names:
|
|
Mapping of Danish names to English names (XML file) |
Uninstall ServerScan Directory Watcher Service
-
Navigate to the location where you saved the original .MSI installation file.
-
Right-click the .MSI file and select Uninstall. This will start the uninstallation process.
If any error occur while uninstalling, follow these steps:
-
Open PowerShell as an Administrator.
-
Run these commands:
-
sc.exe stop "KMD WorkZone ServerScan Service" -
sc.exe delete "KMD WorkZone ServerScan Service"
-
Confirm removal of the installation folder
When you have uninstalled the service, verify that the folder has been removed (C:\Program Files (x86)\KMD.WorkZone.ServerScan). If the folder still exists, you can delete it manually. Administrative rights may be required.