Configure Citizen Access
This topic describes how to configure the applications that are required to run WorkZone Citizen Access.
To run WorkZone Citizen Access, you need the following applications:
|
Application |
Deployment |
Comments |
|---|---|---|
|
Test client |
Locally |
An app that you can use to access the Citizen Access module. You must configure the app locally. |
| WorkZone Application Proxy |
AKS |
Deploy to AKS as a container. |
|
API Management |
Azure |
Configure in Azure. |
|
WorkZone Identity Data Service (IDS) |
AKS |
Deploy to AKS as a container. |
See also the Architecture diagram.
Before you can configure Citizen Access the following prerequisites must be fulfilled:
The test client application URL must be registered with KMD Identity.
Valid security details to authenticate from KMD Identity.
Required access to configure the Azure API Management service.
Required access to Azure Key Vault to read and update the keys.
Access to run the PowerShell.
Access to Citizen Access repo.
Access to Citizen Access Client Application build artifact.
WorkZone products must be deployed and able to access OData.
Docker Desktop must be installed locally and must be able to build Linux images.
Configure the test client
The test client is an app that can be used for testing that citizens can log in with their digital ID. It's a web application that can be hosted in any Windows-based environment.
-
.NET 8.0 Runtime installed on the host operating system.
-
ASP.NET Core Runtime 8.0 installed on the host operating system.
-
Development certificate installed on the host operating system. See the Microsoft article Generate self-signed certificates with the .NET CLI.
-
Unused port number 44375 on localhost (or different one configured with KMD Identity).
Fetching the artifacts
-
Get the latest build files from the pipeline [Citizen Access Client App](https://dev.azure.com/workzone-kmddk/WorkZone/_build?definitionId=3147).
Artifact name:
ClientBuildFile name:
Source.zip -
Extract files from
Source.zip -
Remove the
appsettings.Development.json, andappsettings.Production.json` files.
Setting up the app
Replace the appsettings.json content with following snippet. The configuration gets data from WorkZone Citizen Access that is hosted on Dev-AKS.
		insert{
  "Logging": {
    "LogLevel": {
      "Default": "Information",
      "Microsoft": "Warning",
      "Microsoft.Hosting.Lifetime": "Information"
    }
  },
  "AllowedHosts": "*",
  "Urls": "https://localhost:44375", // url on which application is running, must be configured with KMD Identity
  "Security": {
    "IdPMetadataUrl": "https://identity.kmd.dk/adfs/.well-known/openid-configuration",
    "ClientId": "", // ClientId for KMD Identity
    "ClientSecret": "", //Client Secret for KMD Identity
    "ApiScope": "allatclaims user_impersonation",
    "RequestDetailsApiUrl": https://<domain>/appproxyservice/api // Application Proxy API URL
  }
}

Running the test client
Open shell in folder containing sources and run KMD.Workzone.CA.IdentityClient.exe.
Configure Azure Key Vault
The key value configuration is required to store the keys so that the key will be sent as a header and validated in IDS.
-
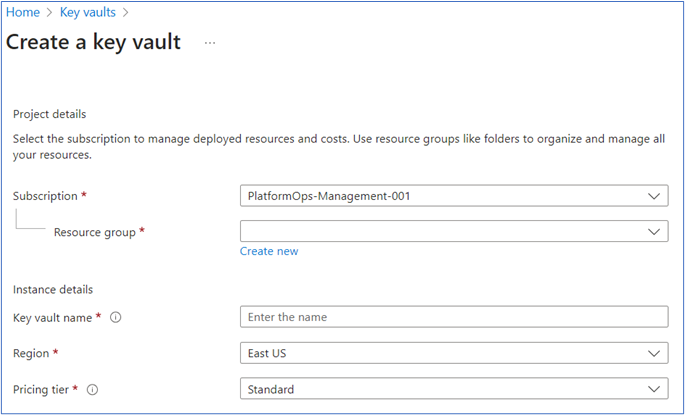
In the Azure portal, select Key vaults.

-
Create a new key vault by choosing a resource group, and fill in information in the Instance details section.
-
Click Review + create.
-
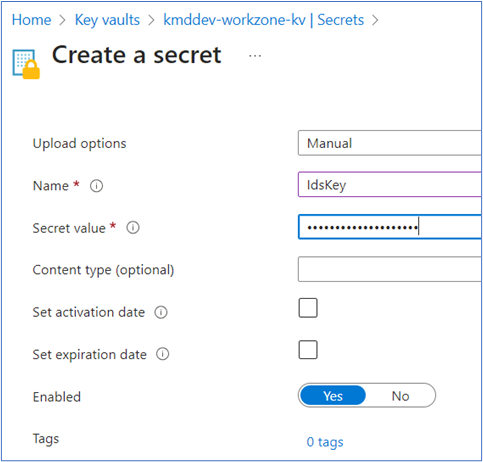
Select the key vault that you just created to create secrets.

-
Select Generate/Import to create a new secret. In this example, create a secret named IdsKey and enter a secret value, and then click Create.
 .
.
Create an Azure AKS instance
-
In the Azure portal menu, select Create a resource.
-
In the Search box, enter Kubernetes Services, and then select Kubernetes Services.
-
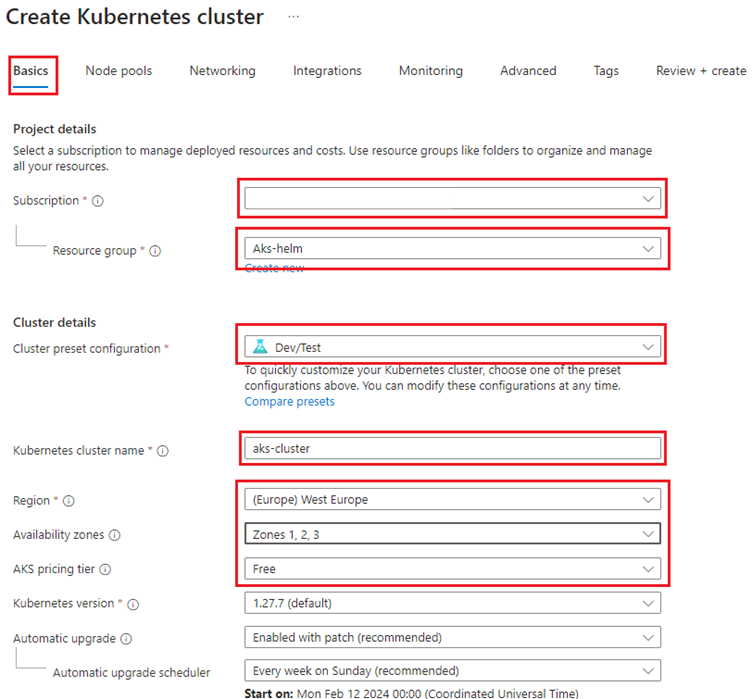
On the Basics tab, fill in the following fields on :
Under Project details:
-
Select the subscription.
-
Select a resource group in the Resource group field. If the resource group does not exist, click Create new and enter a resource group name.
-
In the Cluster preset configuration field, select Dev/Test for development, testing, or demo purposes.
-
Enter a name for the Kubernetes cluster
-
In the Region field, select a region for the AKS cluster.
-
In the Select Availability zones, select Zone 1, Zone 2 and Zone 3.
-
In the AKS pricing tier field, select Free for development, testing, or demo purposes.
-
On the Node pool tab, click Add new node pool.
-
Enter a name for the node pool and fill in the settings as shown below:
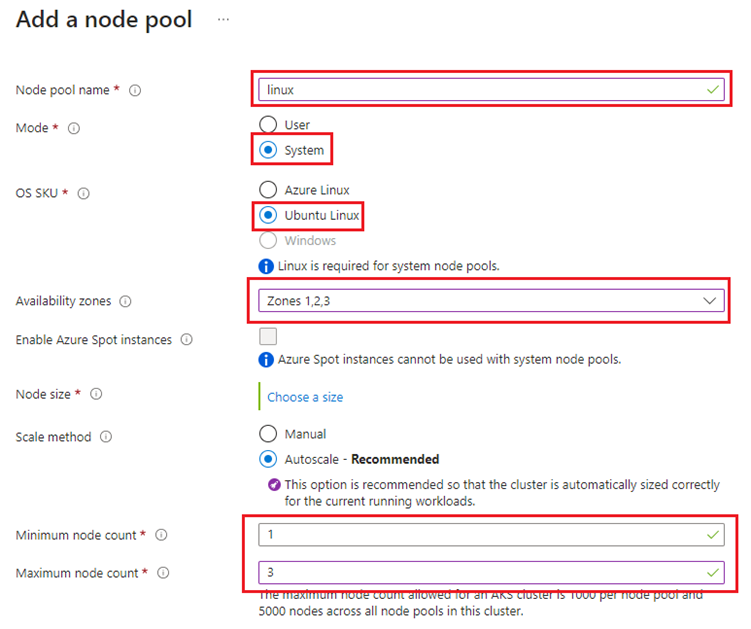 Note: Select the 3 in the Maximum node count field for for development, testing, or demo purposes.
 -
Click Add.
-
Click Review + create tab.
-
Client Create.
Under Cluster details:
Create a multitenant Microsoft Entra application
You need to create a service principal to get access to pulling images from WorkZone ACR.
Follow below steps below to configure a service principal in Azure Entra ID.
-
In the Azure Portal menu, select Create a resource.
-
In the Search box, enter Microsoft Entra ID, and then select Microsoft Entra ID.
-
Under Manage in the menu, click App registrations > New registration.
-
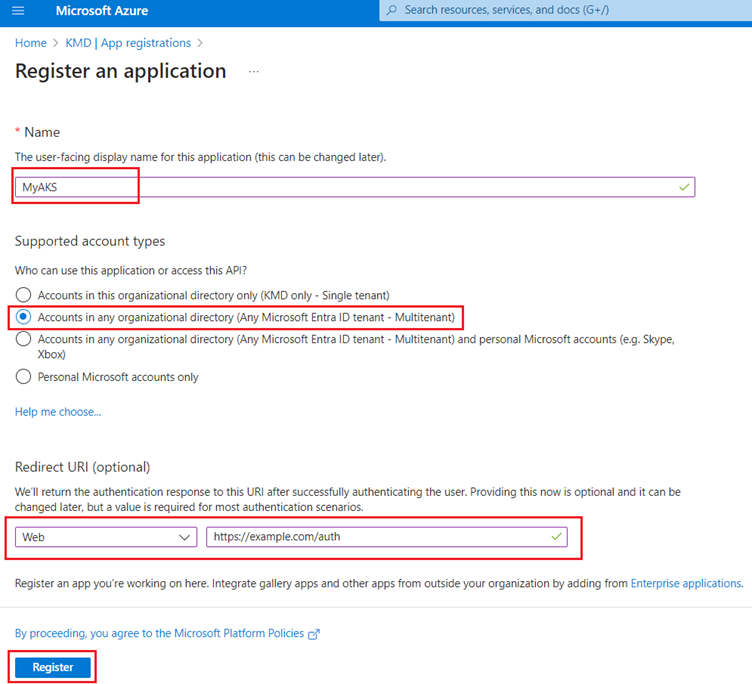
Enter the name of the application (the service principal name).
-
Under Supported account types, select Accounts in any organizational directory (Any Microsoft Entra ID tenant - Multitenant).
-
Under Redirect URI (optional), select Web, and enter any URL. If you have an authentication endpoint for your organization that you want to use, enter it here. Otherwise, you can enter https://example.com/auth.
-
Click Register.
 .
. -
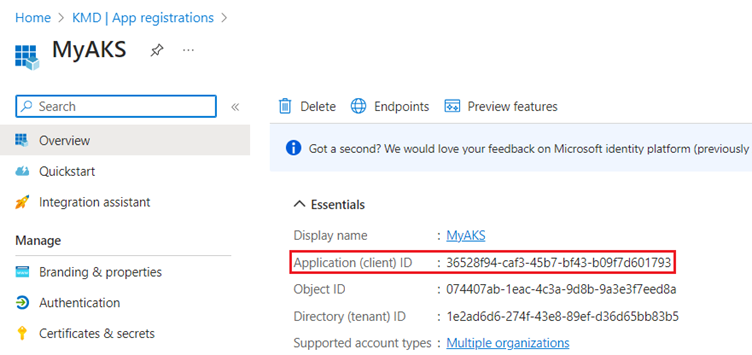
Copy the Application (client) ID.
-
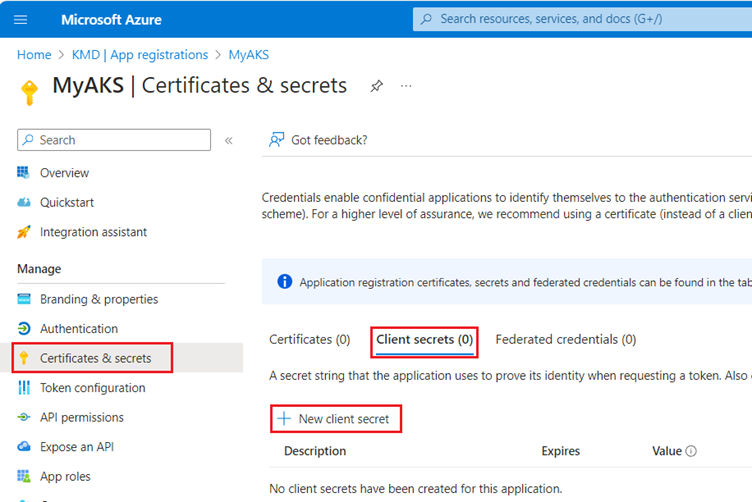
Under Manage in the menu, click Certificates & secrets.
-
Go to the Client secrets tab and click New client secret.
-
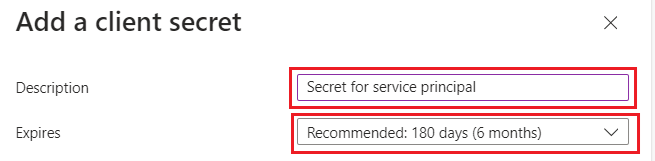
Enter a description, for example Secret for service principal, and select when the client secret should expire as per your standards. Click Add.
-
Copy the client secret value by clicking on copy icon. You will need it to update the AKS cluster's service principal.
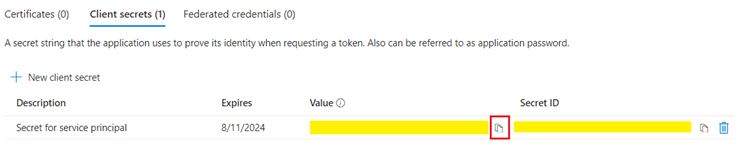 Note: You cannot copy the secret later.
Provision the service principal in the ACR tenant
Follow the below steps to provision the service pincipal in ACR tenant. If you do not have access to provision, you can please send a request to WZ DevOps team by sharing the APP/Client ID, App (Display) Name, and the redirect URL.
-
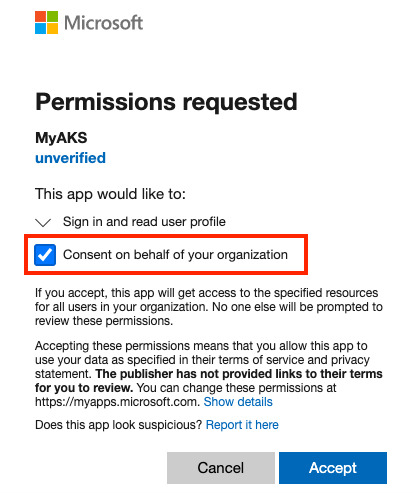
Open the following link using an admin account in the ACR tenant. Where indicated, insert the ID of the ACR tenant and the application ID (client ID) of the multitenant app which was created in Service Principal Configuration.
https://login.microsoftonline.com/<ACR Tenant ID>/oauth2/authorize?client_id=<Multitenant application ID>&response_type=code&redirect_uri=<redirect url> -
In the Permissions requested window, select the Consent on behalf of your organization check, and click Accept.
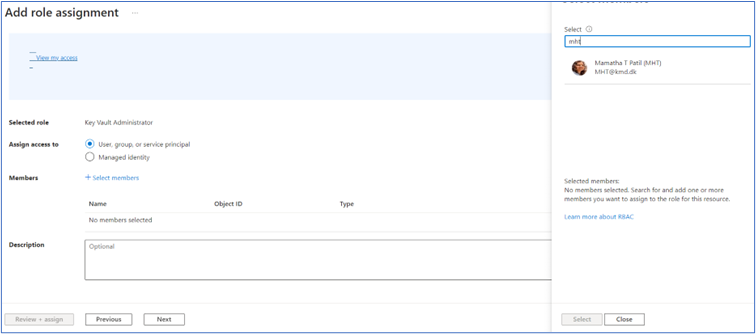
Grant the service principal permission to pull from Registry
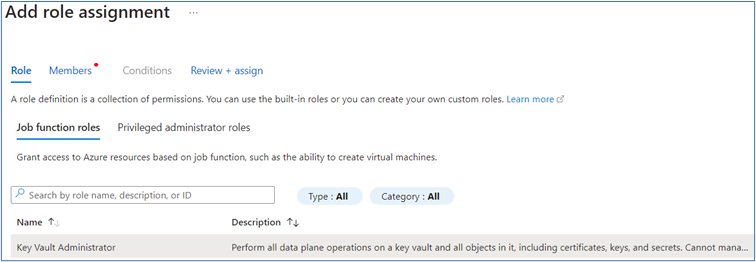
Follow the below steps to grant the service principal in the ACR tenant with AcrPull role.
-
Log in into the Azure Portal.
-
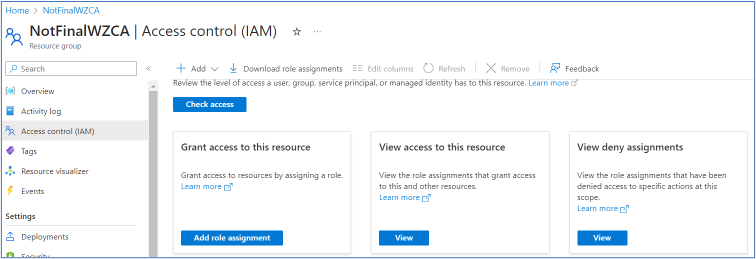
Go to Container Registry, and click Access control (IAM).
-
Click Role assignments, select the service principal, and assign the AcrPull role.
Update AKS with the Azure Microsoft Entra ID application secret
In the tenant where you created the service principal, run the command to update the AKS cluster with the service principal credentials:
az aks update-credentials --resource-group <resource group name> --name myAKSCluster --reset-service-principal --service-principal "$SP_ID" --client-secret "${SP_SECRET}"
Configure Azure API Management
Follow the below steps to configure the Azure API Management.
-
In the Azure Portal menu, select Create a resource to create a new resource group by providing a name and the location.
-
Add administrator rights to key vault for a specific (logged-in) user.
-
Go to Key vaults, and create a new key vault with the secret name IdsKey and the value: <secret value>. The value must be the same as ApiSettings.Key in IDS.

-
Copy files below from the CitizenAccess Repo under the folder Source/ApiManagement.
-
Deploy.ps1
-
Parameters.json
-
Template.json
In the parameters.json file, the names for the API-Management deployment are predefined. You can change the names if needed.
The name of Api-Management service must match the parameter while executing the deploy.ps1 file.
-
-
Execute the Deploy.ps1 file to create an API-Management deployment.
a. ./deploy.ps1 <resource group name> <api-management service name> -
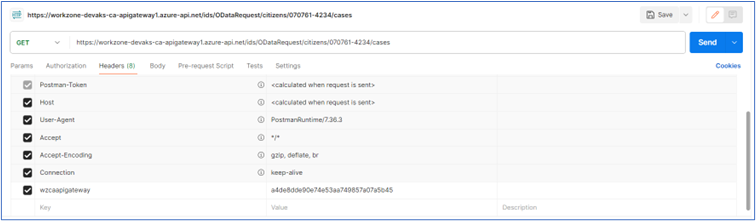
When completed, validate it through Postman.
Configure application proxy
Follow the below steps to configure the Application Proxy Application.
-
Log into Azure Portal where the service principal is created.
-
Click Show Portal Menu > All resources.
-
Click the Kubernetes services that were created earlier.
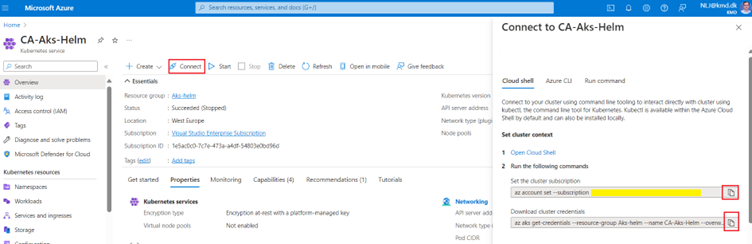
-
Click Connect, and copy the commands from the right-side window.
-
Once the pod is deployed, update the application proxy url in the client application in appSettings.json file.

-
Execute the commands that you just copied in PowerShell in administrative mode.
-
Run the command:
kubectl run appproxyservice --image=wzcommonweuacr.azurecr.io/workzone/wzcitizenaccess/appproxyservice:latest
Configure IDS
-
Log into Azure Portal where the service principal is created.
-
Click Show Portal Menu > All resources.
-
Click the Kubernetes services that were created earlier.
-
Click Connect, and copy the commands from the right-side window.

-
Execute the commands that you just copied in PowerShell in administrative mode.
-
Run the command:
kubectl run ids --image=wzcommonweuacr.azurecr.io/workzone/wzcitizenaccess/ids:latest
Helm chart changes
In Power Shell, run the command:
helm upgrade workzone --values values.yaml --set workzone.wzcitizenaccess.ids.url=https://wzcitizenaccess-ids/ids --set workzone.wzcitizenaccess.appproxy.url=https://wzcitizenaccess-appproxyservice/appproxyservice --set workzone.wzcitizenaccess.appproxy.apiGatewayUri=https://<APIM url> --set workzone.wzcitizenaccess.appproxy.openIdUrl=https://identity.kmd.dk/adfs/.well-known/openid-configuration