Map fields
You can map Interact+ form fields to WorkZone fields by configuring the fields in the Type editor in the WorkZone dispatcher. You write the actual field name in the Title field of a control, where you can also specify the data type of the given value.
The data that a user enters in a form is transferred as is to WorkZone. In WorkZone, a WorkZone component reviews the XML content and looks for keywords that match entities in WorkZone and transform it so that WorkZone can read and understand the content via OData.
You can map fields from Interact to WorkZone provided that the fields are of the type *_Value (not *_Summary). Both standard and custom fields can be transferred.
In the Navigation Property section of OData documentation, you can see how entities in WorkZone are related to each other. You must create the navigation property on the Type editor page. This is important to ensure that the transformation creates a reference to an entity relation that WorkZone understands.
Create and activate mappings
Create mappings
- Open the Interact+ form.
- Click the WZ mapping tab.
-
Click + in the lower right corner and select the dispatcher named Workzone.
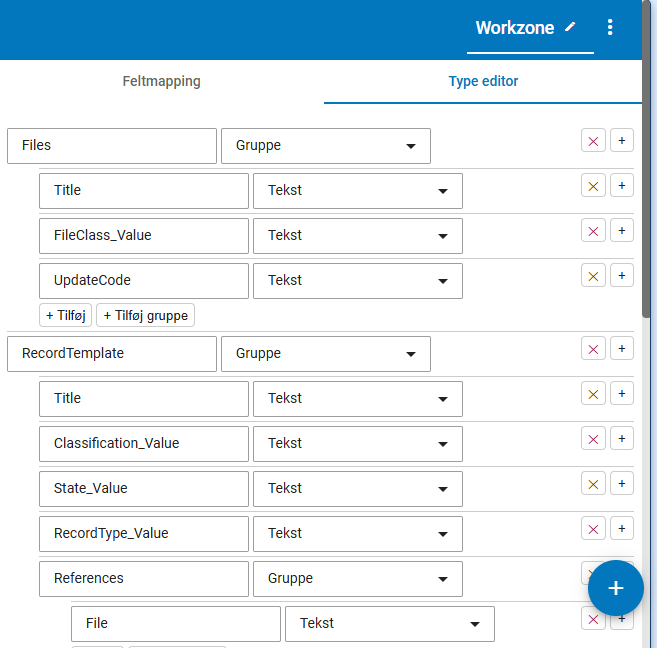
- In the Type editor, you configure the fields you want to map to WorkZone.
-
A Files group to contain all data related to the WorkZone case as form fields. See Mapping data to cases.
-
A RecordTemplate group to contain all data that is associated with documents or files on the selected case as form fields. Note that it is not possible to select a specific title or state per document that is transferred. See Mapping meta data to documents.
-
One or more groups named Contacts to contain all data that is related to the contacts that will be created as case parties from the submission as form fields. See Mapping contact information.
-
A FileContacts group per contact, from which the contact-case relation is defined (Case Party). It is also possible to define the role of the party. See Mapping the role and relation between contact and case.
-
An AddressMains group per contact, from which address information is associated with the contact. See Mapping address information.
-
A Customtype group to contain all data related to the customtype. See Mapping data to a custom type.
Mapping data to cases
-
In the Type editor, create a group named Files.
-
Minimum mandatory fields are Case title (Sagstitel) and Case group (Sagsgruppe).
-
If a field is mandatory in WorkZone, it must also be mandatory in the Interact form.
-
As a main rule, all WorkZone fields of the type "_Value" can be mapped from Interact.
-
Make sure that fields from underlying tables match the code values in WorkZone , for example that the primary party is set in the AddressKey_Value field on the case with the value AddressKey_Value from the contact, and the NCustomLabel_Value field is set to = Primary Part.
-
Custom droplists that are transferred must match the code value from the defined droplist in WorkZone.
Mapping meta data to documents
-
In the Type editor, create a group named RecordTemplate.
-
One RecordTemplate group can relate to one case.
-
The mapping defines metadata that will be added to all documents that are transferred to WorkZone. For example, if you set the document title to "Receipt", all documents will be named "Receipt" in WorkZone.
-
There are no system specific mandatory fields but if no data is mapped, no files are transferred.
-
Documents must have a relation to the case that they are related to. You do this by creating a new group name References within the RecordTemplate. In this group, add a File field in Interact+ (this is a navigation property from the document to the case via OData) where an ID is inserted that corresponds to the group in Interact+ that contains the case data.
-
As a main rule, all WorkZone fields of the type "_Value" can be mapped from Interact.
-
Make sure that fields from underlying tables match the code values in WorkZone. For example, the document type is set to "I" for incoming document because it represents the underlying code in WorkZone.
Mapping contact information
-
In the Type editor, create a group named Contacts. In case of muliple contacts, add a number as a postfix to the text Contacts such as Contacts0, Contacts1, and so on.
-
The NameCode field must not be empty for contacts of the type Person (with CPR)/Person (med CPR) and Company (with CVR)/Virksomhed (med CVR).
-
As a main rule, all WorkZone fields of the type "_Value" can be mapped from Interact.
-
Make sure that fields from underlying tables match the code values in WorkZone. For example, the NameType_Value field must be specified so that it matches the underlying code in WorkZone for contact types.
-
The relation from contact to case is create via the FileContacts entity.
Mapping the role and relation between contact and case
-
In the Type editor, create a group named FileContacts. In case of multiple FileContacts, add a number as a postfix to the text FileContacts such as FileContacts0, FileContacts1, and so on.
-
Filecontacts is a relation table between contacts and the case. You define the party and the party role.
-
The relation between the contacts and the case is created by adding a new group named References and by adding a field named File and a field named Name.
-
The CustomLabel_Value field defines the role of the party that must match the case party role in WorkZone.
Mapping address information
-
In the Type editor, create a group named AdressMains. In case of multiple FileContacts with addresses, add a number as a postfix to the text AddressMains such as AddressMains0, AddressMains1, and so on.
-
On the WZ_ODATA page in the form, create a group named AddressMains.
-
Data is mapped to the AddressMains entity, where the main address can be applied.
-
The Postcode_Value (Postnr.) that is transferred must match the Countrycode_Value (Landekode) for the specific country in WorkZone otherwise the import will fail.
-
There are no mandatory system specific fields but if no data is mapped, the address information is not transferred.
-
Addresses must be related to the contacts they relate to. One address relates to one contact.
-
The relation is created by creating a new group named References and adding a field called Name in Interact+, which is the navigation property from AddressMains to Contacts.
Mapping data to a custom type
-
In the Type editor, create a group named Objects_Som_NameOfCustomtype, for example Objects_Som_Custom_OPLYS.
-
As a main rule, all WorkZone fields of the type "_Value" can be mapped from Interact.
-
The relation between the custom type and the case is created by adding a field named File (this is the navigation property to a case in OData).
-
It is important that the relation is added as the last element of the group.
Mapping of AccessCode/UpdateCode
In situations where you need to use AccessCode/UpdateCode to protect the imported data, it can be a part of the configuration in the WorkZone Dispatcher.
Often this information must not be shown to users, so it could be either a hidden field or a function that provides the code from Logic.
In the relevant group, for example Files, add a field named either AccessCode or UpdateCode.
Both simple and combined codes are supported.
The value field for a simple code:
"{'Code': '<Code>'}"
where <Code> must be replaced with a valid code, for example {'Code': 'JohnDoe'}
The value field for combined codes:
"{'Expression': '<Code0>|<Code1>|<Code2>'}"
where <Code0>, <Code1>, <Code2> must be replaced with valid codes, for example {'Code': 'ForeignOffice|EuropeanOffice'}.
Configure the Interact+ connector service workflow
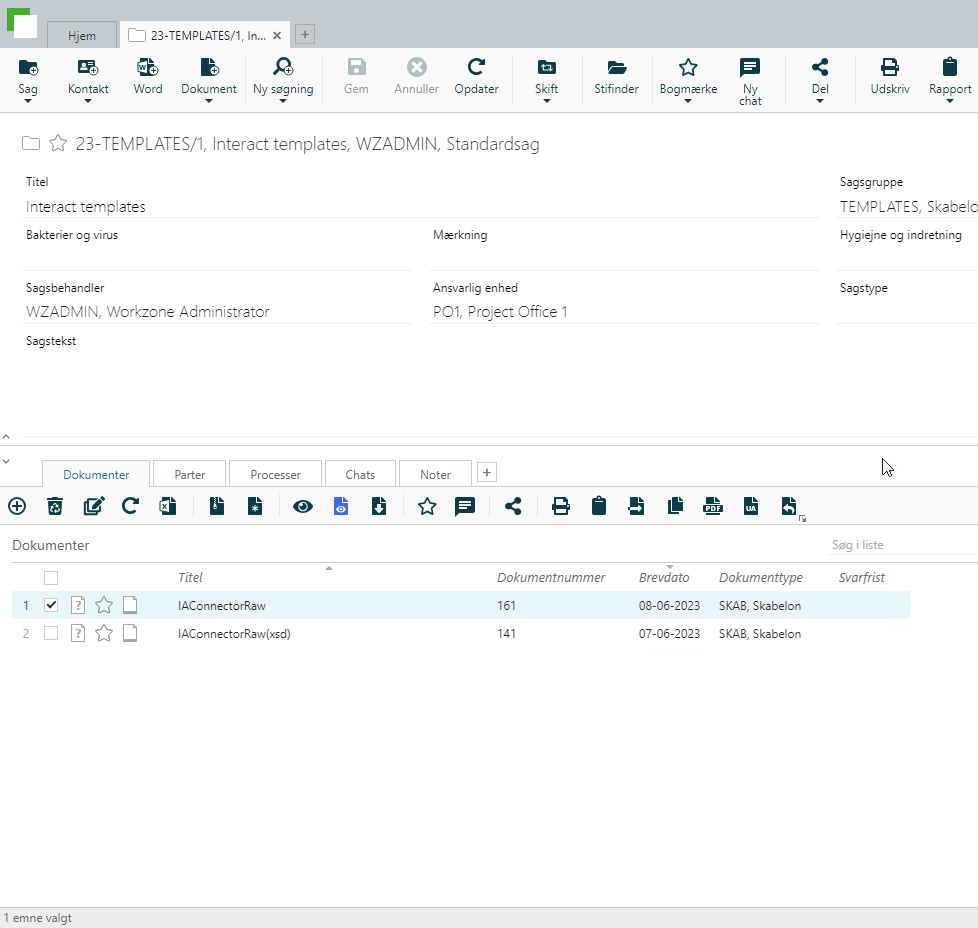
Set up template files in WorkZone Client
-
Create a case in WorkZone Client.
-
Import the XSLT transformation file.
-
Import XSD schema file.
Configure the service workflow in WorkZone Configurator
-
In WorkZone Configurator, go to Process > Service workflows.
-
Create a new service workflow of the type Interact+ connector and fill in the fields. See Configure an Interact+ connector service workflow for descriptions of each parameter.
-
From the created case, add the document number from the transformation file (XSLT) in the CustomTransformationRecordId field.
-
From the created case add the document number from the schema file (XSD) in the CustomSchemaRecordId field.