Database setup
With WorkZone Archive, all your historical data is stored within the same database as separate schemas. This eliminates the need to maintain multiple historical databases. When your organization needs to archive current database entries—such as during a period change in compliance with Danish Archiving legislation—you export the production database to a temporary database and then datapopulate it and transform it into a schema, which you can then import back to your production database. This page provides an example scenario where historical data is archived as a database schema, referred to as an archive period schema.
Creating a New Period Archive Schema
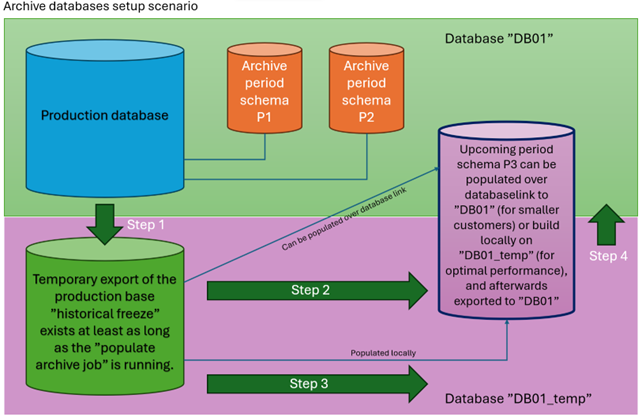
In this example, the production database is named “DB01” with two existing period archive schemas (P1 and P2). We will create a new archive period schema called “P3”.
Step 1: Upgrade and Export/Import
Upgrade the Production Database: Ensure that the production database is upgraded to a WorkZone version that supports WorkZone Archive. If you do not do this now, you must do it after you have exported the database.
Export the Database: Export the database to a new temporary database. In the illustrated example above, the temporary database is named “DB01_temp”. If the production database was not upgraded before you exported it, the temporary database should be updated now. This is to get the latest definitions from the WorkZone Archive data dictionary.
Step 2: Create the New Archive Period Schema
Create the P3 Schema: Execute the relevant scripts to create the new Archive P3 schema. This can be done in “DB01_temp” after upgrading, ensuring fast data population before exporting to “DB01”.
Alternative Creation: Alternatively, create the P3 schema directly in the upgraded production database “DB01”. If data volumes are small, populate the P3 schema over a database link from “DB01_temp” to “DB01” (link named “WZ_ARCHIVE_DB_LINK”).
Step 3: Populate the New Archive Period Schema
Populate P3 Schema: Execute the relevant scripts to populate the new Archive P3 schema.
Step 4: Export/Import the New Period Schema
Final Steps: Depending on the chosen path in Step 2, this step may be skipped if the P3 schema was created and populated in “DB01” using a database link.