Work with documents
In WorkZone, a document refers to a file that is added to an entity, which is often a case or another document. When a document is located on a case, it is referred to as a case document. A document that is placed on another document is called a supplementary document and the document that the supplementary document is placed on is referred to as the main document.
Add a document to a case
You can upload an existing document from your file system to a case, or create a new document using the Omnidocs template used by your organization.
Upload an existing document from your file system
- Drag and drop the needed document from your file system to the case.
- Click Yes in the confirmation dialog.
Create a new document from an Omnidocs template
- In the top right corner, click
 New document.
 - Select Create from template and log in to Omnidocs.
- Select a template and click Next.
- Before you click Create, you can fill out optional information, such as a new document title.
Add a new Word, Excel, or PowerPoint document
- In the top right corner, click New document.
- Select the document type that you want to create.
- A new, untitled document of the selected type is added to the case and opens in the corresponding program, where you can name it and start editing right away.
View a case document
You can view documents to check their most important details without opening the document page.
- In a list of documents, click the title of a document that you want to view. The preview pane will open where the document is rendered as a PDF for you to read.
- See a PDF rendition of the selected document.
- Open the document in WorkZone
- Open the document in a corresponding app or download it, depending on the file type.
- Move the document to another case, copy the document to another case, move the document the recycling bin, or make it a supplementary document.
From a document preview, you can:
Open a document page
The document page contains a PDF rendition of the document and displays information and related supplementary documents and parties. To open a document page:
- Select a document, and click
 Open. The page for the selected document will open.
 - Switch between the Document overview, and Activities tabs to view relevant details.
- Document overview: Here you can see a preview of the document, document information, supplementary documents, and related parties.
- Activities: In the Lifecycle section, you can see a chronology of all changes made to this document since it was created. For example, when and by whom this document was created or updated.
Open a document in a corresponding app
- Open a document in the preview pane, or open the document page.
- Click Open in and select the desktop option, for example Word (desktop). When you open a document in a desktop app, the document will become locked for editing by other users. See The document is locked for editing by another user and Edit a document that is locked by another user
Open a document in a web-based editor
- Your WorkZone administrator must first enable and configure your Office Online Server in WorkZone Configurator under Office > Office Online Server.
On a document page or from a document list, click Open in > Word (web). The document will then open in the corresponding web-based editor(such as Microsoft Office for the web), depending on the document type.
In this example, the WorkZone document is a Word document. The menu will show Excel (web) or PowerPoint (web) for Excel and PowerPoint documents.
Edit a WorkZone document in a web-based editor
To edit the content of a WorkZone document, click Open in > Word (web) and start making your changes. Your changes will be automatically synced to WorkZone. You must have write access to the document that you want to edit. If you do not have write access to the document, it will open in View mode.
In this example, the WorkZone document is a Word document. The menu will show Excel (web) or PowerPoint (web) for Excel and PowerPoint documents.
Co-authoring
It is possible for multiple users to simultaneously edit a WorkZone document that is open in a web-based editor.
The document is locked for editing by another user
Once a WorkZone document is opened in either a web-based editor or in a corresponding desktop app, the document will be locked for editing in the other editor version. When a document is locked for editing by another user, you can only open the document in View mode in the alternative editor version until the document lock is released.
If the document is locked for editing because it is open in a web-based editor, you can join the co-authoring session and make your changes in the web-based editor.
If the document is locked for editing because it is open in a desktop app, you can, for example, download a copy of the document and merge your changes when the lock is released. See Edit a document that is locked by another user.
Edit document details
You can edit document information from the preview pane, or from the document page.
Edit document information from the preview pane
- In a list, click title of a document. The preview pane will open.
- In the preview pane, click on a field to start editing it. Note that some fields will be locked for editing. This depends on your organization's configuration.
-
Make your changes, and click Save.
Edit document information from the document page
- Open the document page.
- In the Information pane, click on a field to start editing it. Note that some fields will be locked for editing. This depends on your organization's configuration. Note: You cannot edit the Document state, Created by, and Case fields in this way. To change the document state, see Lock or archive a document To edit the Case field, see Move a document to another case
-
Make your changes, and click Save.
Lock or archive a document
From a list
- Select one or more documents.
- If you have selected one document, click
 > Change state and then select
  Lock or
  Archive.
 - If you have selected more than one document, at the bottom of the list, select Lock or Archive.
From a document page
When you have a document page open, you can select Change state in the action group and then select ![]() Lock or
Lock or ![]() Archive.
Archive.
Move a document to another case
- Open the document page.
- In the top right corner, click
 >
>  Move. The Move document dialog then opens.
 - In the Move to case field, select an existing case to move the document to.
- Optionally, select the Archive document on new case check box if you want the document to be moved to the new case with the Archived state.
- Click Move.
Move (rejournalise) an archived document to another case
If you have the DEJOURNALADM access rights, you can move an archived document to another case. This will move the document to the selected case, and create a record on the original case, indicating where and when the document has been moved to.
- Open the document page.
- In the top right corner, click > Move. The Rejournalise document dialog then opens.
- In the Move to case field, select an existing case to move the document to.
- Optionally, add a Comment.
- Click Move.
Copy a document to another case
- Open the document page.
- In the top right corner, click > Copy. The Copy document dialog then opens.
- In the Copy to case field, select an existing case to create a copy of the document on.
- Optionally, select the Archive document on new case check box if you want the copy of the document to be created on the new case with the Archived state.
- Click Copy.
Change main document to a supplementary document
You can change a main document into a supplementary document, only if this main document does not contain any supplementary documents. If it contains supplementary documents, you must remove them, for example, by moving them under a new main document or changing them into main documents. Once the main document no longer contains supplementary documents, you can change it into a supplementary document.
- Open the document page page of the main document, or select the document on a list.
- In the top right corner, click >
 Change to supplementary document (or > Change to supplementary document from the list menu).
 - In the Change to supplementary document dialog, select the main document to change.
- Click Save.
View document lifecycle
The document lifecycle shows all changes that have been made to the document since it was created in WorkZone. For example:
- When the document was created in WorkZone.
- When the document details were updated or changed.
- Open the document page.
- Open the Activities tab.
- Navigate to the Lifecycle section.
Print case documents
You can select case documents on a case and generate a PDF file, which you can save on a case or on a local disk. The PDF file will include the selected documents and, optionally, meta data.
- Open the case page.
-
In the Documents list, click
 Print documents.
 - In the Print case documents dialog, the left-hand list shows the case documents that are available for print.
- Click
 to move the selected documents to the right-hand list, which shows the case documents that you have selected for print. Here, you can drag and drop the documents to place them in the order that you want them to appear in the PDF file.
 - Only documents from the right-hand list will be included in the PDF file.
- An
 arrow next to a document indicates that this is a main document that has one or more supplementary documents. Click the arrow to expand the list of supplementary documents. When you select to print a main document, all of its supplementary documents will automatically be included as well. You can deselect them manually, if needed.
 - Optionally: Under the drop-down, you can click Add all archived to move all main documents that have the Archived state with their supplementary documents (even if they are not archived) to the right-hand list.
- If needed, adjust settings for the PDF file:
- Print template: Select a template for the PDF file that is generated.
- A case with parties and documents: Include meta data of the case, documents and parties, and selected documents.
- Public Access, printout of the case documents: Include meta data of the case, documents and parties, and selected documents.
- Report without a cover page: Include selected documents only.
- Title: Specify a file name for the PDF file that is generated.
- Click Save on case to create a PDF file that will be saved on the same case, or click Print to save the PDF file on your local disk so you can print it later.
Add or remove contacts as parties on a document
Add contacts as parties on a document
- Open the document that you want to add parties to.
- In the Parties section, click
 Add parties.
 - In the Add parties dialog, you can search for the contacts you want to add as parties:
- Enter a text to search for in the Free text field.
- Select the type of contact that you want to search for in the Type field, for example Person (with CPR). This way you can narrow the scope of your search to only include contacts of the selected type.
- Click Search. The search results are displayed in the left column.
- Select one or more contacts and click . The selected contacts will move to the right column.
- You can select a role for the contact in the Role field, for example Party or Recipient.
- Click Save. The added contacts are displayed on the Parties list on the case.
Remove parties from a document
- Open the document that you want to remove one or more parties from.
- Select the check box next to the party that you want to remove.
- If you selected one party, click and then
 Remove to remove the party
 - If you selected multiple parties, click Remove at the bottom of the Parties list to remove the parties.
Create contacts as parties on a document
- Open the document that you want to add parties to.
- Click Add parties.
- In the Add parties dialog, click Create contact, and then select the type of contact you want to create.
- In the Create contact dialog, enter the contact information, and click Save. The new contact appears in the Add parties dialog.
- Click Save. The new contact is added on the Parties list on the document.
Edit a document that is locked by another user
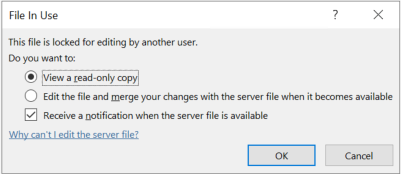
You can edit a Microsoft Word, PowerPoint, or Excel document that is being edited by someone else. In WorkZone, a pencil will appear on the document icon (for example, ![]() for a Word document) indicating that another person is editing the document. When you open the document, a Microsoft message will inform you that the file is locked for editing by another user.
for a Word document) indicating that another person is editing the document. When you open the document, a Microsoft message will inform you that the file is locked for editing by another user.
Edit the document
- In the File in Use dialog, select relevant option:
- View a read-only copy: You can view but not edit the document.
- Edit the file and merge your changes with the server file when it becomes available: You can edit the document. When the document is released (no longer locked), you changes will be merged into the server version of the document.
- Optionally, select the Receive a notification when the server file is available check box to receive a notification when the document is no longer locked for editing.
- Click OK.
You can find more information in the Microsoft help for Word, PowerPoint, and Excel.