Configure SmartPost to use next generation Digital Post (NgDP)
In this article, you can read about how to upgrade SmartPost to use NgDP instead of e-Boks in a test environment. The SmartPost integration to NgDP supports both sending and receiving messages.
To upgrade to NgDP, you need to do the following:
- Change the e-Boks dispatcher.
- Change the e-Boks material.
- Configure mail boxes for incoming messages.
To upgrade an installation from e-Boks to NgDP:
- e-Boks Push Service must be installed. See Install and configure WorkZone e-Boks Push Service.
- The SmartPost eBoks integration must be working.
- A combined sender and receiver system must be configured in the Agency for Digitisation's administrative portal named Administrativ Adgang portal. You access the Administrativ Adgang portal using the link: https://admin.test.digitalpost.dk/login.
- If you use SmartPost to receive incoming emails and have configure mailboxes, you must create the contact hierarchy in the Administrativ Adgang portal.
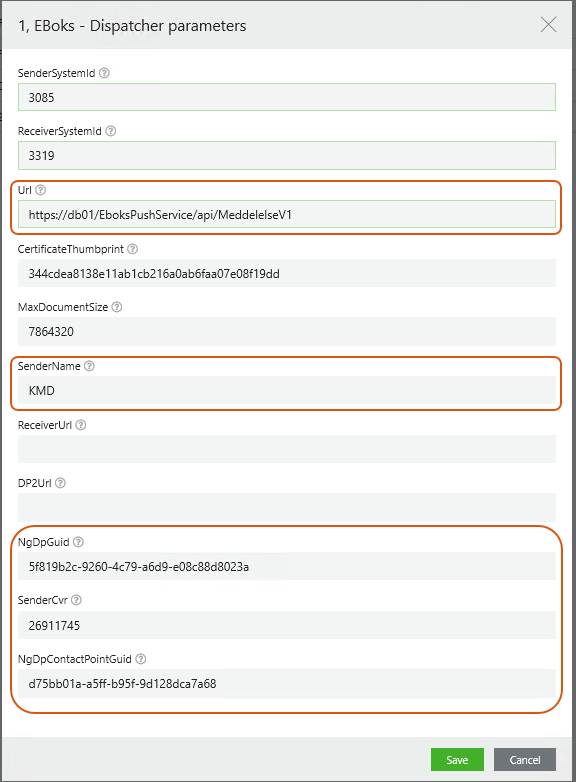
Change the e-Boks dispatcher
- In WorkZone Configurator, go to Process > Process dispatchers.
- Point to
 next to the e-Boks dispatcher, and click
  Edit dispatcher parameters.
 - In the URL field, change the endpoint that points to e-Boks to the local installation of the e-Boks push service.
Change the URL from:
https://demo-rest.e-boks.dk/v1.svc
to:
http(s)://<database>/EboksPushService/api/MeddelelseV1.
- Fill in the following fields:
- SenderName—the name of your organization.
- NgDpGuid—the GUID of your sender/receiver system. You can see the GUID in the ID field on the Afsender/modtagersystem (Sender/receiver system) page in the Administrativ Adgang portal.
- SenderCvr—the CVR number of your organization
- NgDpConactPointGuid—your organization's contact point for replies to messages. Fill in this field if you have configured the e-Boks material to allow replies to messages. See Configure an e-Boks material. You can see the GUID of your organization's default reply point in Agency for Digitisation's administrative portal, Administrativ Adgang on the Kontaktstruktur (Contact hierarchy) page.
See also Configure dispatchers.
NgDP uses the material ID from e-Boks but the configuration that was previously done in the e-Boks Administration Portal is now done in WorkZone.
- In WorkZone Configurator, go to Process > e-Boks materials.
- Create a new material or edit an existing material. The following fields are specific to NgDP:
- Permit users to reply— Turn on to allow recipients to reply to messages.
- Messages are mandatory for the receiver—Turn on if the sender is allowed to send mandatory messages.
- Messages are regarded as from a authority—Turn on if the sender is a public authority.
- Messages are legal notifications—Turn on if the sender is allowed to send legal notifications.

See also Configure e-Boks materials.
Configure mail boxes for incoming messages
You set up the e-Boks message handler workflow in the same way as before. See Configure an e-Boks Message Handler service workflow. You can specify a default case to receive the replies by specifying a case in the DefaultCaseNo field.
If your organization has multiple mailboxes that are mapped to specific, you must fill in a new NgDP guid field with the GUID of the corresponding contact point for each mailbox mapping that have been configured. You can see the GUID in the ID field on the Kontaktstruktur (Contact structure) page in the Administrativ Adgang portal.

See also Handle e-Boks messages sent to subunits.