Updated: 12/03/2025
List actions
This section describes the basic tasks associated with the lists. See also Save and reuse search lists.
Open a list in a new tab
- On the Home tab, select the list you want to open in a new tab.
- In the Main ribbon, click
 Open in new tab or click the mouse-scroll button.
Note: You can pin a list to the browser the same way a detail page can be pinned. See Pinning detail pages for more information.
Open a detail page of an item from a list
If you open more than one item from a list, the detail page of each item (for example a case, document, or contact) will open in a new tab. This makes navigation easier and gives you a quick overview of each opened item.
- Open a list that contains the item whose detail page you want to open.
- Double-click the item. Its detail page will open in a new tab.
Add / Remove columns in a list
Lists display the most commonly used data in the columns but you can adjust which data is displayed in the list columns by adding or removing extra columns to the list.
To add / remove columns to a list
- Open a list and right-click in the columns of the list to open a drop-down list of all available columns1.
- In the drop-down list, select the column you want to display in the list. A column that is not selected will not be displayed from the list.
1You can select More... open the Select columns form. The Select columns form enables you to fine-tune the list columns as well as define the individual column width in pixels and reset the list columns, clearing all list column customizations.
Work with multiple list items
When you work with lists, you can apply some of the ribbon actions to multiple selected items in a list. See About ribbon buttons.
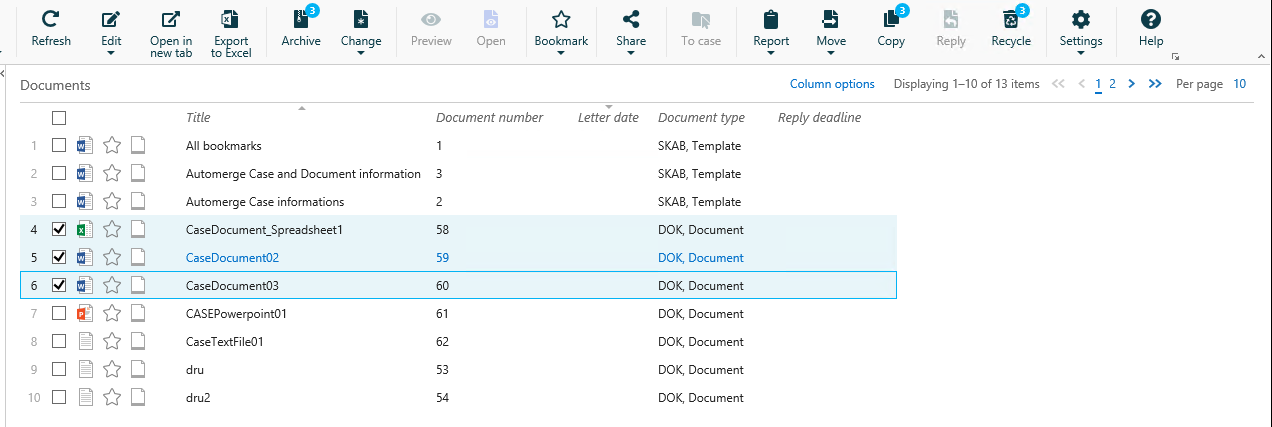
- From a list, select the items that you want to work with. The counter on the ribbon buttons displays the number of selected items you can apply the function of each button to.
- Click a ribbon button or right-click on a list item and select an option from the list menu to apply this function to the selected items.
Note: You can view and edit up to 50 list items as a time. If you have the MULTIEDIT access code, you can view and update up to 500 list items at a time.
Edit one or more items from a list
You can edit meta data on an list item, foe example changing the case handler of a case directly on the Open cases list in the navigation pane.
Edit a single item in a list
- In a list, select the item that you want to edit.
- In the main ribbon, click
 Edit or right-click the list item and select Edit
 - Make your changes by entering or selecting a new value.
- Click Save.
Edit multiple items in a list
When you work with lists of cases or documents, you can edit some of their meta data directly from a list.
- For multiple selected cases you can edit case handler, case category, responsible unit, acting unit, state, case type, planned closing date, closed date, read access, retention code, and default document classification. You can also edit case information and date types.
- For multiple selected documents you can edit document type, document group, acting unit, case handler, responsible unit, reply date, read access, retention code, and classification. You can also edit document information and date types.
- For multiple selected contacts, you can only edit contact information and date types.
- You can edit the reference type from lists that display document references and case references.
Tip: When you select multiple cases or documents and edit them from a list, your selection remains after you have completed editing and you can continue editing the same items without having to re-select them.
Note: You can only apply one new value to multiple items. If you need to apply multiple new values to multiple items, for example if you need to change the Planned close as well as the Closed fields for multiple cases, you must first update the Planned close fields and then update the Closed date for all the selected cases.
- Open a list that contains multiple items you want to edit.
- Select the items you want to edit and in the main ribbon, click Edit or right-click the list item and select Edit.
- Select the field you want to update from the drop-down list to open the Edit form. The selected field will be displayed in the Edit form title.
- In the Edit form, enter the new value for the selected field and click Save.
If the cases, documents or contacts selected for mass editing contain hidden custom fields (custom fields that have been created but not added to the respective detail pages), you can enable these fields for mass editing.
- Open a list that contains multiple items you want to edit.
- Select the items you want to edit and in the main ribbon, click Edit > Enable properties to edit to open the Configure ribbon form. You can also right-click the list item and select Edit > Enable properties to edit. Finally, you can click
 Configure ribbon in the main ribbon to open the Configure ribbon form.
 - In the Configure ribbon form > Edit menu, select the dimmed custom fields you want to enable for mass editing, displaying the selected fields in the Edit menu. You can also clear fields to hide them from the Edit menu.
- Click Save to save your changes to your personal configuration.
- Open a list that contains multiple items you want to edit.
- Select the items you want to edit and in the main ribbon, click Edit or right-click the list item and select Edit.
- In the drop down list, select Information to open the Edit Information form.
- In the Edit Information form:
- In the Information Type field, select the information type field you want to edit.
- In the Information Value field, enter the value for the selected information type field.
- In the Edit field:
- Select Add to add the selected information type and value to the Information tab in the item's detail tab.
- Select Remove to remove the selected information type field and value from the Information tab in the item's detail tab. Only the field type and value that correspond exactly to the information type and value you entered in the Edit Information form will be removed from the selected items.
- In the Confirm dialog, click Yes to confirm your choice (Add or Remove).
- Open a list that contains multiple items you want to edit.
- Select the items you want to edit and in the main ribbon, click Edit or right-click the list item and select Edit.
- In the drop down list, select Date to open the Edit Date form.
- In the Edit Date form:
- In the Date Type field, select the date type field you want to edit.
- In the Date Value field, enter the date for the selected date type field. You can click the Open Calendar icon in the Date field to open a calendar to help you select a valid date.
- Click Edit and...
- Select Add to add the selected date type and value to the Dates tab in the item's detail tab.
- Select Remove to remove the selected information type field and value from the Dates tab in the item's detail tab. Only the date type and date that correspond exactly to the date type and date you entered in the Edit Date form will be removed from the selected items.
- In the Confirm dialog, click Yes to confirm your choice (Add or Remove).
- Open a list that contains multiple items you want to edit.
- Select the items you want to edit and in the main ribbon, click Edit or right-click the list item and select Edit.
- In the drop-down list, select:
- Contact references (for Contacts).
- Parties (for Cases or Documents).
- The Edit Parties or Edit contact references form is displayed depending on whether you are editing cases and documents or contacts.
- In the Edit parties or Edit contact references form:
- In the Type field, select a type to filter the contacts to be added or removed.1
- In the Party role field, select a role to filter the contacts to be added or removed.1
- In the Party field, select the name or ID of the contact to be added or removed.
- In the Edit field:
- Select Add to add the party or contact reference to the contacts selected in the list.
- Select Remove to remove the party or contact reference from the contacts selected in the list.
- In the Confirm dialog, click Yes to confirm your choice (Add or Remove).
1 You do not need to filter the contacts by type or role, but filtering can help you select the contact to add or remove by reducing the list of contacts in the Party field.
View a list item in the preview pane
You can view additional information on a list item in a preview pane, for example you can view a document from the Documents list on the case detail page in the preview pane.
Important: PDF documents can be displayed in the preview pane from the detail page only.
- Open a list, for example Documents.
- Select a document.
- In the main ribbon, click
 Preview or right-click the list item and select Preview to display the lists of parties and supplementary documents in the preview pane.
View supplementary documents
You can expand a main document to view its supplementary documents in the document list. To do this, click the small black triangle on the left-hand side of the desired document. You can see the following information about each supplementary document:
- File type shown by the icon
- Document number
- Document name
To view all information about a specific supplementary document, double-click its name. The document detail page will appear in a new tab.
View child cases
You can expand a parent case to view its child cases in the case list. To do this, click the small black triangle on the left-hand side of the desired case. You can see the following information about each child case:
- Case name
- Case number
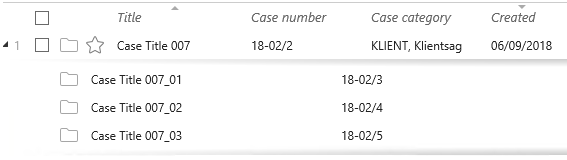
To view all information about a specific child case, double-click its name. The case detail page opens in a new tab.
Child cases of a child case are not displayed in this list.
Export a list to Excel
You can export any list from WorkZone Client to Excel and have all information about the items of this list automatically inserted into an Excel document in the same order and with the same column names as in WorkZone Client.
Note:
- You can edit the exported Excel document (for example to create a report) in the same way as you would edit any other Excel spreadsheet. However, the changes you make in the Excel spreadsheet will NOT be saved in WorkZone Client.
- You can get the latest version of an exported list and its items in WorkZone Client at any time by exporting this list anew.
Export a list to Excel
The first time you export a list from WorkZone to Microsoft Excel, you must set up your Excel connection.
To set up the Excel connection, you must define the privacy level for your current spreadsheet as well as for the actual connection used to integrate Excel with WorkZone.
- Private: Your spreadsheet and connection will not be able to communicate with each other or other spreadsheets.
- Organization: Your spreadsheet and connection will only be able to communicate with other spreadsheets with the Organization privacy level.
- Public: Your spreadsheet and connection can communicate with all other spreadsheets.
Once you have set up your connection, you only need to define the privacy level for the current spreadsheet the next time you export WorkZone data to Excel.
- Select a list that you want to export to Excel.
- In the Main ribbon, click
 Export to Excel to open a new Excel spreadsheet containing the information from the selected list items , exported in the same order and with the same column names as in WorkZone Client.
 - In the top bar of the Microsoft Excel spreadsheet, click Enable Editing and then Activate content to enable the excel spreadsheet to be updated with data from WorkZone.
- In the Privacy level form, define the level of privacy of your data for the current spreadsheet to start data transfer from WorkZone to the spreadsheet.
- You can work in the Excel spreadsheet and save it locally.
Tip: In Microsoft Excel, click Data > Queries and Connections to open the Queries and Connections panel to see the progress of the data transfer from WorkZone in the WorkZone OData connection.
Update an exported list from Excel
You can refresh an exported list in Excel and get the latest version of this list in WorkZone Client.
- Open the Excel document with an exported list.
- On the Data tab, click Update all in the Queries and Connections group.
- If you have edited any column labels, your changes will be overwritten with the column labels from WorkZone.
Tip: You can protect your changes to column labels by editing column labels in the query used to extract WorkZone data and in this way prevent WorkZone form updating your column labels when updating the data in the spreadsheet.
You can filter any list to, for example, view a subset of its content or find a specific item. You can apply a filter to one or more columns of a list. When a list column is filtered, the column heading is displayed with a yellow overlay.
The applied filter will automatically be reset when you open a new list. You can save your list filter in the your current configuration by selecting the Save filter check box when you create the filter. All saved list filters will be removed if you reset your configuration which also restores the default configuration. If you do not want to reset the entire configuration, you can reset a list filter by removing all filter criteria and saving the filter.
The applied list filters are saved in your private configuration and cannot be distributed as part of a WorkZone configuration.
- Open a list you want to apply a filter for.
- Point at the name of the column you want to filter. The column filter icon
 is displayed.
 - Click the column filter icon to open the filter dialog.
- In the filter dialog, click the empty field to open a drop-down list and a filter criteria. If you know the name of the criteria, You can enter the name to automatically search the drop-down list. To add more filter criteria, click the field again and repeat.
Depending on the column type, you can select filter criteria as date ranges, free texts, or standard values such as@Me,@My unit,@Empty, or@Filled in. - If you want to save the filter in your configuration, select the Save filter check box.
- Click Apply to apply the filter and close the filter dialog.
You can reset any list filter, removing all list filters from the list. If you have several lists columns, each with its own filter, all filters will be removed.
If you want to remove a list filter from one column but keep list filters applied to other list columns, you must edit the list filter you want to reset and remove all filter criteria from that list filter only.
- Open a list you want to remove a filter from.
- Click on the column filter icon
 to open the filter dialog.
 - In the filter dialog, click Reset All Filters to remove all list filters from the list and close the filter dialog.
If you want to remove only some of the values from your list filter you must:
- Open a list you want to change the list filter for.
- Click the column filter icon to open the filter dialog
- In the filter dialog, click the X in front of the values you want to remove.
- If you want to save the filter in your configuration, select the Save filter check box.
- Click Apply to your save your changes and close the filter dialog.