Updated: 27/06/2024
Register a document
You can register a document by using the Document Registration pane. To do this, fulfill the needed fields and click Save on Case.
Document information
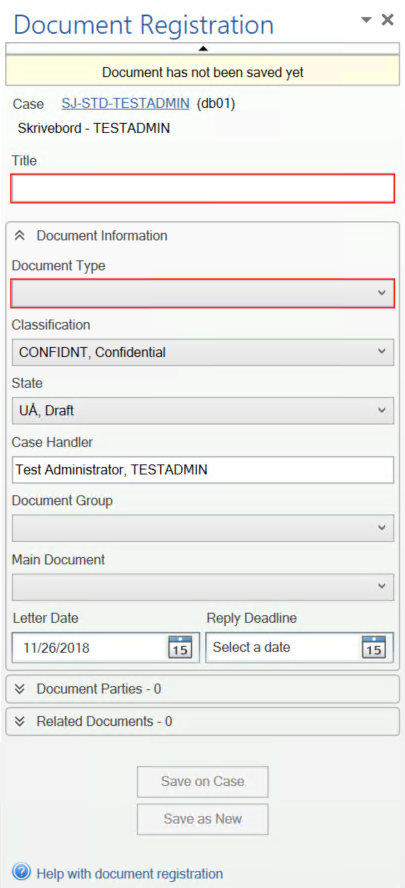
- Title – Enter title of the document.
- Document Type – The document type indicates whether the document is, for example, incoming, outgoing, or internal.
- Classification – Classification orders and prioritizes data based on its sensitivity. By default, classification code is inherited from the selected case, but you can change it in this field. Note that supplementary documents inherit classification code from their main documents.
Important:
- Classification on the unsaved document is updated every time you change its main document or case.
- Classification on the saved documents is not automatically updated when you change classification on the documents' case or main document.
- State – Document state shows what you can do with the document: who can see and edit it, and what can be edited. The document state is reflected in the document's life cycle.
- Personal draft – UP. Can be viewed, edited and deleted by the creator only.
- Draft – UÅ. When you save a document as a draft, you and other people in your department or organization can edit the document in its native program.
- Locked document – UL. The document itself cannot be edited by anyone, but document information can be edited by anyone.
- Archived – ARK. The document itself cannot be edited by anyone, but document information can be edited by anyone. To edit the document information, you need to open the document in WorkZone Client. Once saved, you cannot revert the document state to draft.
- Case Handler – Responsible contact for the document. By default, this is the contact who created the document. To assign another contact, remove the contact's name and start typing the required contact's name.
- Document Group – Select the group to which the document belongs, for example, Decision, Confirmation, Consultation.
- Main Document – If your document is a supplementary document, select a main document.
- Letter Date – Click the calendar
icon
 to change the letter date. Its default value is the current date.
 - Reply Deadline – Click the calendar
icon to type the date on which the document should be answered.
Manage document parties
Document parties are the contacts that relate to the document. The contact's role (for example, Sender, Author) defines how the contact relate to the document.
Add document parties
-
In the Document Parties panel, click the Add/Remove button.

-
Search for the required contacts:
- To find a contact by any word in its meta data, type free text in Search for the words and click Search.
- To display a specific group of contacts, select a filter from Search in.
- To display contact of a specific contact types, select a filter from Type.
- To search by name, address, or city, click Show more search options. Click Show fewer search options to collapse this section.

- In the lower left pane, select a party
and click the right-arrow button
 .
Repeat this step for each party you want to add.
.
Repeat this step for each party you want to add. - If necessary, specify roles for the parties.
- Click OK.

Remove document parties
- Select the document party you want to remove in the Current selection pane.
- Click the left-arrow button
 .
. - Click OK.
Manage document references
Document references are the documents that relate to the current document. The role (for example, Copy, Mail) defines how the documents relate to each other.
Add document references
-
In the Related Documents panel, click the Add/Remove button.
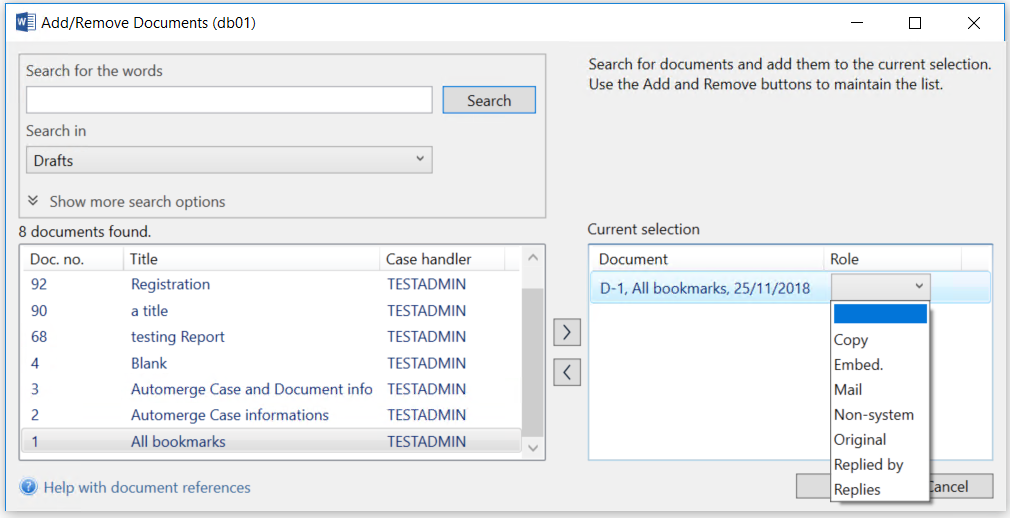
-
Search for the required documents:
- To find a document by any word in its meta data or body, type free text in Search for the words and click Search.
- To display a specific group of documents, select a filter from Search in.
- To search by document number, case handler, or title, click Show more search options. Click Show fewer search options to collapse this section.
- In the lower left pane, select a document
and click the right-arrow button .
Repeat this step for each document you want to add.
- If necessary, specify roles for the documents.
- Click OK.
Remove document references
- Select the document reference you want to remove in the Current selection pane.
- Click the left-arrow button .
- Click OK.