Multitenant installation
Please contact KMD WorkZone Support to get the necessary scripts that are used in the installation process.
Multitenant installation of WorkZone is only supported for WorkZone 2023.0.
You can run WorkZone in a multitenant environment on Windows. In this setup, multiple customers can run WorkZone on the same servers without impacting each other. Each customer installation has:
-
Specific domains.
-
Specific pools.
-
The same Active Directory (AD) but different service user.
-
Specific URLs.
-
Different users on services.
The installation of a new customer tenant is, to a large extent, automated by scripts.
The following prerequisites must be fulfilled to install WorkZone in a multitenant architecture:
-
Your organization must run on WorkZone 2023.0.
-
WorkZone must be a standard installation (without customizations).
-
You must have a web server or an agent server where WorkZone is already installed. WorkZone must be installed with Olympus.
-
Minimum Exchange Server requirement is Exchange Server 2016.
Unsupported modules
Some WorkZone modules are not supported in a multitenant installation:
-
WorkZone Mass Dispatch
-
WorkZone Configuration Management
-
WorkZone Export/Import
-
KMD Logic CVR Update
Add a new customer site to an existing server
To add a WorkZone site for a new customer, you need to run two scripts:
-
AddWorkZoneIISSite.ps1that sets up the IIS part of WorkZone Content Server, WorkZone Configurator, and WorkZone Client creates a WorkZone site. -
\AddWorkZoneAgents.ps1that sets up the standard WorkZone Content Server agents: free text indexing agent, the subscription agent, and the OCR agent.
Please contact KMD WorkZone Support to get the scripts.
The AddWorkZoneIISSite.ps1 script
The AddWorkZoneIISSite.ps1 script adds a site for each customer you want to add to the web server. A customer site may have multiple database bindings because a customer may have multiple databases, for example, a production database and several historical databases.
The AddWorkZoneIISSite.ps1 script uses the following parameters:
| Parameter | Description |
|---|---|
|
SiteName |
The name of the site that you want to create. |
|
Hosts |
A list of hosts that correspond to the ODBC data sources that you want to bind to this site. Important: If a customer has multiple databases, make sure to add the production database as the first host. This is important because there can be only one net.tcp binding for a site. The Net.tcp binding will only be available for the first host that is specified.
The FQDN name will be used if the Domain parameter is specified. |
|
Domain |
The domain name that will be used for the FQDN bindings for the site. The parameter is optional but if you run on HTTPS, it must be specified because it is used for creating the FQDN bindings. The FQDN bindings will be created as a combination of the hosts and the domain |
|
CertThumbs |
Certificate thumbnails that will be used in the bindings. You need to have a certificate thumbnail for each of the hosts. |
Get-Help .\AddWorkZoneIISSite.ps1 -Full which will show the parameters and descriptions of how to use them.To create a new site, run the AddWorkZoneIISSite.ps1 script:
.\AddWorkZoneIISSite.ps1 -SiteName "Customer2" -Hosts "db02","db03" -Domain "lmdom.local" -CertThumbs "b8ab029e4d3ef620cf435d81308a17ca2e4bdca7","b8ab029e4d3ef620cf435d81308a17ca2e4bdca7"
The script creates a customer site named Customer2, which is bound to the hosts db02 and db03. The domain name is lmdom.local and there are two certificate thumbnails; one for each of the hosts. In this example, the thumbnails are the same for both hosts.
When you have run the script, complete the following steps:
-
Set up ODBC data sources if you have not done it before running the script.
-
Manually restart IIS Admin Service or the entire web server after the script has been executed for the IIS to pick up the changes to "BackConnectionHostNames".
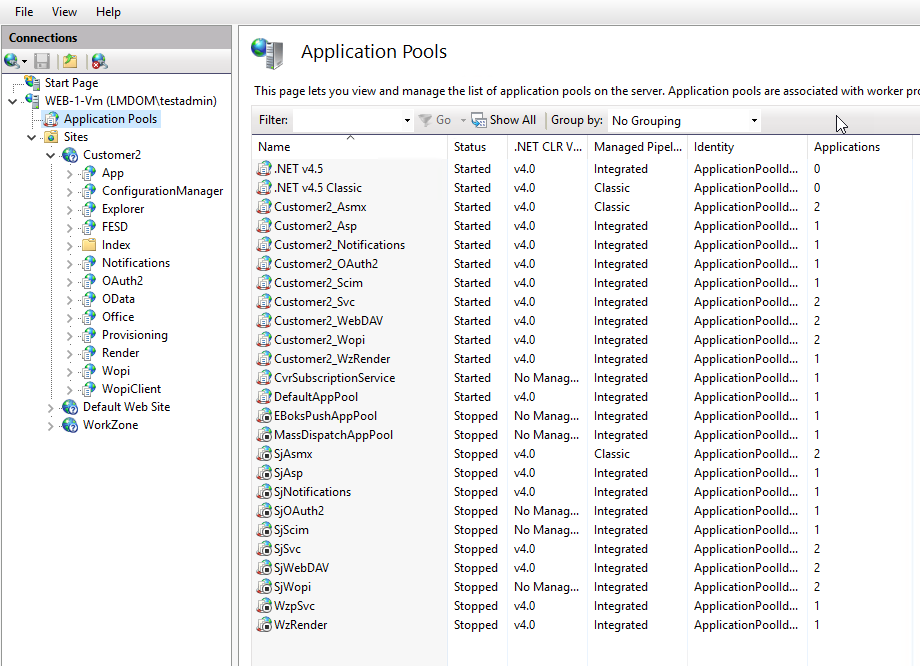
A new site Customer2 is created with applications and its own set of application pools that are prefixed with Customer2.
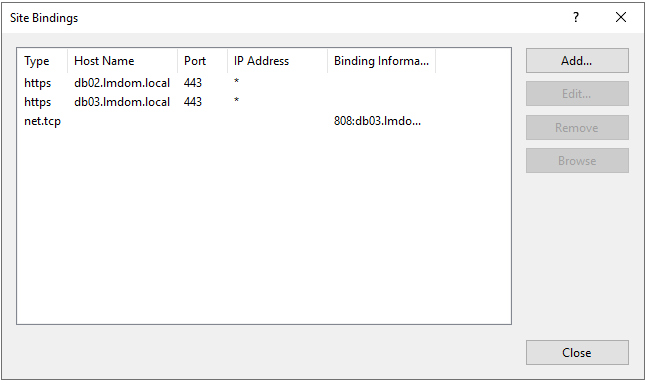
Bindings are set up for db2 and db3.
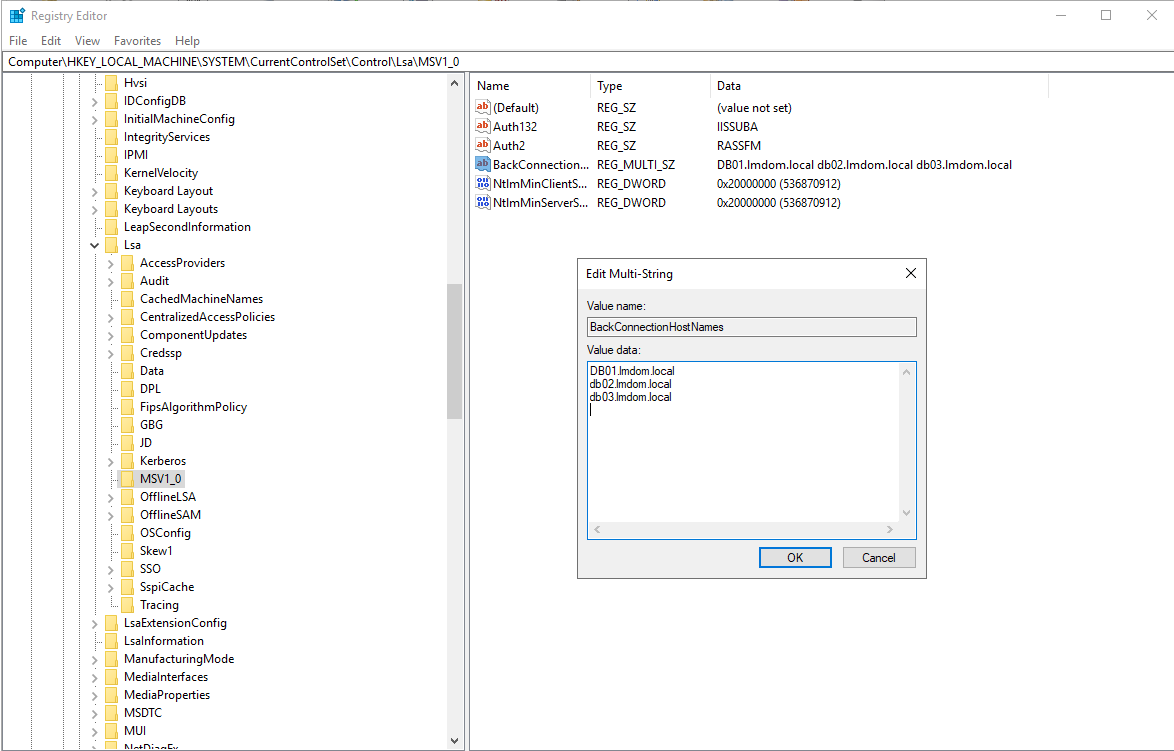
FQDN hosts are added to the "BackConnectionHostNames" registry value.
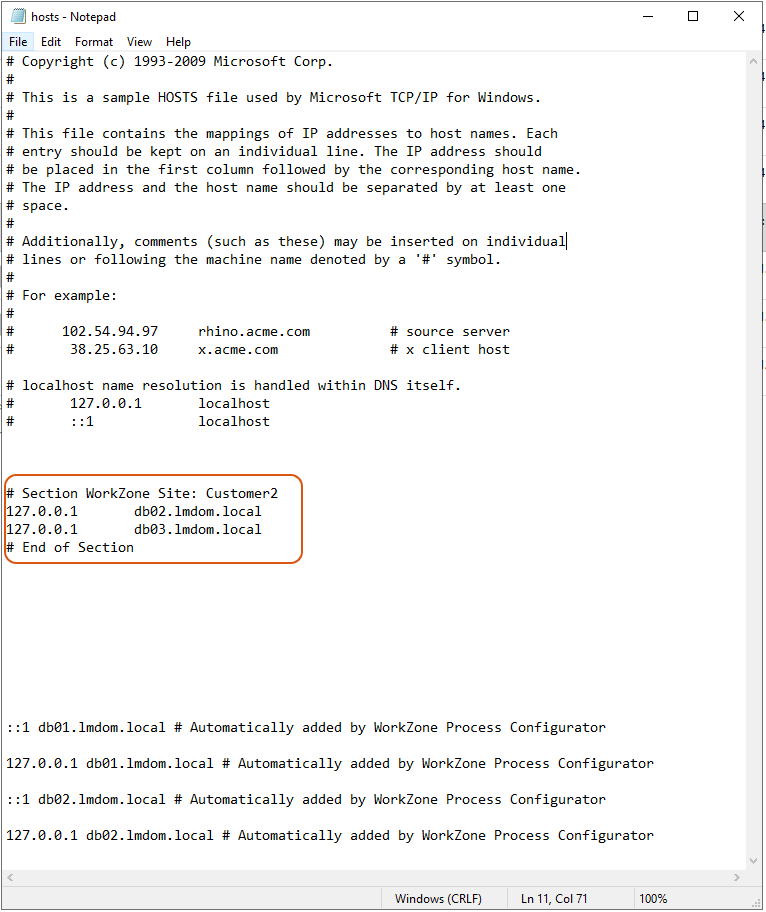
FQDN hosts are added with the 127.0.0.1 loopback address to the hosts file.
About importing documents from another WorkZone database
The script does not set up CORS for customers with more than one database for the customers to use the Import from WorkZone feature in WorkZone Client. The Import from WorkZone feature allows users to import a document from another WorkZone database into the current WorkZone installation. See Importing documents from other databases in the WorkZone Client User Guide.
To import a document from another database (typically a historical database), it must be possible to call the “historical” WorkZone OData Webservice from the production version of WorkZone Client. To allow this call in a multitenant installation, you need to set up CORS-AllowHosts on the web service in the OData web.config file. On the web server, there is only one web.config file. This means that if customers with multiple databases want to use the Import from WorkZone feature, you must specify all hosts for all customers in the web.config file.
The AddWorkZoneAgents.ps1 script
The AddWorkZoneAgents.ps1 script installs the WorkZone Content Server agents against the new databases that have been set up using the AddWorkZoneIISSite.ps1 script. The agents are:
-
Free text indexing
-
Subscription
-
Service COM OCR.
The AddWorkZoneAgents.ps1 script has one parameter Dsns, which is a list of the ODBC DSN's that the agents will be set up for.
Get-Help .\AddWorkZoneAgents.ps1 -Full which will show the parameters and descriptions of how to use them.To create the agents, run the AddWorkZoneAgents.ps1 script:
.\AddWorkZoneAgents.ps1 -Dsns "db02","db03"
The script installs new agents that correspond to each of the two databases db02 and db03.
Go to Services to see the agents. In this example, the agents are Scanjour Free Text Indexing db2, Scanjour COM OCR db02, Scanjour Subscription db02, and so on.
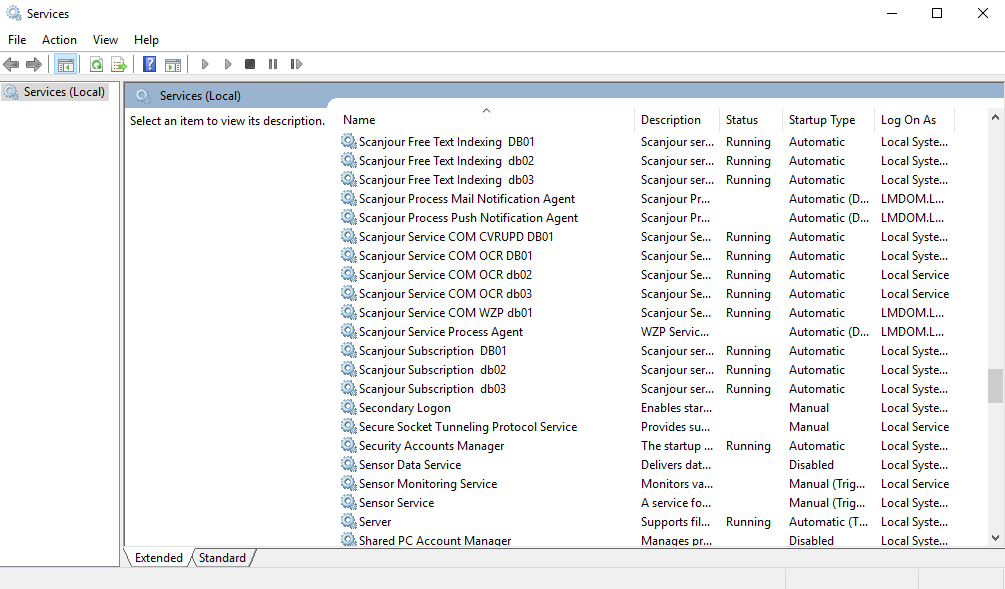
When you have run the script, start the services, or reboot the server and the services with start automatically.
Text indexes
Text indexes are not created automatically for new customers. To create them manually:
-
Open ScanSQL.
-
Connect to SJbase, and go to Text Indexes > Indexes.
-
Create missing indexes.
WorkZone for Office
Run DBconnect for each of the customer's databases to load database configuration files.
dbconnect /dbdsn=db02 /dbuser=sjsysadm /dbpassword=sjsysadm /serveruri=https://db02.lmdom.local /oauth2uri=https://db02.lmdom.local/OAuth2 /log=C:\Temp\log.txt
dbconnect /dbdsn=db03 /dbuser=sjsysadm /dbpassword=sjsysadm /serveruri=https://db03.lmdom.local /oauth2uri=https://db03.lmdom.local/OAuth2 /log=C:\Temp\log.txt
For more information about DBconnect, see Install WorkZone for Office server.
WorkZone Meeting
Download manifests
Download WorkZone for Office Meeting manifests for each of the customer's databases.
https://db02.lmdom.local/App/Office/WebAddins/outlook/meeting/MeetingManifest.xml
https://db03.lmdom.local/App/Office/WebAddins/outlook/meeting/MeetingManifest.xml
For more information about downloading manifests, see Download manifests.
Verify app links
Open the MeetingManifest.xml file for each of the databases and verify that the app link contains the name of the database, in this example db02 and db03.
<AppDomains>
<AppDomain>https://db02.lmdom.local</AppDomain>
</AppDomains>
Change display name
In the manifest file, edit the display name to see which database you are working with in the user interface. In this example, db02 and db03.
<DisplayName DefaultValue="WorkZone DB02">
<Override Locale="da-DK" Value="DB02 - WorkZone"/>
<Override Locale="de-DE" Value="DB02 - WorkZone"/>
</DisplayName>
Change ID
In the manifest file, change the <Id> node so that each database has a unique ID. You can, for example, change one character.
Example of an ID: <Id>9ab22f51-1787-4446-bc8c-4b55a006aeb1</Id>
Exchange Admin Center
-
Go to Exchange Admin Center.
-
Go to Organization > Add-ins.
-
Upload the changed manifests.
-
Add a new one and define users.
Assign different manifests to different customers
-
Go to Exchange Admin Center
-
Go to Recipients > Groups > Create distribution group. The distribution group should contain all users in the corresponding organization per customer.
-
Run the ConfigureAddins.ps1 script on the Exchange Server. See also instructions in the script. For example:
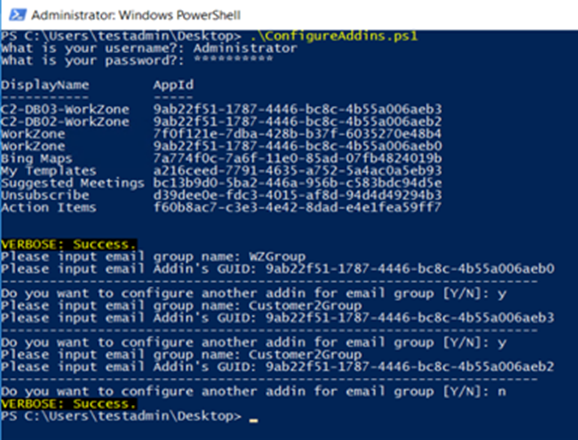
WorkZone PDF
Configure the databases
Run the WorkZone PDF Installer to configure the databases. In this example, db02 and db03.
For more information, see Perform database configuration.
Install WorkZone PDF Crawler
Run the WorkZone PDF installer on the agent server to configure WorkZone PDF Crawler for the databases. In this example for DB2 and DB3.
Install WorkZone PDF with PowerShell
You can install WorkZone PDF with a PowerShell script.
& '.\KMD WorkZone PDF.exe' -DbConfig -db:db02 -dbuser:sjsysadm -dbpassword:sjsysadm -oauth2:https://db02.lmdom.local/oauth2 -odata:https://db02.lmdom.local/OData -CrawlerClientId:PdfCrawlerdb02 -CrawlerClientSecret:Secretdb02 -Log:C:\temp\wzpdf02.log
& '.\KMD WorkZone PDF.exe' -DbConfig -db:db03 -dbuser:sjsysadm -dbpassword:sjsysadm -oauth2:https://db03.lmdom.local/oauth2 -odata:https://db03.lmdom.local/OData -CrawlerClientId:PdfCrawlerdb03 -CrawlerClientSecret:Secretdb03 -Log:C:\temp\wzpdf03.log
& '.\KMD WorkZone PDF.exe' -crawler -i -odata:"https://db02.lmdom.local/OData" -CrawlerClientId:PdfCrawlerdb02 -CrawlerClientSecret:Secretdb02 -l:"C:\Logs\Crawler02.log"
& '.\KMD WorkZone PDF.exe' -crawler -i -odata:"https://db03.lmdom.local/OData" -CrawlerClientId:PdfCrawlerdb03 -CrawlerClientSecret:Secretdb03 -l:"C:\Logs\Crawler03.log"
WorkZone Process
Before deploying WorkZone Process for a specific customer, make sure that:
-
A full functional WorkZone Process installation exists in the WorkZone site. See Install WorkZone Process.
-
An IIS website with the same name exists on the server. You can create with the WZCS deployment script named AddWorkZoneIISSite.ps1. See Add a new customer site to an existing server. The same database cannot be used on different websites.
-
WorkZone PDF and WorkZone for Office are configured for the customer's database on the customer specific site.
-
WorkZone Process 2023.0 Hotfix HF01 or newer is installed.
To deploy WorkZone Process for a specific customer in a multitenant environment, a new Customer parameter has been added to WorkZone Process Configurator. The value of the parameter corresponds to the name of the customer and the specific customer site. The name of the customer must be maximum 10 characters long and can only contain numbers at the end, for example Customer2.
When you have run WorkZone Process Configurator, the customer installation has:
-
A customer specific application pool.
-
Customer specific notification agents (Mail notification agent, Push notification agent, and Service process agent).
-
A customer specific push service.
-
A customer specific mail agent.
Customer specific application pool
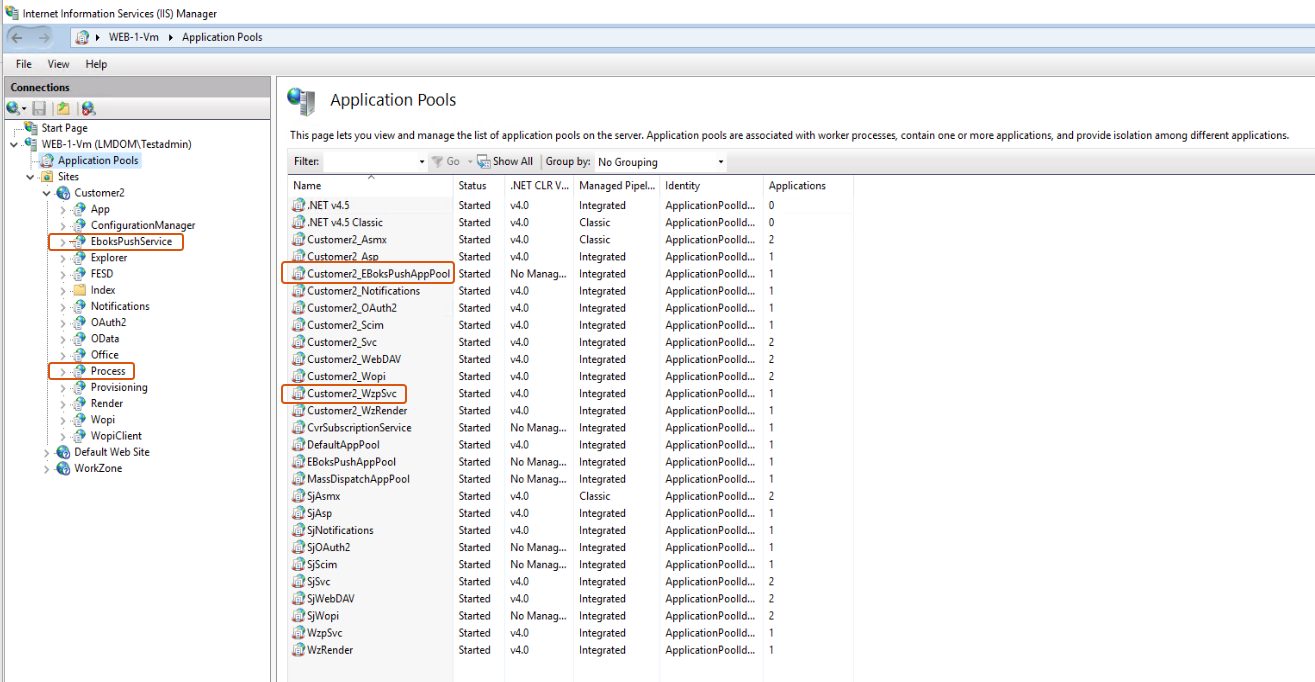
The name of the application pool will be <customer>_WzpSvc. The root folder of the web site will be C:\Program Files (x86)\KMD\WorkZone\Process\Web\<customer>__Services.
The root folder contains a web.config file with the customer specific configuration for the site. If needed, you can configure the MSMQ endpoint for the notification agents in this file.
Customer specific notification agents
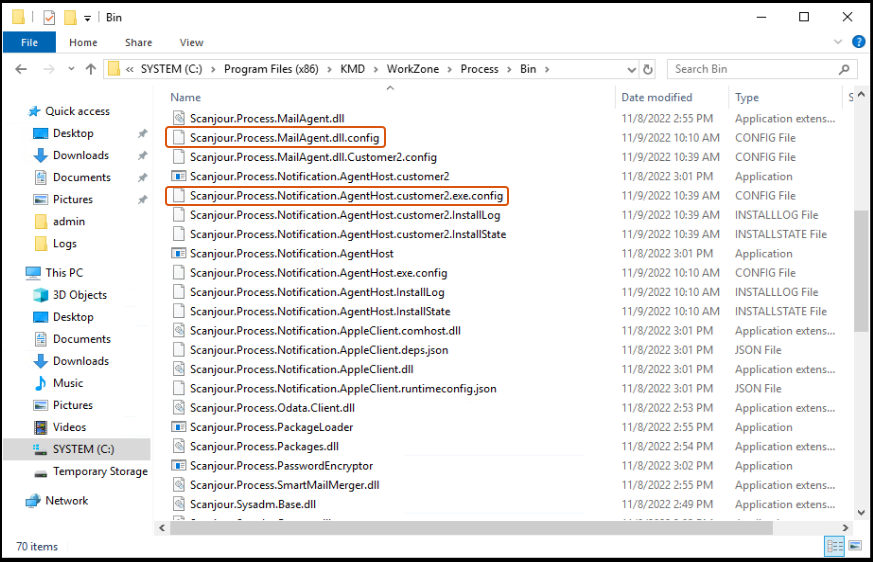
Notification agents are installed but only if the agent role is active for the customer. A host process exe and config file will be created for the customer in the process bin folder: C:\Program Files (x86)\KMD\WorkZone\Process\Bin. The config file contains customer specific configuration for all three agents. The configuration includes the customer specific MSMQ endpoints.
Scanjour.Process.Notification.AgentHost.<customer>.exe
Scanjour.Process.Notification.AgentHost.<customer>.exe.config
Mail notification agent
Name: Scanjour.Process.Notification.MailNotificationAgent.<customer>
Display name: Scanjour Process Mail Notification Agent (<customer>)
MSMQ end point: net.msmq://*/private/<customer>_MailNotificationAgentQueue
Push notification agent
Name: Scanjour.Process.Notification.PushNotificationAgent.<customer>
Display name: Scanjour Process Push Notification Agent (<customer>)
MSMQ end point: net.msmq://*/private/<customer>_PushNotificationAgentQueue
Service process agent
Name: Scanjour.Process.ServiceProcessAgent.<customer>
Display name: Scanjour Service Process Agent (<customer>)
MSMQ end point: net.msmq://*/private/<customer>_ServiceProcessAgentQueue
Customer specific push service
The customer specific push service is located in the folder: C:\Program Files (x86)\KMD\WorkZone\Process\<customer>_WorkZone.Dispatcher.Eboks.PushService.
The push service command line tool is also available in this folder.
An application pool named <customer>_EBoksPushAppPool is created and a web application <customer>_EBoksPushAppPool is created in the customer site.
Customer specific mail agent
When the mail agent service is installed, it will use the name of the database, not the name of the customer.
Name: Scanjour.Service.COM.WZP<database>
Display name: Scanjour Service COM WZP <database>
A configuration file is made in the process bin folder: C:\Program Files (x86)\KMD\WorkZone\Process\Bin\ that contains the customer specific configuration: Scanjour.Process.MailAgent.dll.<customer>.config
Run WorkZone Process Configurator
You can run WorkZone Process Configurator in normal and silent mode using the Customer parameter. If you run it in normal mode, the name of the customer will be shown in the title bar. In this example, the WorkZone Process will be configured for the customer site named Customer2.
Make sure that:
-
The Customer2_wzprocess user is created in AD.
-
Customer2_MailAgent@lmdom.local has an email address.
- In PowerShell, start WorkZone Process Configurator:
Scanjour.Process.Configurator.exe Customer='Customer2' - Select both the Web and the Agent roles.
- Configure the database connection, in this example for db02. The endpoint will be https://db02/.
When you have completed the configuration, new web sites and app pools that are prefixed with the customer name appear in the IIS manager.
A new web services folder that is prefixed with the customer name is created for the new Process web site.
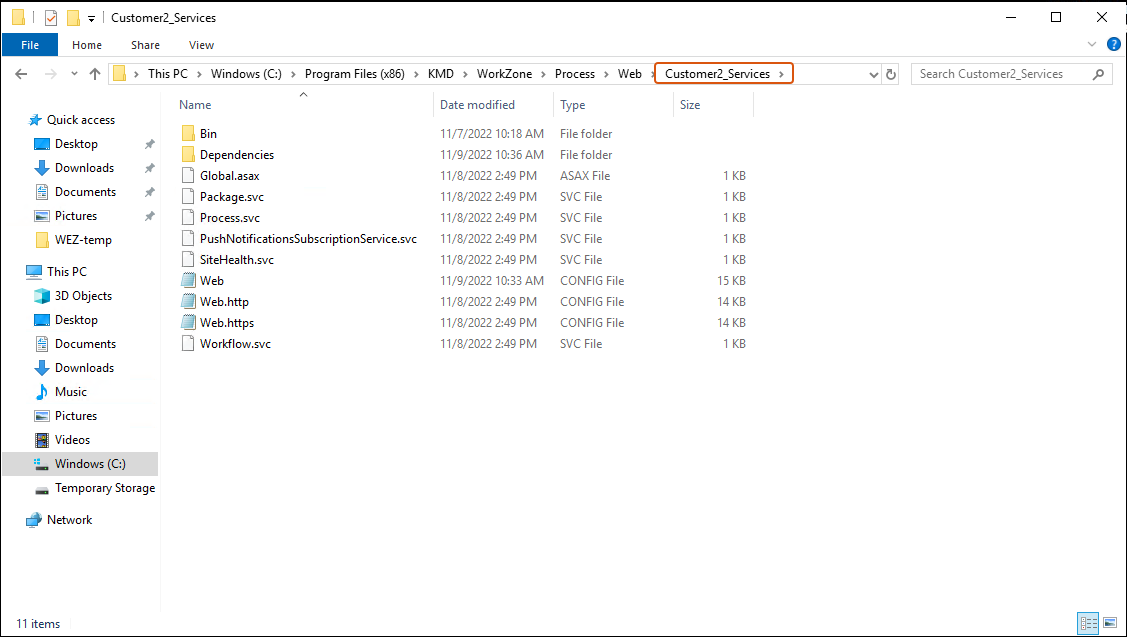
By default, the web.config file will use the localhost MSMQ endpoints for the notification agents.
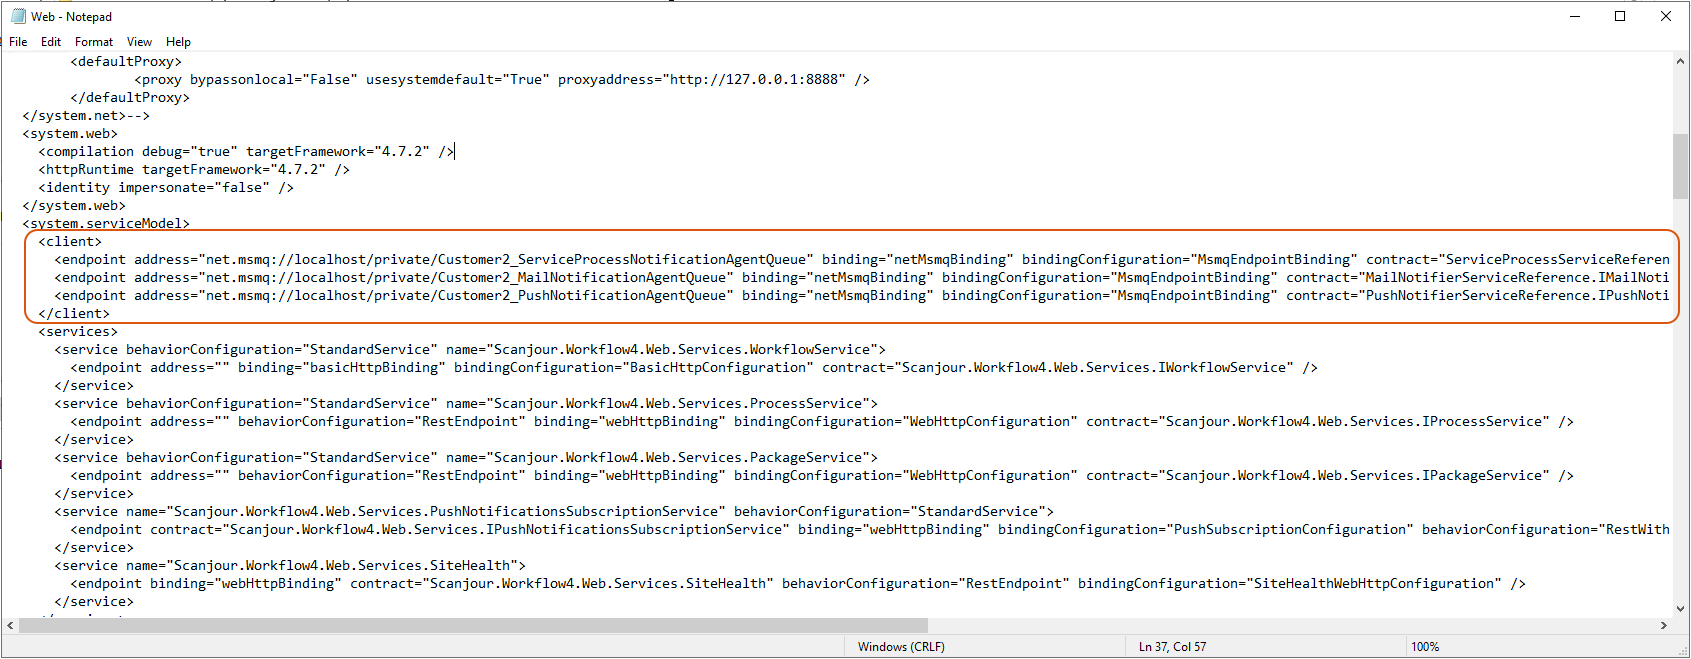
The e-Boks push service is installed in a new folder that is prefixed with the customer name.

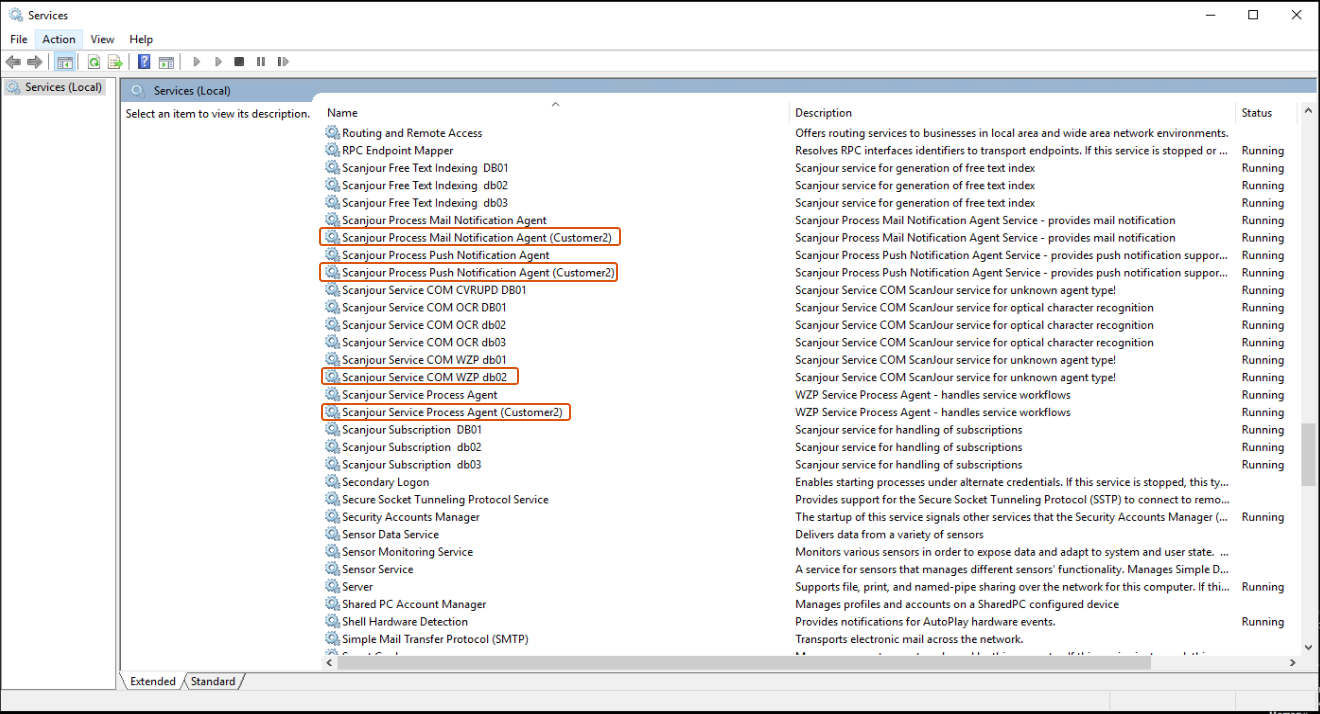
Four new customer specific services appear after the configuration.
The process\bin folder contains configuration files for the new customer specific services.
NgDP certificates
You can use specific NgDP certificates for specific customers.
-
Install all customers' certificates on the web server.
-
When you configure dispatchers for a specific customer, specify the thumbprint for the specific customer's NgDP certificate in the dispatcher parameters. See Configure dispatchers.
-
Apply access to the certificates to the application pool user (<customer>_WzpSvc) and to the specific customer's service user.
