Enroll WorkZone - Cloud Edition in Azure and set up SCIM provisioning
To enroll a new WorkZone instance in Microsoft Azure and set up SCIM (System for Cross-Domain Identity Management) provisioning users and groups from Entra ID to WorkZone, you must complete the following steps:
- 1. Associate UPN with WorkZone SCIMADMIN account
- 2. Generate secret token
- 3. Set up Microsoft Entra enterprise application
- 4. Configure automatic provisioning for the enterprise application
- 5. Assign users and groups to the enterprise application
1. Associate UPN with WorkZone SCIMADMIN account
To associate the UPN with the WorkZone SCIMADMIN account, run the following SQL against your organization’s WorkZone - Cloud Edition database.
update users set upn=(UPN) where user_name='SCIMADMIN'
Note that WorkZone technicians often carry out this task.
2. Generate secret token
You need to generate a secret token for use in your Entra ID enterprise application setup of the WorkZone provisioning.
-
Log on with the account from step 1.
-
Open WorkZone Configurator and go to Services > SCIM Provisioning.
-
On the SCIM Provisioning page, generate a token and copy it for use in theEntra ID Enterprise Application.
See SCIM provisioning in the WorkZone Configurator Guide.
3. Set up Microsoft Entra enterprise application
The setup of the Entra enterprise application depends on whether your WorkZone - Cloud Edition instance is publicly accessible or not publicly accessible.
WorkZone - Cloud Edition is publicly accessible
For WorkZone Cloud Edition setups where WorkZone is publicly accessible, you need to create a new non-gallery application for provisioning in your Azure tenant as shown below.
-
Enter a name of your own choice.
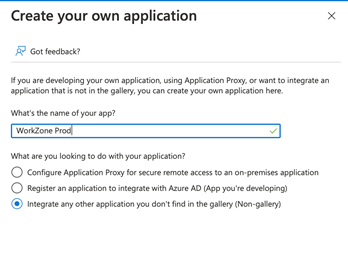
Please see the Microsoft article Integrate your SCIM endpoint with the AAD SCIM client for instructions on how to create a non-gallery application
WorkZone - Cloud Edition is not publicly accessible
If the WorkZone servers are not publicly accessible, for example when they are hosted in a lab and you want to test or develop in the lab, you will need to use the gallery app named On-Premises SCIM app, and additionally install a SCIM agent on the web server.
Please see the Microsoft article Microsoft Entra on-premises application provisioning to SCIM-enabled apps for instructions on how to create an on-premise application.
4. Configure automatic provisioning for the enterprise application
For both public and non-public WorkZone - Cloud Edition instances, you will need to configure automatic provisioning for the enterprise application that you created in step 3.
- Under Admin Credentials, enter the address to the WorkZone Provisioning SCIM web service. For example,
https://CUSTOMER.workzone.cloud/provisioning/scim. - Enter the secret token that you generated in step 2 in the Secret Token field.
- Click Test Connection to test the connection.
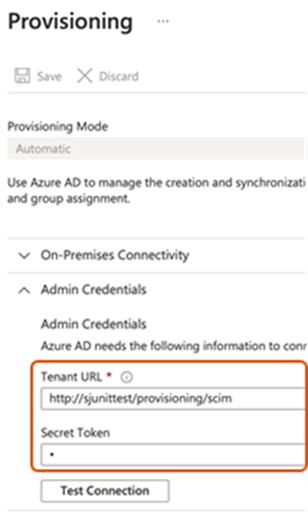
- Click Save.
- Reopen the Provisioning. The Mapping tab is now available.
- Under Mappings, leave the default settings for mapping users and groups as is to use the default mapping scheme that Azure offers. The default settings are displayName, ObjectId, and members. If you want to provision group descriptions from Entra ID to WorkZone or add guest users, you need to create additional mappings.
 Group description
The group description in Entra ID provides additional information about a group. The description can help you identify the group after the group has been provisioned to WorkZone and added to the AccessCodeDomain table as an access code. The group description in Entra ID is not part of the default mapping scheme, so you will need to add the mapping before you start the provisioning.
Follow the steps below to provision the group description from Entra ID to WorkZone:
- Select your "SCIM provisioning" app.
- Go to Provisioning and click Edit attribute mappings.
- Expand Mappings and click Provision Microsoft Entra ID Groups.
- On the Attribute Mapping page, click Add New Mapping.
- Select Description in the Source attribute field and urn:ietf:params:scim:schemas:extension:WorkZone:2.0:Group:description in the Target attribute field.
Guest usersIf you want to invite people that are not part of your organization to collaborate with you in WorkZone as guest users, you will need to do additional mapping. See Add guest users.
- Save the configuration.
5. Assign users and groups to the enterprise application
Assign the relevant users and groups to the application and start the automatic provisioning See Provision Entra ID to WorkZone.
Entra ID runs the provisioning service runs every 40 minutes. During the provisioning, users and groups are added to a set of staging tables in the WorkZone database, and a WorkZone - Cloud Edition application named SourceImport.exe creates the WorkZone users and assigns access codes to them based on the data in the staging tables.
It is recommended that WorkZone technicians set up a scheduled task that will run this application every 40 minutes.
The command line to use is:
SourceImport.exe /mode=AZURE_AD /db=<Name of WorkZone database>
For example:
SourceImport.exe /mode=AZURE_AD /db=db01
Staging tables
The three most important tables that are populated with data from Entra ID are:
- SCIM_USER
- SCIM_GROUP
- SCIM_GROUP_MEMBER
The SCIM_GROUP_MEMBER table contains the connections between users and the groups that they are member of as well as connections between nested groups.