Map - Geodata (only available if ordered)
The map module is an add-on module to Interact which lets the user find a property and draw or mark up any measures to be carried out for the property. The module was created in cooperation with Geodata.
The map module can be selected from the menu to the left under Modules. You drag it into the dialogue and it will appear as a button to be clicked. This will open a webpage with a map.
Define map the first time
Before the module can be used, the map has to be defined. Under Settings and the Integration tab, you activate the map function and enter the addresses to the service and user name provided by GeoData.
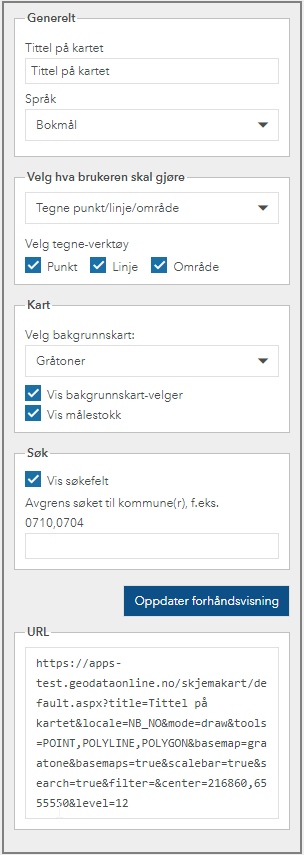
Once you have activated the module, you can open a dialogue and include the module Map - GeoData. When you click on Define map, the browser will open and direct you to Geodata. You can set the map to always open with e.g. the town hall at the centre of the map. A map link from Geodata (see the URL field at the bottom of the left column) contains and argument with center in it, see the screen shot. Copy the string into Interact, go to Settings and the Integrations tab. Paste the part of the string that starts with center at the end of URL Map designer under Map - Geodata. Paste the string with ? before center.
The map is interactive and you can search by municipality, town, address, cadastral unit number, property unit number, etc. To the left, you find the settings.
Settings for map view on the GeoData website

Tittel på kartet: Enter the title of the map. It will be visible to the user of the dialogue front end.
Språk: Here you select language the end user will see front end. It is only available in Bokmål, Nynorsk and English.
Choose what the user should do: Here you choose what should be possible to do on the map; draw in the map (tick for point, line, area), select in the map (either property, building, address or postal zone), select more in the map (either addresses, buildings, properties or postal zones) or select in the map (ArcGIS Online) (requires a separate service). What you select here has an influence on what information can be retrieved from the map module and be used in fields in the dialogue.
Select background map: Here you select the type of map to display.
Vis bakgrunnskart-velger: If ticked, the map selector will be displayed to the user of the map.
Vis målestokk: If ticked, the scale will be displayed to the user of the map.
Vis geolocation: When ticked, an icon is displayed to select your own position in the map 
Extra map layers: Here you can check the box for extra map layers that can show the end user in the map image.
Vis søkefelt: Here you can select whether the search field should show for the end user in the map image.
Avgrens søket til kommune: Here you can delimit the area (municipality) to be displayed by the map. Enter the municipality number of the municipality/municipalities you want to include.
Oppdater forhåndsvisning: When you have made all your choices, press Oppdater forhåndsvisning to update the map URL. The text in the URL box will change and you can copy it and insert it into Interact.
URL: Copy URL and insert it back in Interact.
Use the Draw Point, Draw Line, or Draw Area button to highlight important things on the map. In the field URL to the left on the screen, copy the URL generated.
Go back to Interact and paste the copied URL into the Value formula field under Settings. In front of URL type =" and after URL ".
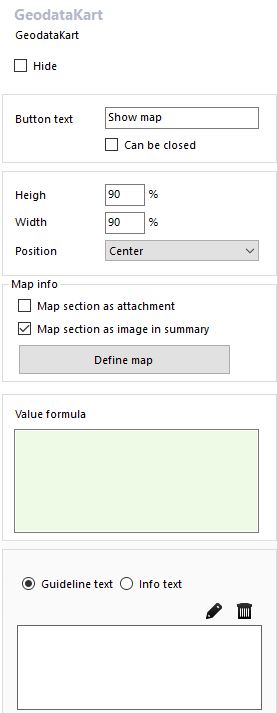
Map module settings in Interact

Hide: Choose if a map module should be hidden to the user and be triggered by path selection.
Button text: Here you set the name of the button as displayed to the user populating the dialogue.
Can be closed: If ticked, the user can close the map view window by clicking on the X in the top right corner.
Height /Width: Set the size of the window to display the map when a form user clicks the button.
Position: Select the position of the button in the dialogue.
Map section as attachments: Tick if you want the map section that the user selects to be sent as a photo attachment when submitting a form.
Map section as image in summary: Tick if you want the map section selected by the user to be displayed as part of the receipt.
Define map: Click on this button to select the map section that should be displayed to the user of the dialogue. In the browser, enter an address or property information in the search field and click Enter. In the URL field at the bottom left, copy the link back to Interact and enter it in the value formula field.
Value formula: Enter the URL retrieved from the GeoData website, see Define map. It must be entered like this: ="URL"
When the person populating the dialogue gets to the map module in the dialogue, there is a button to be clicked. This button opens a modal window in which the user can make some choices, such as drawing points or lines. Once the user is done and clicks Save, the modal window and a map section with the choices is taken back to the dialogue.
Centre map on address
If you want the map section to show the user's own address, the map can be centred around this address. In that case, you have to add the text string +"&text="+ and then the text variable for the address to be searched for. The string to be added in the value formula field will be similar to this:
="https://apps-test.geodataonline.no/skjemakart/default.aspx?title=Bryggen i Bergen&locale=NB_NO&mode=draw&tools=
POINT,POLYLINE,POLYGON&show=&basemap=graatone&basemaps=true&scalebar=
true&search=true&filter=¢er=-31908,6734764&level=15"
+"&text="+AdresseVariabel
Add the address variable (AdresseVariabel) in the normal way by ctrl+click. If you want to map up an address variable from different step in the dialogue, it is recommended to use the advanced editor in order to find the variable more easily.